이 버전에는 잘못된 편집 사항이 있을 수 있습니다. 최신 확인된 스냅샷으로 전환하십시오.
필요한 것
-
이 단계는 번역되지 않았습니다. 번역을 도와주십시오
-
Loosen the two Phillips screws securing the access door to your iMac.
-
Remove the access door.
-
-
이 단계는 번역되지 않았습니다. 번역을 도와주십시오
-
Remove the following screws along the lower edge of your iMac:
-
Three 6 mm T8 Torx screws
-
One 8 mm T8 Torx screw
-
-
이 단계는 번역되지 않았습니다. 번역을 도와주십시오
-
To lift the front bezel off the iMac, simultaneously:
-
Use your thumbs to press in the RAM arms and hold the iMac down.
-
Use your index fingers to pull the small bridge of material on the front bezel toward yourself.
-
Pull the front bezel up with your index fingers.
-
Once the small bridge of material has cleared the RAM arms, lift the front bezel by its lower edge just enough to clear the bottom edge of the rear case.
-
-
이 단계는 번역되지 않았습니다. 번역을 도와주십시오
-
Lift the front bezel off the rear case and rotate it away from the bottom edge of the iMac, minding the camera and microphone cables still attached to its upper edge.
-
-
이 단계는 번역되지 않았습니다. 번역을 도와주십시오
-
Disconnect the microphone cable.
-
Disconnect the camera cable by pulling its connector away from the socket on the camera board.
-
-
이 단계는 번역되지 않았습니다. 번역을 도와주십시오
-
Remove the two T6 Torx screws securing the display data cable to the logic board.
-
-
이 단계는 번역되지 않았습니다. 번역을 도와주십시오
-
Pull the black plastic tab attached to the display data cable connector to disconnect it from the logic board.
-
-
이 단계는 번역되지 않았습니다. 번역을 도와주십시오
-
Use your fingertips to pull both sides of the wide inverter cable connector out of its socket on the logic board.
-
De-route the inverter cable from its location next to the CPU fan.
-
-
이 단계는 번역되지 않았습니다. 번역을 도와주십시오
-
Remove the eight T8 Torx screws securing the display assembly to the rear case.
-
-
-
이 단계는 번역되지 않았습니다. 번역을 도와주십시오
-
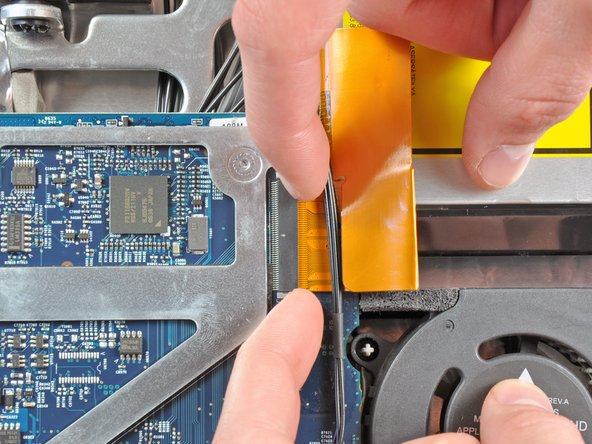
Gently pull the cable retainer on the optical drive cable ZIF socket toward the right side of the iMac.
-
-
이 단계는 번역되지 않았습니다. 번역을 도와주십시오
-
Pull the optical drive ribbon cable out of its socket, being careful not to rip it in the process.
-
-
이 단계는 번역되지 않았습니다. 번역을 도와주십시오
-
Pull the optical drive thermal sensor connector toward the right side of the iMac to disconnect it from the logic board.
-
-
이 단계는 번역되지 않았습니다. 번역을 도와주십시오
-
Peel off the strip of EMI tape attaching the right side of the optical drive to the rear case.
-
-
이 단계는 번역되지 않았습니다. 번역을 도와주십시오
-
Push down on the optical drive bracket retaining clip while pulling the top edge of the optical drive away from the rear case.
-
-
이 단계는 번역되지 않았습니다. 번역을 도와주십시오
-
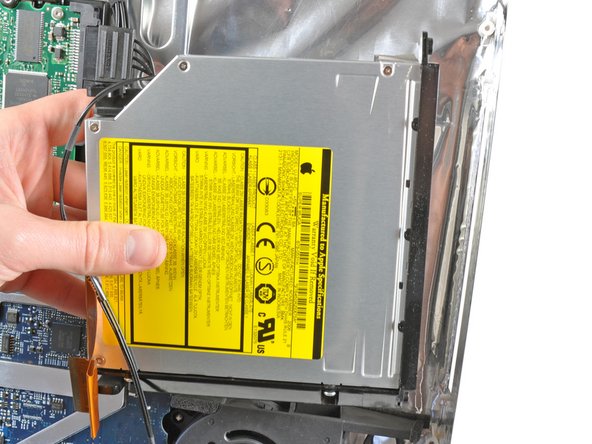
Rotate the optical drive slightly toward the bottom edge of the iMac while pulling it away from the rear case to release the lower retaining clip.
-
Pull the optical drive away from the right side of the rear case and remove it from the iMac.
-
-
이 단계는 번역되지 않았습니다. 번역을 도와주십시오
-
Remove the two T6 Torx screws securing the optical drive cable to the optical drive.
-
-
이 단계는 번역되지 않았습니다. 번역을 도와주십시오
-
Insert the flat end of a spudger into the gap between the optical drive cable connector and the optical drive.
-
Twist the spudger to separate the connector from the optical drive.
-
-
이 단계는 번역되지 않았습니다. 번역을 도와주십시오
-
Use the flat end of a spudger to remove the pieces of EMI foam from the underside of the optical drive.
-
-
이 단계는 번역되지 않았습니다. 번역을 도와주십시오
-
Use the tip of a spudger to push the two optical drive bracket tabs out of their slots in the top of the optical drive.
-
-
이 단계는 번역되지 않았습니다. 번역을 도와주십시오
-
Using the tip of a spudger, press the optical drive bracket tab out of its slot on the side of the optical drive.
-
-
이 단계는 번역되지 않았습니다. 번역을 도와주십시오
-
Use the tip of a spudger to press the optical drive bracket tabs out of the slots in the top of the optical drive.
-
-
이 단계는 번역되지 않았습니다. 번역을 도와주십시오
-
Pull the optical drive bracket toward the open end of the optical drive to free it from the optical drive.
-
-
이 단계는 번역되지 않았습니다. 번역을 도와주십시오
-
Use the flat end of a spudger to pry the optical drive thermal sensor off the adhesive securing it to the optical drive.
-
-
이 단계는 번역되지 않았습니다. 번역을 도와주십시오
-
Remove the three 3.0 mm Phillips screws from the optical bay enclosure.
-
-
이 단계는 번역되지 않았습니다. 번역을 도와주십시오
-
Starting from the left edge, gently pull open the optical bay enclosure.
-
Continue to pull open the two halves of the enclosure until they separate.
-
-
이 단계는 번역되지 않았습니다. 번역을 도와주십시오
-
Remove the two 3.0 mm Phillips screws securing the faceplate to the optical bay enclosure.
-
-
이 단계는 번역되지 않았습니다. 번역을 도와주십시오
-
Lift the black plastic faceplate out of the optical bay enclosure.
-
Reassemble the optical bay enclosure without the faceplate, reusing the original three 3.0 mm Phillips screws to keep it intact.
-
-
이 단계는 번역되지 않았습니다. 번역을 도와주십시오
-
Remove the plastic positioner from the optical bay hard drive enclosure by pressing in on one of the clips on either side and lifting it up and out of the enclosure.
-
-
이 단계는 번역되지 않았습니다. 번역을 도와주십시오
-
Make sure that the hard drive connectors are facing down before placing it into the enclosure.
-
Gently place the hard drive into the enclosure's hard drive slot.
-
While firmly holding the enclosure in place with one hand, use your other hand to press the hard drive into the enclosure connectors.
-
-
이 단계는 번역되지 않았습니다. 번역을 도와주십시오
-
Once the hard drive is snug, reinsert the plastic positioner while holding the hard drive against the bottom of the enclosure.
-
Reconnect any cables you have removed from the original optical drive onto the optical bay enclosure.
-


다른 10명이 해당 안내서를 완성하였습니다.

