소개
Changing the oem battery into 18650 li-ion cell
Upgrade the capacity
필요한 것
-
-
Disassemble the JBL Charge 3 is relatively similar to the Xtreme and also by follow Youtube (just search keyword 'Charge 3 Dissemble')
-
Note: no need to take out the two speaker tweeters.
-
-
-
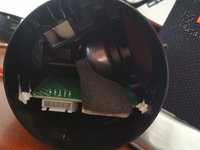
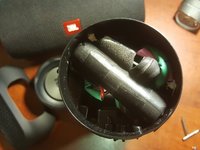
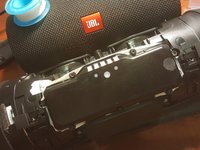
To get the battery out, you have to take out the right side radiator.
-
Notice there is two plastic latches, you need to lift both up using some small metal part as the leverages.
-
While both latches are up and hold the speakers, trying to turn the radiator anti-clockwise.
-
This can be hard as first but no worry and there is no cable connected to the radiator.
-
As you turn about 1.5cm (or can not turn further), just take out the radiator cap.
-
-
-
Disconnect the cable connected to the battery to the board inside the speaker before taking out the battery
-
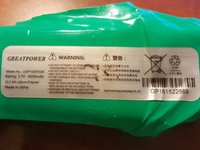
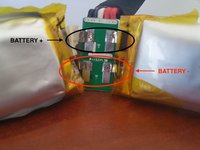
The JBL battery is Lithium Polymer
-
Brand: GreatPower
-
Model: GSP1029102A
-
Rating: 3.7V 6000mah 22.2 Wh
-
-
-
-
Option A: is to purchase exactly the same battery and then install it. It is straight forward. No explanations needed.
-
Option B (my choice): is to replace with an available Li-ion 18650 to save the time order from China and assure the capacity.
-
I decide to pick up 3 cells from Panasonic 3400mah NCR-18650B. Two unprotected and one protected.
-
WARNINGS: make sure all the battery is same voltage before replacing in the speakers. Be CAREFUL not to short circuit them. Maybe balance and equalize them.
-
-
-
You need to wire them in Parallel (i.e. 1s3p pack).
-
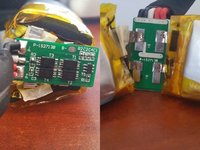
Two unprotect will be wired to the JBL BMS board. I solder the black wire to the B+ and the red wire to the B-.
-
To keep the next replacement easier, I only connect the battery by twisting the color coded wires together and wrapping them with electrical tape.
-
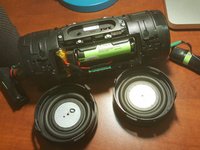
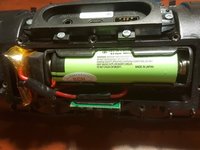
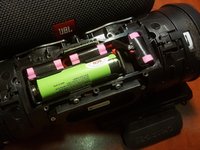
One unprotected cell will be in the original battery compartment inside the cell holder (as shown) connect to one side of the BMS board.
-
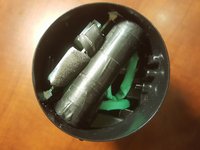
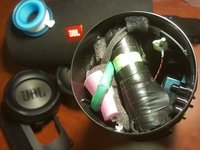
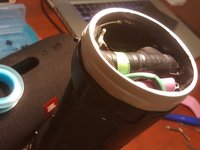
Two cells will be inside the speaker compartment behind the Bass Radiator. The unprotected one (right hand side radiator) will connect directly to the BMS board.
-
The protected one (after I open and rearrange the PCB of the battery for a better fit into the speaker compartment) will connect parallel to the protected one from other side of the bass radiator.
-
-
-
For your reference. After Finished!
-
NOTEs:
-
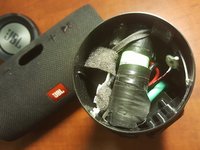
I put a few pink foam to make sure no rattle of wires, secured everything and heats isolation (if any :))
-
The cell holder is glued to the battery compartment by silicon.
-
The cells in the battery compartment is just right side and just barely fit so will stay in place without any glue.
-
-
-
Put everything back in reverse order.
-
Be careful with the screws, they can be easily stripped.
-
For a peace of mind, I use plumping tape to ensure 100% waterproof as after all we may have opened the original speaker seals.
-
Note: make sure everything seals completely, otherwise you will hear the speakers rattle when you play heavy bass songs.
-
GOOD LUCK AND HAVE FUN !!!
-


To reassemble your device, follow these instructions in reverse order.
다른 12명이 해당 안내서를 완성하였습니다.

52가이드 댓글
Cant i only replace the one 18650 battery? Or do I need These silver packs?
You probably can use only one 18650 battery but then your speaker will run out of juice much quicker ^^
The way I connect everything is parallel so if you only use one then just direct soldering to the positive and negative of BMS
Note that you can only charge the battery only when you connect the battery through BMS.
Cheers
Hi! How are you? Some bottom leds are failing in my charge 3. Do you know if this could be repaired? Does it afect any other function? Thank you! Dario.
Hi, I do not know if you can replace the bottom leds. My guess it would not affecting the function of your speaker, you can test when open it up and checking the charge on the battery to see before charging and after charging is 3.7 volts. Meaning it is charging and how long the speakers battery should last 10 hrs per charge on high volume.
can u both use the stock battery and 18650 battery ? thanks