주요 콘텐츠로 건너뛰기

JBL Pulse 3 Speaker Replacement

필요한 것

  1. JBL Pulse 3 Speaker Replacement, Speaker Grill: 1 단계, 이미지 1/1
    • Lay the JBL Pulse 3 on its side as shown in the picture.

    • Use a plastic opening tool to lift the top right corner of the speaker grill. A small amount of force is necessary to remove the grill.

  2. JBL Pulse 3 Speaker Replacement: 2 단계, 이미지 1/1
    • Repeat step 1 for bottom right corner of speaker grill.

  3. JBL Pulse 3 Speaker Replacement: 3 단계, 이미지 1/2 JBL Pulse 3 Speaker Replacement: 3 단계, 이미지 2/2
    • After pulling the right side of the grill off, place thumb underneath grill as shown in the picture.

    • Lift and pull straight out to pull grill off the posts.

    • Repeat steps 1-3 for the left side of the speaker grill on the JBL Pulse 3. The speaker grill should now be completely removed from the JBL Pulse 3.

  4. JBL Pulse 3 Speaker Replacement, Outside Casing: 5 단계, 이미지 1/2 JBL Pulse 3 Speaker Replacement, Outside Casing: 5 단계, 이미지 2/2
    • Use a Phillips #00 screwdriver to remove the six black 6mm screws on the inside of the top of the bottom section.

  5. JBL Pulse 3 Speaker Replacement: 6 단계, 이미지 1/2 JBL Pulse 3 Speaker Replacement: 6 단계, 이미지 2/2
    • Turn the JBL Pulse 3 right-side up and unscrew the top ring of the device. A small amount of force and/or a cotton cloth may be necessary to remove this piece.

  6. JBL Pulse 3 Speaker Replacement: 7 단계, 이미지 1/2 JBL Pulse 3 Speaker Replacement: 7 단계, 이미지 2/2
    • Remove the six 5mm screws on top of the JBL Pulse 3 with a Phillips #0 screwdriver.

  7. JBL Pulse 3 Speaker Replacement: 8 단계, 이미지 1/1
    • Pull off the top disc of the JBL Pulse 3.

  8. JBL Pulse 3 Speaker Replacement: 9 단계, 이미지 1/2 JBL Pulse 3 Speaker Replacement: 9 단계, 이미지 2/2
    • Remove the five 7mm screws on the inside of the JBL Pulse 3 with a Phillips #1 screwdriver.

  9. JBL Pulse 3 Speaker Replacement: 10 단계, 이미지 1/2 JBL Pulse 3 Speaker Replacement: 10 단계, 이미지 2/2
    • Peel off black, taped-on electrical lead from the inside side of the JBL Pulse 3.

  10. JBL Pulse 3 Speaker Replacement: 11 단계, 이미지 1/1
    • Pull the top section of the JBL Pulse 3 up. The outside casing to the JBL Pulse 3 should now be removed.

  11. JBL Pulse 3 Speaker Replacement, LED Light Display: 12 단계, 이미지 1/3 JBL Pulse 3 Speaker Replacement, LED Light Display: 12 단계, 이미지 2/3 JBL Pulse 3 Speaker Replacement, LED Light Display: 12 단계, 이미지 3/3
    • Use a Phillips #2 screwdriver to remove the six 11 mm screws that circle the bottom of the LED light display.

    • Pull the LED light display off of the JBL Pulse 3 base.

  12. JBL Pulse 3 Speaker Replacement: 13 단계, 이미지 1/2 JBL Pulse 3 Speaker Replacement: 13 단계, 이미지 2/2
    • Use tweezers to pull the five connections off of the LED light display.

  13. JBL Pulse 3 Speaker Replacement, Motherboard: 14 단계, 이미지 1/2 JBL Pulse 3 Speaker Replacement, Motherboard: 14 단계, 이미지 2/2
    • Using a Phillips #0 screwdriver, remove the two black 8mm screws on the bottom of the LED light display.

  14. JBL Pulse 3 Speaker Replacement: 15 단계, 이미지 1/3 JBL Pulse 3 Speaker Replacement: 15 단계, 이미지 2/3 JBL Pulse 3 Speaker Replacement: 15 단계, 이미지 3/3
    • Pull out the motherboard slightly from the LED light display as shown. Using tweezers, unplug the three connections attached to the motherboard.

  15. JBL Pulse 3 Speaker Replacement: 16 단계, 이미지 1/1
    • Pull the rest of the motherboard out from the LED light display.

    • Using wire cutters, snip the black wire connecting to the base of the JBL Pulse 3 at the base of the motherboard. The motherboard should now be removed from the JBL Pulse 3.

  16. JBL Pulse 3 Speaker Replacement, Speaker: 17 단계, 이미지 1/2 JBL Pulse 3 Speaker Replacement, Speaker: 17 단계, 이미지 2/2
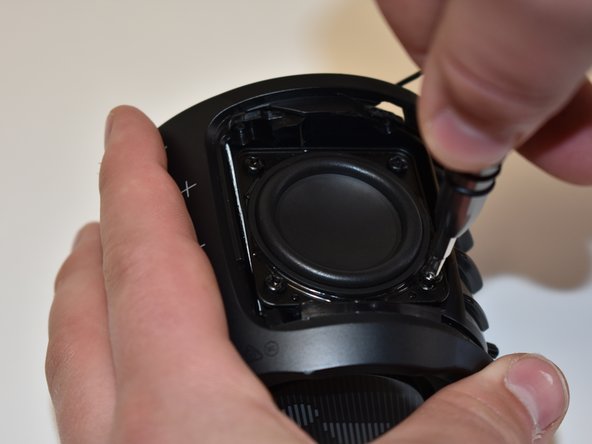
    • Using a Phillips #2 screwdriver, remove the four 10mm screws on the corner of the speaker on the side of the base of the JBL Pulse 3.

  17. JBL Pulse 3 Speaker Replacement: 18 단계, 이미지 1/2 JBL Pulse 3 Speaker Replacement: 18 단계, 이미지 2/2
    • Pull out the speaker and cut the black and red wire with wire cutters. The speaker should now be removed from the JBL Pulse 3.

결론

To reassemble your device, follow these instructions in reverse order.

Note: To finish replacing the speaker, you must solder both wires back on to the new speaker.

Kaitlyn Greenfield

회원 가입일: 09/20/18

1,161 평판

안내서 6개 작성하였습니다

댓글 2개

My speaker is making weird noises. It sounds like being crack. Do I need to replace the speaker or try to teardown to clean up the dust?

John - 답글

Hey Mates. Tell me please, somebody knows , the size of the replacement speaker and it fit from jbl charge 3 or some models? Thanks

Seven Nes - 답글

댓글 쓰기

조회 통계:

24 시간 전: 1

7일 전: 7

30일 전: 31

전체 시간: 2,399