소개
A summary of the tricks when disassembling the Jura drainage valve.
-
-
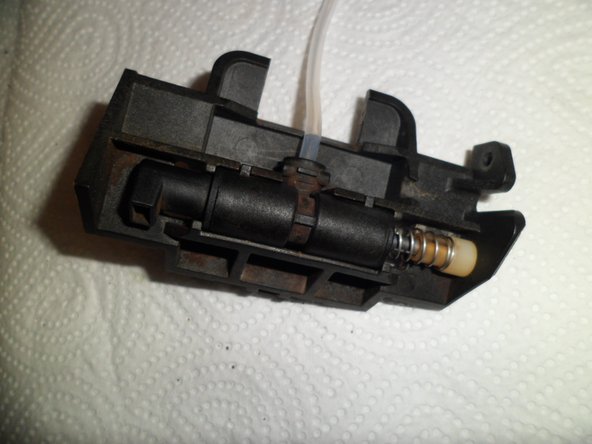
When lots of water leaks under a Jura brew-group it could be a broken sealring at the drainage. The first sealring is shown inside the white circle. This sealring has a lot of mechanical stress because at this point the brew-group moves up and down. From here comes the fresh water. The screwdrivers points at the metal spring-claw to pull off.
-
For this guide i have chosen a cleaned drainage valve. In real maintenance it will be extremly filthy, greasey and lots of coffee crumbs will trickle down. Use papertowel, toothpick,. toothbrush and degreasespray and clean everything under water.
-
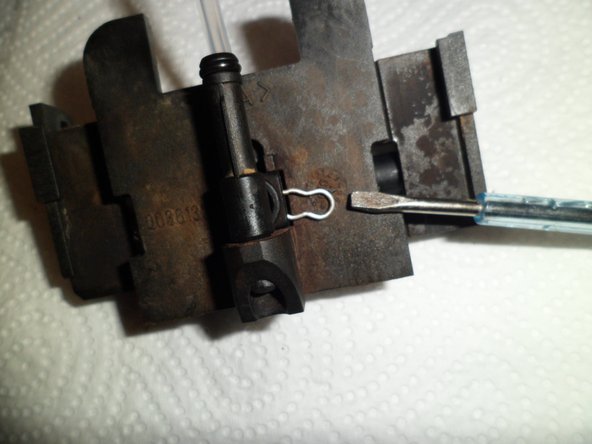
Turn the valve and use the screwdriver to leverage the white part with the spring. It should come up; if nothing moves it needs better cleaning because the grease here is very sticky.
-
Now all the parts should fall off the valve block. Hold your hand above it because the spring could snap away.
-
-
-
-
The parts of the valve. You can see the two bigger rings: they are located INSIDE the big T-tube.
-
The FLAT side of the big sealrings point to OUTSIDE left and right. All plastic-parts have notches, look for them when reassembling these parts.
-
The white fresh water hose has a metal spring-claw, too and can also pulled away if consisted.
-
When reassembling use a little bit of food-silicone-grease on every sealring.
-
-
-
Clean and grease all selrings with food-silicone-grease.
-
When reassembling start with the part as shown on the first photo. Don't forget the sealring on both ends !
-
Second and third picture show the ready assembled valve: Push the white part with the spring together and insert it in the valve-block. You see the notches, they only fit in one direction. :) I now understand that my camera is bad, I hope I may buy a better one.
-
-
-
The first picture shows the drainage-valve-block from the right side. The white, round part must sit in center of the circle, otherwise it won't close and water will run through it.
-
Push it sometimes it should move easy.
-
Don't forget the spring-claw to secute the tube from the valve.
-
That's it, now you can replace the drainage valve back in the brew-group of your nice Jura. :)
-


To reassemble your device, follow these instructions in reverse order.
To reassemble your device, follow these instructions in reverse order.
다른 6명이 해당 안내서를 완성하였습니다.

댓글 6개
Jura ENA 5 Drain valve is similar but I have a problem where water and steam leaks from the nipple after the rinse has been completed. It seems like there is pressure build up and the valve cannot hold. I have 2x ENA 5 machines. I have tried 2 different drain valve assemblies and both leak on one faulty machine. Could this be related to the PCB? If I don’t turn off the power quickly when the steam leak starts, the overheat fuse will break on the water block and cause Error 1.
It seems the water heater block can not control the heat and causes the drain valve to leak steam. I have error 1 (from water block overheat). I replaced the fuse and again steam comes out the drain valve. How to test the PCB to confirm?