소개
The flowmeter can have various faults: often the thin inlet channel is dirty - or the water stops further down the line, e.g. because the heater is calcified. The sensor may be defective, in which case you need to replace the flowmeter. Here we will show how to remove the flowmeter, open it and repair or replace it.
필요한 것
-
-
The backpanel is secured with two proprietary screws with oval head. They seem to be rivets, but in fact are screws. The only purpose is, to keep us out of our own devices. You can remove them using an oval drive bit. (Part of some IFixit tool collections or available at a Jura provider or iFixit). In a pitch try needle nose pliers. Here a DIY guide.
-
Remove the two oval head screws on the lower edge of the backpanel.
-
Lift the panel up.
-
-
-
Disconnect all connectors from the motherboard. Note for reassembly how their slot was.
-
The circuit board is secured with a screw. Unscrew it.
-
Lift the plate up by about 5 mm. Then carefully lift it out.
-
-
-
-
The flowmeter is visible underneath. It is clamped onto a round plastic support. The support is fixed in the base with three catches.
-
Disconnect the inlet and outlet hoses.
-
Release the three latches and lift the support with the flowmeter.
-
Take out the flowmeter. It is only hanging on the cables.
-
-
-
Blow into the flowmeter at the lower nozzle. It should go quite easily and you should hear the turbine whirring.
-
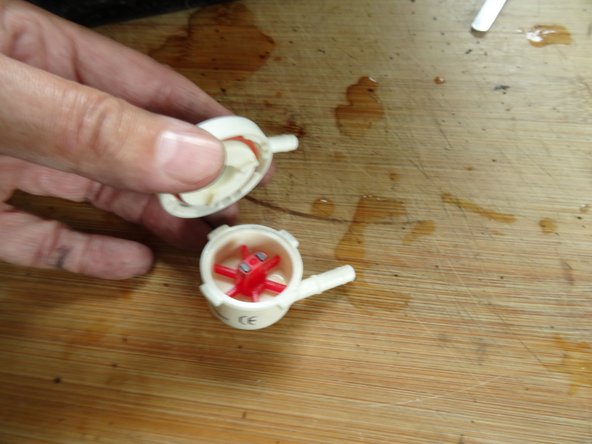
The upper half of the flowmeter is locked in place with a twist-lock latch. Turn the upper part slightly counterclockwise.
-
Lift off the upper half. Pay attention to the sealing ring. The turbine can be lifted out easily.
-
Now you can clean and decalcify everything well. In particular, clean the inlet nozzle, e.g. with a needle. The opening is quite narrow.
-
If the turbine does not run easily now, the flowmeter must be replaced. The sensor itself may also be defective.
-


Work through the steps in reverse order to reassemble your device.
Work through the steps in reverse order to reassemble your device.
다음 번역가들에게 특별히 감사 드립니다:
100%


이 번역자 분들은 저희가 세상을 수리하는데 동참해 주시는 분입니다! 기여하시겠습니까?
번역 시작하기 ›
팀
