주요 콘텐츠로 건너뛰기

이 버전에는 잘못된 편집 사항이 있을 수 있습니다. 최신 확인된 스냅샷으로 전환하십시오.

필요한 것

  1. 이 단계는 번역되지 않았습니다. 번역을 도와주십시오

    : 1 단계, 이미지 1/2 : 1 단계, 이미지 2/2
    • Unscrew the four 3.5mm side screws with a Phillips #1 screwdriver.

    • There are two screws per side.

  2. 이 단계는 번역되지 않았습니다. 번역을 도와주십시오

    : 2 단계, 이미지 1/3 : 2 단계, 이미지 2/3 : 2 단계, 이미지 3/3
    • Use a spudger to unhook the plastic clips on the sides and top of the front panel. There are two clips on each side and one clip on the top.

    • Place the spudger between the plastic tab and the metal case and gently lift the spudger away from the case.

  3. 이 단계는 번역되지 않았습니다. 번역을 도와주십시오

    : 3 단계, 이미지 1/1
    • Pull the top of the front panel out and down to remove front panel.

    • Remove the front panel gently so as not to damage the ribbon cables behind it.

  4. 이 단계는 번역되지 않았습니다. 번역을 도와주십시오

    : 4 단계, 이미지 1/3 : 4 단계, 이미지 2/3 : 4 단계, 이미지 3/3
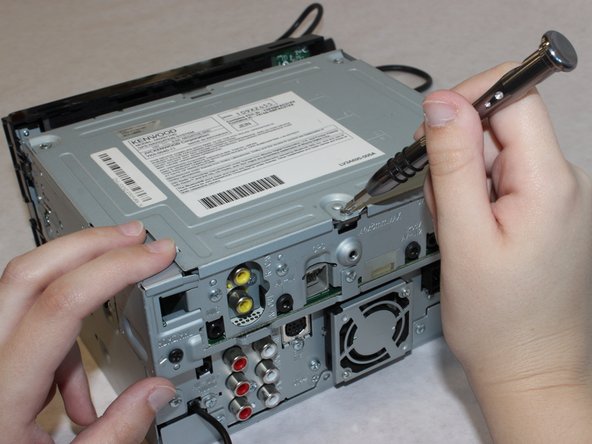
    • Unscrew the three 5mm screws from the top of the device using a Phillips #1 screwdriver.

    • Lift up to remove the top casing.

  5. 이 단계는 번역되지 않았습니다. 번역을 도와주십시오

    : 5 단계, 이미지 1/1
    • Lift the CD drive carefully to expose the attached cable underneath.

  6. 이 단계는 번역되지 않았습니다. 번역을 도와주십시오

    : 6 단계, 이미지 1/2 : 6 단계, 이미지 2/2
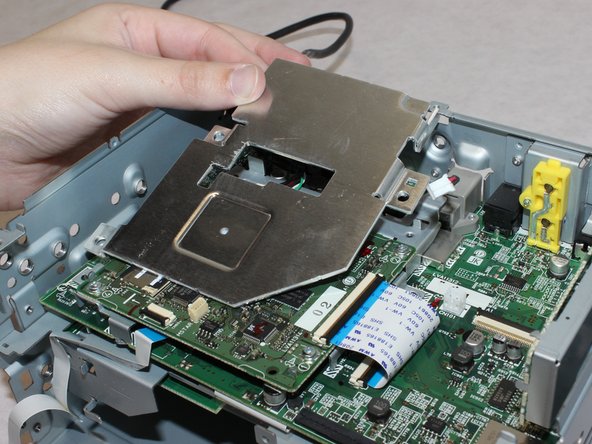
    • Flip up the black clasp with a spudger to disconnect the large white ribbon cable connecting the CD drive to the board underneath.

  7. 이 단계는 번역되지 않았습니다. 번역을 도와주십시오

    : 7 단계, 이미지 1/1
    • Carefully unplug the fan power cord with the tweezers.

  8. 이 단계는 번역되지 않았습니다. 번역을 도와주십시오

    : 8 단계, 이미지 1/2 : 8 단계, 이미지 2/2
    • Unscrew the three 5mm length screws with the Phillips #1 screwdriver.

    • Remove the metal plate

    • Removing the plate will damage the heat sink compound. This will need to be replaced during reassembly.

  9. 이 단계는 번역되지 않았습니다. 번역을 도와주십시오

    : 9 단계, 이미지 1/2 : 9 단계, 이미지 2/2
    • Unscrew the three 5.5mm long screws with a Phillips #1 screwdriver.

  10. 이 단계는 번역되지 않았습니다. 번역을 도와주십시오

    : 10 단계, 이미지 1/3 : 10 단계, 이미지 2/3 : 10 단계, 이미지 3/3
    • Remove the four 5.5mm screws with the Phillips #1 screwdriver.

  11. 이 단계는 번역되지 않았습니다. 번역을 도와주십시오

    : 11 단계, 이미지 1/1
    • Lift the top part of the unit up from the lower chassis.

  12. 이 단계는 번역되지 않았습니다. 번역을 도와주십시오

    : 12 단계, 이미지 1/2 : 12 단계, 이미지 2/2
    • Remove the two 13mm long screws with a Phillips #1 screwdriver.

    • Gently thread the power cable through the circuit boards to separate the fan from the body of the stereo.

결승점

Wendy Zaballos

회원 가입일: 09/17/18

952 평판

안내서 6개 작성하였습니다

Washington State, Team S1-G1, Hope Fall 2018 Washington State, Team S1-G1, Hope Fall 2018 회원

WSU-HOPE-F18S1G1

4 회원들

안내서 6개 작성하였습니다

댓글 0개

댓글 쓰기

조회 통계:

24 시간 전: 1

7일 전: 6

30일 전: 14

전체 시간: 908