주요 콘텐츠로 건너뛰기

Kindle 1st Generation ON/OFF Power and Wifi Switches Replacement

필요한 것

  1. Kindle 1st Generation ON/OFF Power and Wifi Switches Replacement, Battery: 1 단계, 이미지 1/1
    • Slide the grey plastic cover laterally off the back of the device.

  2. Kindle 1st Generation ON/OFF Power and Wifi Switches Replacement: 2 단계, 이미지 1/2 Kindle 1st Generation ON/OFF Power and Wifi Switches Replacement: 2 단계, 이미지 2/2
    • Use a plastic opening tool to lift the battery on the side closest to the edge of the device.

    • Unplug the battery from the device by pinching the white connector and pulling.

    • Do not yank the battery or try to disconnect the battery by pulling the wires.

  3. Kindle 1st Generation ON/OFF Power and Wifi Switches Replacement, ON/OFF Power and Wifi Switches: 3 단계, 이미지 1/1
    • Unscrew eight (8) Phillips #00 screws (3 mm).

  4. Kindle 1st Generation ON/OFF Power and Wifi Switches Replacement: 4 단계, 이미지 1/2 Kindle 1st Generation ON/OFF Power and Wifi Switches Replacement: 4 단계, 이미지 2/2
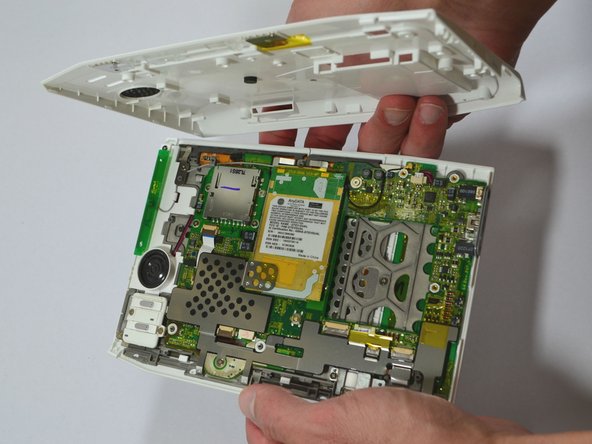
    • Start at one side of the device. Use a soft plastic prying tool to separate the casing of the device. Slowly work your way around the entire device.

    • Avoid prying between the buttons and the device. This could cause damage to the buttons.

  5. Kindle 1st Generation ON/OFF Power and Wifi Switches Replacement: 5 단계, 이미지 1/2 Kindle 1st Generation ON/OFF Power and Wifi Switches Replacement: 5 단계, 이미지 2/2
    • Unscrew the two (2) Phillips #00 screws (3 mm) which fasten the metal casing shield.

    • Slowly remove the metal casing shield by lifting it and carefully peeling up the tape.

  6. Kindle 1st Generation ON/OFF Power and Wifi Switches Replacement: 6 단계, 이미지 1/1
    • Remove the two (2) Phillips #00 screws (3 mm) which fasten the ON/OFF Power and Wifi Switches to the device.

  7. Kindle 1st Generation ON/OFF Power and Wifi Switches Replacement: 7 단계, 이미지 1/2 Kindle 1st Generation ON/OFF Power and Wifi Switches Replacement: 7 단계, 이미지 2/2
    • Lift the flap attaching the blue and white ribbon cable to the motherboard by lifting it vertically with the pointed-end of the spudger.

    • The flap is connected via a hinge. Once you lift the flap, it will stay up and the cable will be lose. Remember to snap it back down during reassembly.

    • Carefully lift the ON/OFF Power and Wifi Switch vertically from the device motherboard.

결론

To reassemble your device, follow these instructions in reverse order.

다른 한 분이 해당 안내서를 완성하였습니다.

Samantha Manning

회원 가입일: 06/04/13

766 평판

안내서 6개 작성하였습니다

댓글 0개

댓글 쓰기

조회 통계:

24 시간 전: 0

7일 전: 3

30일 전: 11

전체 시간: 1,980