주요 콘텐츠로 건너뛰기

KitchenAid KSM150PSER Speed Control Plate Replacement

필요한 것

  1. KitchenAid KSM150PSER Speed Control Plate Replacement, Speed Control Plate: 1 단계, 이미지 1/2 KitchenAid KSM150PSER Speed Control Plate Replacement, Speed Control Plate: 1 단계, 이미지 2/2
    • Using a Phillips #2 screwdriver, remove the 10mm screw on the back cover by rotating it counterclockwise.

    • The back cover is now free. Remove it by pulling back and up on the cover.

  2. KitchenAid KSM150PSER Speed Control Plate Replacement: 2 단계, 이미지 1/3 KitchenAid KSM150PSER Speed Control Plate Replacement: 2 단계, 이미지 2/3 KitchenAid KSM150PSER Speed Control Plate Replacement: 2 단계, 이미지 3/3
    • Using a Phillips #2 screwdriver, remove the 5mm screws holding the trimband to the top housing by rotating them counterclockwise.

    • Pull the trimband off the housing by grabbing each side and pulling it off the front.

  3. KitchenAid KSM150PSER Speed Control Plate Replacement: 3 단계, 이미지 1/3 KitchenAid KSM150PSER Speed Control Plate Replacement: 3 단계, 이미지 2/3 KitchenAid KSM150PSER Speed Control Plate Replacement: 3 단계, 이미지 3/3
    • Using a Phillips #2 screwdriver, remove the 12mm screw by holding the grounding wire in place and rotating it counterclockwise.

    • Using pliers or tweezers, remove the connectors attached to the speed control plate.

  4. KitchenAid KSM150PSER Speed Control Plate Replacement: 4 단계, 이미지 1/2 KitchenAid KSM150PSER Speed Control Plate Replacement: 4 단계, 이미지 2/2
    • Remove the seal from the back of the mixer. Then unhook the spring from the bottom of the speed control plate by using tweezers and pulling it back and out of the plate.

    • Take a rag or towel and hook the spring on the towel so that the hook doesn’t spring back inside the mixer.

  5. KitchenAid KSM150PSER Speed Control Plate Replacement: 5 단계, 이미지 1/2 KitchenAid KSM150PSER Speed Control Plate Replacement: 5 단계, 이미지 2/2
    • Using a Phillips #2 screwdriver, remove the two adjustment screws by rotating them counterclockwise.

    • Before beginning to remove the screws, use a ruler and measure how far the screws are in. These screws determine the speed of the mixer, and not screwing them back in to the same position will change the speed of the mixer.

  6. KitchenAid KSM150PSER Speed Control Plate Replacement: 6 단계, 이미지 1/1
    • The control plate can now be removed by pulling back on the plate.

결론

To reassemble your device, follow these instructions in reverse order.

다른 7명이 해당 안내서를 완성하였습니다.

Richa Gadgil

회원 가입일: 01/24/18

295 평판

안내서 1개 작성함

Cal Poly, Team S2-G5, Livingston Winter 2018 Cal Poly, Team S2-G5, Livingston Winter 2018 회원

CPSU-LIVINGSTON-W18S2G5

4 회원들

안내서 10개 작성하였습니다

댓글 한 개

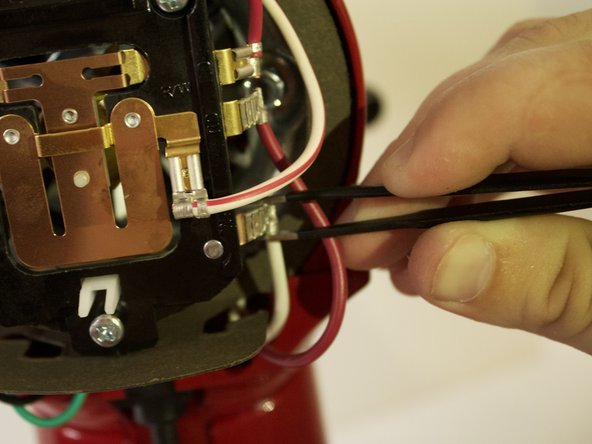
Thanks for this, but a quick question, when the mixer is switched off, the metal bar on the back of the speed plate at the bottom, is that supposed to rest on the two prongs that stick out towards the bottom of the inside of the mixer? Thanks.

Mark R (dflipb) - 답글

댓글 쓰기

조회 통계:

24 시간 전: 4

7일 전: 42

30일 전: 228

전체 시간: 18,483