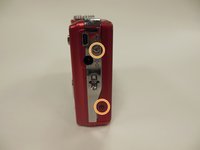
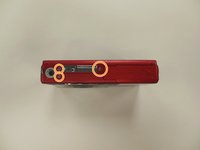
주요 콘텐츠로 건너뛰기

Kodak EasyShare M381 Button Replacement

필요한 것

  1. Kodak EasyShare M381 Button Replacement, Battery: 1 단계, 이미지 2개 중 1개 Kodak EasyShare M381 Button Replacement, Battery: 1 단계, 이미지 2개 중 2개
    • First, press in and slide forward the battery latch as indicated by the arrow.

  2. Kodak EasyShare M381 Button Replacement: 2 단계, 이미지 1개 중 1개
    • Press down on battery until you hear a click and release it. Battery should easily slide out.

  3. Kodak EasyShare M381 Button Replacement, Back Panel Frame: 3 단계, 이미지 3개 중 1개 Kodak EasyShare M381 Button Replacement, Back Panel Frame: 3 단계, 이미지 3개 중 2개 Kodak EasyShare M381 Button Replacement, Back Panel Frame: 3 단계, 이미지 3개 중 3개
    • Remove the 3.9 mm frame screws using a Phillips #00 screwdriver.

    • Using a magnetized surface to keep from losing screws may be very helpful.

  4. Kodak EasyShare M381 Button Replacement: 4 단계, 이미지 2개 중 1개 Kodak EasyShare M381 Button Replacement: 4 단계, 이미지 2개 중 2개
    • Using both hands, carefully pull the frame apart from the camera.

  5. Kodak EasyShare M381 Button Replacement, Button: 5 단계, 이미지 1개 중 1개
    • Carefully pick up frame and push upward on buttons.

  6. Kodak EasyShare M381 Button Replacement: 6 단계, 이미지 1개 중 1개
    • Clean and replace as needed.

    • A microfiber cloth, or any other type of electronic cloth may be used to clean them if desire.

결론

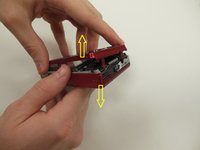
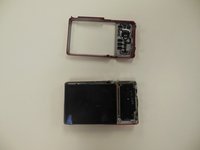
To reassemble your device, follow these instructions in reverse order.

작성자

3다른 기여자 명과 함께

Christina Hamby

회원 가입일: 01/30/15

449 평판

안내서 4개를 작성함

댓글 0개

댓글 쓰기

조회 통계:

지난 24시간: 0

지난 7일: 1

지난 30일: 7

전체 시간: 320