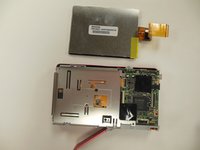
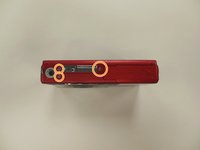
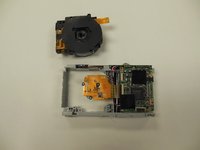
주요 콘텐츠로 건너뛰기

Kodak EasyShare M381 Lens/Optics Replacement

필요한 것

  1. Kodak EasyShare M381 Lens/Optics Replacement, Battery: 1 단계, 이미지 1/2 Kodak EasyShare M381 Lens/Optics Replacement, Battery: 1 단계, 이미지 2/2
    • First, press in and slide forward the battery latch as indicated by the arrow.

  2. Kodak EasyShare M381 Lens/Optics Replacement: 2 단계, 이미지 1/1
    • Press down on battery until you hear a click and release it. Battery should easily slide out.

  3. Kodak EasyShare M381 Lens/Optics Replacement, Screen: 3 단계, 이미지 1/1
    • Remove the two 3.85 mm screws on the bottom right of the camera, as indicated.

  4. Kodak EasyShare M381 Lens/Optics Replacement: 4 단계, 이미지 1/1
    • Remove dial button located on top of camera, by gently pulling up.

  5. Kodak EasyShare M381 Lens/Optics Replacement: 5 단계, 이미지 1/2 Kodak EasyShare M381 Lens/Optics Replacement: 5 단계, 이미지 2/2
    • Starting at one side, carefully work the chrome frame off of the camera itself.

    • Be careful not to disturb the shutter or flash buttons on top of the camera.

  6. Kodak EasyShare M381 Lens/Optics Replacement: 6 단계, 이미지 1/1
    • On the right side of the camera, locate and remove the two 3.25 mm screws as highlighted.

  7. Kodak EasyShare M381 Lens/Optics Replacement: 7 단계, 이미지 1/3 Kodak EasyShare M381 Lens/Optics Replacement: 7 단계, 이미지 2/3 Kodak EasyShare M381 Lens/Optics Replacement: 7 단계, 이미지 3/3
    • Carefully lift the motherboard panel up, pulling towards the left. Make sure you do not rip the blue ribbon.

    • Using a plastic opening tool, gently lift up on the ribbon fastener until it is in an upright position.

    • Slide panel away from camera.

  8. Kodak EasyShare M381 Lens/Optics Replacement: 8 단계, 이미지 1/2 Kodak EasyShare M381 Lens/Optics Replacement: 8 단계, 이미지 2/2
    • Using a plastic opening tool, gently lift ribbon clamp as indicated to remove the screen ribbon from the motherboard.

    • Screen should now be detached. Gently lift it away from the base of the camera.

  9. Kodak EasyShare M381 Lens/Optics Replacement, Back Panel Frame: 9 단계, 이미지 1/3 Kodak EasyShare M381 Lens/Optics Replacement, Back Panel Frame: 9 단계, 이미지 2/3 Kodak EasyShare M381 Lens/Optics Replacement, Back Panel Frame: 9 단계, 이미지 3/3
    • Remove the 3.9 mm frame screws using a Phillips #00 screwdriver.

    • Using a magnetized surface to keep from losing screws may be very helpful.

  10. Kodak EasyShare M381 Lens/Optics Replacement: 10 단계, 이미지 1/2 Kodak EasyShare M381 Lens/Optics Replacement: 10 단계, 이미지 2/2
    • Using both hands, carefully pull the frame apart from the camera.

  11. Kodak EasyShare M381 Lens/Optics Replacement, Lens/Optics: 11 단계, 이미지 1/3 Kodak EasyShare M381 Lens/Optics Replacement, Lens/Optics: 11 단계, 이미지 2/3 Kodak EasyShare M381 Lens/Optics Replacement, Lens/Optics: 11 단계, 이미지 3/3
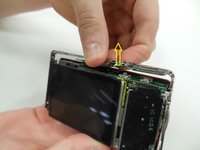
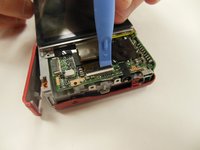
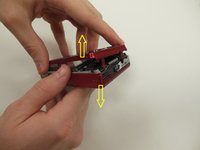
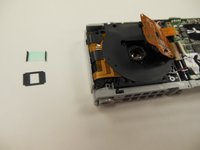
    • Locate and remove the four 3.25 mm screws securing the back panel to the frame of the camera using the Phillips #00 screwdriver.

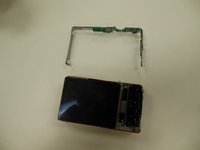
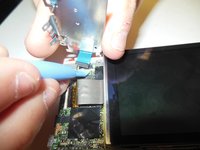
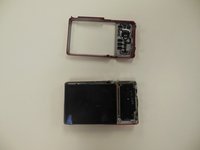
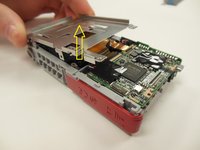
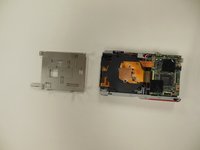
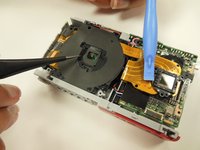
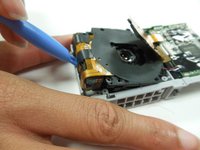
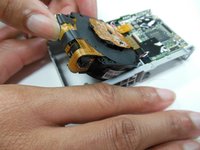
    • Lift up and remove panel, detaching it from the camera frame.

  12. Kodak EasyShare M381 Lens/Optics Replacement: 12 단계, 이미지 1/2 Kodak EasyShare M381 Lens/Optics Replacement: 12 단계, 이미지 2/2
    • Remove the three 3.25 mm screws securing the hexagon-shaped, copper panel to the optical device.

    • Gently peel back the main optic ribbon, ensuring it is securely out of the way.

    • This ribbon is very fragile, and, if torn, the camera will not function properly. Handle with care.

  13. Kodak EasyShare M381 Lens/Optics Replacement: 13 단계, 이미지 1/1
    • Remove the six 3.25 mm screws securing the optic lens to the camera frame.

  14. Kodak EasyShare M381 Lens/Optics Replacement: 14 단계, 이미지 1/2 Kodak EasyShare M381 Lens/Optics Replacement: 14 단계, 이미지 2/2
    • Carefully remove the square lens film, ensuring you do not bend it. This film will be in two pieces: a black cover, and a glass square piece. It is very fragile, so handle with care.

    • This film is very fragile. Handle with care.

  15. Kodak EasyShare M381 Lens/Optics Replacement: 15 단계, 이미지 1/2 Kodak EasyShare M381 Lens/Optics Replacement: 15 단계, 이미지 2/2
    • There is a small ribbon attaching the optical lens piece to the motherboard. Using a plastic opening tool, gently lift up on this ribbon's clamp, detaching it from the motherboard.

  16. Kodak EasyShare M381 Lens/Optics Replacement: 16 단계, 이미지 1/3 Kodak EasyShare M381 Lens/Optics Replacement: 16 단계, 이미지 2/3 Kodak EasyShare M381 Lens/Optics Replacement: 16 단계, 이미지 3/3
    • The optic assembly should now be free. Use a pry tool to lift it far enough up that you can grab and remove it.

    • Be sure the detached ribbons are held out of the way to avoid any possible damage to them.

결론

To reassemble your device, follow these instructions in reverse order.

Christina Hamby

회원 가입일: 01/30/15

449 평판

안내서 4개 작성하였습니다

댓글 한 개

I'm with ya up 'til step 2. The right hand back of my camera has controls (zoom in/out, trash/list/info, right/left/up/down, etc. on it and no visible screws as in your step 3 picture. It appears that another panel has been removed to expose these screws. Can you elaborate?

moe_r - 답글

댓글 쓰기

조회 통계:

24 시간 전: 1

7일 전: 3

30일 전: 11

전체 시간: 627