주요 콘텐츠로 건너뛰기

Komplete Audio 2 USB port replacement

필요한 것

  1. Komplete Audio 2 USB port replacement, Bottom cover screws: 1 단계, 이미지 1/3 Komplete Audio 2 USB port replacement, Bottom cover screws: 1 단계, 이미지 2/3 Komplete Audio 2 USB port replacement, Bottom cover screws: 1 단계, 이미지 3/3
    • The interface has 6 screws holding its bottom cover. In this step, we're going to remove them.

    • Place the device bottom up.

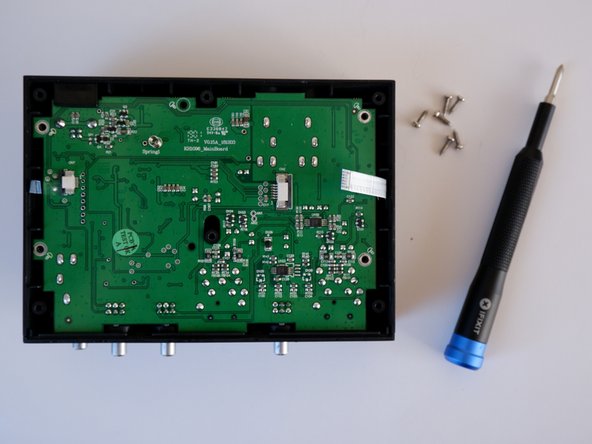
    • Using a Phillips #1 screwdriver, remove the 6 screws from the bottom cover.

    • Please note that the middle screw is located behind the product label.

  2. Komplete Audio 2 USB port replacement, Bottom cover detachment: 2 단계, 이미지 1/1
    • Besides the screws we removed already, the bottom cover uses 4 plastic tabs (two tabs on the front of the device and two on the sides).

    • Pry the plastic tabs to remove the bottom cover.

    • It shouldn't require much force to open the cover once the screws are removed (I broke one of the tabs trying to open the device with the middle screw still in place).

  3. Komplete Audio 2 USB port replacement, Ribbon cable connectors: 3 단계, 이미지 1/3 Komplete Audio 2 USB port replacement, Ribbon cable connectors: 3 단계, 이미지 2/3 Komplete Audio 2 USB port replacement, Ribbon cable connectors: 3 단계, 이미지 3/3
    • The main PCB has two ribbon cables connected to it. In this step, we're going to make sure they can be safely disconnected.

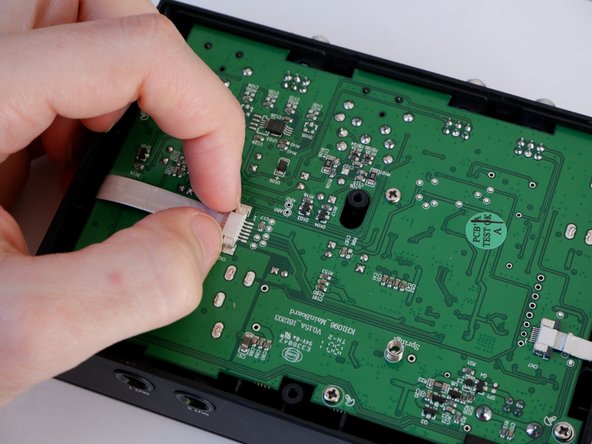
    • Unlock the ribbon cables by pulling on the grey plastic bits of their connectors (as indicated on the second image).

  4. Komplete Audio 2 USB port replacement, Ribbon cables: 4 단계, 이미지 1/2 Komplete Audio 2 USB port replacement, Ribbon cables: 4 단계, 이미지 2/2
    • Now that both of the ribbon cables are unlocked we can safely disconnect them from the main PCB.

    • Disconnect both ribbon cables by gently pulling them out of their connectors (you may need to wiggle the cables to the sides a little).

  5. Komplete Audio 2 USB port replacement, Main PCB screws: 5 단계, 이미지 1/3 Komplete Audio 2 USB port replacement, Main PCB screws: 5 단계, 이미지 2/3 Komplete Audio 2 USB port replacement, Main PCB screws: 5 단계, 이미지 3/3
    • The main PCB is held in place by 6 screws. In this step, we're going to remove them.

    • Using a Phillips #0 screwdriver, remove the 6 screws from the bottom cover.

  6. Komplete Audio 2 USB port replacement, Front panel screws: 6 단계, 이미지 1/3 Komplete Audio 2 USB port replacement, Front panel screws: 6 단계, 이미지 2/3 Komplete Audio 2 USB port replacement, Front panel screws: 6 단계, 이미지 3/3
    • There are 2 screws attaching the front panel to the rest of the case. They are deeper inside the case, so they may not be immediately visible.

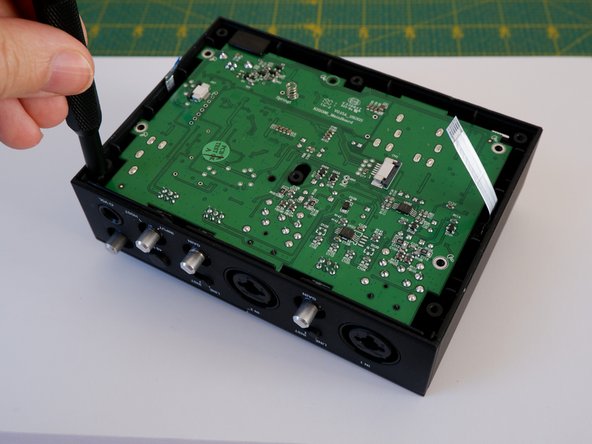
    • Using a Phillips #0 screwdriver, remove the 2 screws as shown on the photos.

  7. Komplete Audio 2 USB port replacement, Front panel detachment: 7 단계, 이미지 1/3 Komplete Audio 2 USB port replacement, Front panel detachment: 7 단계, 이미지 2/3 Komplete Audio 2 USB port replacement, Front panel detachment: 7 단계, 이미지 3/3
    • With the screws removed, the front panel can be unclipped from the top cover.

    • Gently pry on the sides of the front panel as indicated by the arrows on the first image.

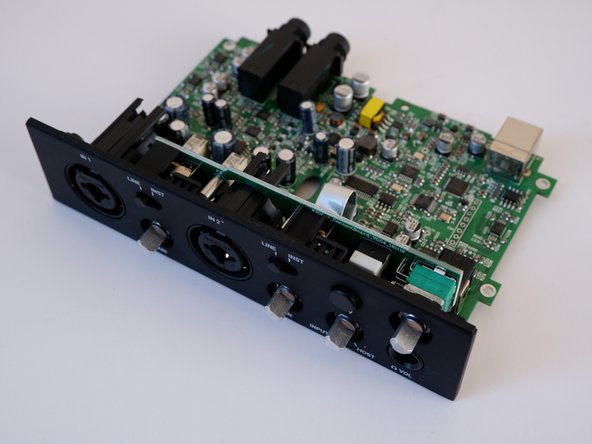
    • Pull on the front panel upwards until it detaches from the top cover.

    • This step takes some trial and error - take your time and try not to apply excessive force.

  8. Komplete Audio 2 USB port replacement, USB port cover: 8 단계, 이미지 1/2 Komplete Audio 2 USB port replacement, USB port cover: 8 단계, 이미지 2/2
    • The USB port has a plastic cover that's loosely attached to the main PCB. It's likely to fall out once the main PCB is pulled out.

  9. Komplete Audio 2 USB port replacement, USB port replacement: 9 단계, 이미지 1/3 Komplete Audio 2 USB port replacement, USB port replacement: 9 단계, 이미지 2/3 Komplete Audio 2 USB port replacement, USB port replacement: 9 단계, 이미지 3/3
    • In order to replace the USB port you will need to desolder the one which is already in place first.

    • The locations of the relevant pins are indicated in the pictures 2 and 3.

    • If you're new to desoldering, take a look at this tutorial from Instructables: https://www.instructables.com/The-Ultima...

    • Desolder the USB port from the main PCB and then solder in the replacement.

결론

To reassemble your device, follow these instructions in reverse order.

다른 한 분이 해당 안내서를 완성하였습니다.

Kuba M

회원 가입일: 03/13/22

199 평판

안내서 1개 작성함

댓글 0개

댓글 쓰기

조회 통계:

24 시간 전: 0

7일 전: 7

30일 전: 42

전체 시간: 907