주요 콘텐츠로 건너뛰기

Kurio 7 Camera Replacement

필요한 것

  1. Kurio 7 Camera Replacement, Back Panel: 1 단계, 이미지 1/3 Kurio 7 Camera Replacement, Back Panel: 1 단계, 이미지 2/3 Kurio 7 Camera Replacement, Back Panel: 1 단계, 이미지 3/3
    • Begin by removing the rubber cover from the Kurio 7.

  2. Kurio 7 Camera Replacement: 2 단계, 이미지 1/2 Kurio 7 Camera Replacement: 2 단계, 이미지 2/2
    • Remove the four 30 mm Phillips #00 screws from the outer case.

  3. Kurio 7 Camera Replacement: 3 단계, 이미지 1/2 Kurio 7 Camera Replacement: 3 단계, 이미지 2/2
    • Insert the plastic opening tool in the gap between the front cover and the back cover of the device.

    • Slide the plastic opening tool around the edge of the device. Gently pry apart the tabs that hold the front cover and the back cover together.

    • Be careful not to break off the tabs that hold the front cover and the back cover together.

  4. Kurio 7 Camera Replacement: 4 단계, 이미지 1/2 Kurio 7 Camera Replacement: 4 단계, 이미지 2/2
    • Once all of the tabs are removed, the back cover should come off easily.

    • Gently remove the back cover. There are wires inside that may get caught on the cover while removing it. These wires are soldered to their components and are difficult to reattach.

  5. Kurio 7 Camera Replacement, Kurio 7 Motherboard Removal Guide: 5 단계, 이미지 1/2 Kurio 7 Camera Replacement, Kurio 7 Motherboard Removal Guide: 5 단계, 이미지 2/2
    • Use a plastic credit card, or other thin object, to separate the battery from the screen.

    • Be sure to work the card carefully and slowly around in order to not damage, break, or deform the battery.

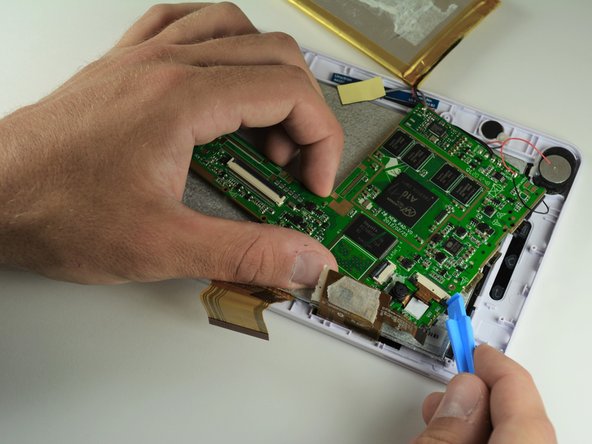
    • Carefully set the battery aside.

  6. Kurio 7 Camera Replacement: 6 단계, 이미지 1/2 Kurio 7 Camera Replacement: 6 단계, 이미지 2/2
    • Use a Phillips #00 screwdriver to remove the eight 40mm screws holding the motherboard in place.

  7. Kurio 7 Camera Replacement: 7 단계, 이미지 1/3 Kurio 7 Camera Replacement: 7 단계, 이미지 2/3 Kurio 7 Camera Replacement: 7 단계, 이미지 3/3
    • Place the plastic opening tool on the base of the black ribbon clip and pull up, like a lever, to release the mount. This should release the clip holding the ribbon to the mount.

    • Pull the ribbon out of the mount.

  8. Kurio 7 Camera Replacement: 8 단계, 이미지 1/1
    • There should be masking tape on the yellow ribbon. Pull the tape off of the motherboard and wrap it around the yellow ribbon.

    • Do not pull the tape completely off the motherboard, as it is used to protect components on the ribbon.

    • To remove the ribbon from the mount, follow the same steps in Step 3.

  9. Kurio 7 Camera Replacement: 9 단계, 이미지 1/1
    • Pull back the ribbons and put the battery near the bottom of the Kurio.

    • The motherboard is now removed so that other components can be worked on.

  10. Kurio 7 Camera Replacement, Camera: 10 단계, 이미지 1/1
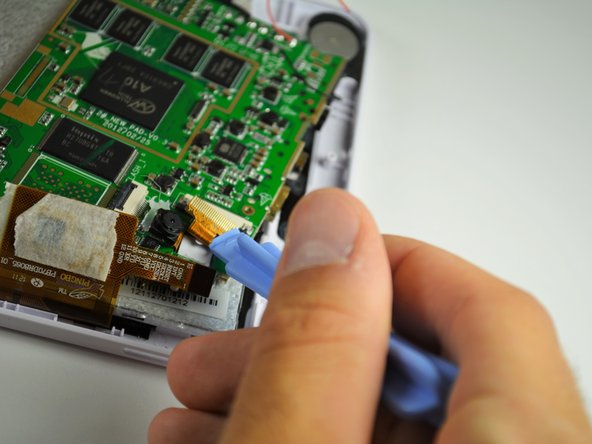
    • Carefully remove the soft black tape that covers the camera. Keep the tape for the replacement steps.

  11. Kurio 7 Camera Replacement: 11 단계, 이미지 1/3 Kurio 7 Camera Replacement: 11 단계, 이미지 2/3 Kurio 7 Camera Replacement: 11 단계, 이미지 3/3
    • To release the camera's ribbon, use the opening tool to pull on the black edges of the ribbon mount.

    • Alternate sides until the ribbon is loose enough to pull out.

  12. Kurio 7 Camera Replacement: 12 단계, 이미지 1/1
    이 단계에 사용된 도구:
    Tweezers
    $4.99
    구매
    • There may be hot glue holding down the front camera. Use the tweezers to carefully pull it off.

  13. Kurio 7 Camera Replacement: 13 단계, 이미지 1/1
    • To remove the camera, grab the ribbon with tweezers and pull the camera through the mother board.

    • Do not pull on the ribbon hard, but try to line up the camera so that fits through the hole in the motherboard.

    • The camera is double sided, as the Kurio 7 have both a front and a back camera.

    • You have successfully removed the camera!

결론

Replace with new camera. To reassemble your device, follow these instructions in reverse order.

Omri Nissan

회원 가입일: 04/16/14

321 평판

안내서 2개 작성하였습니다

Cal Poly, Team 12-36, Maness Spring 2014 Cal Poly, Team 12-36, Maness Spring 2014 회원

CPSU-MANESS-S14S12G36

4 회원들

안내서 14개 작성하였습니다

댓글 0개

댓글 쓰기

조회 통계:

24 시간 전: 0

7일 전: 4

30일 전: 10

전체 시간: 886