주요 콘텐츠로 건너뛰기

Kyocera Echo Flash and Motherboard Replacement

필요한 것

  1. Kyocera Echo Flash and Motherboard Replacement, Battery: 1 단계, 이미지 1/1
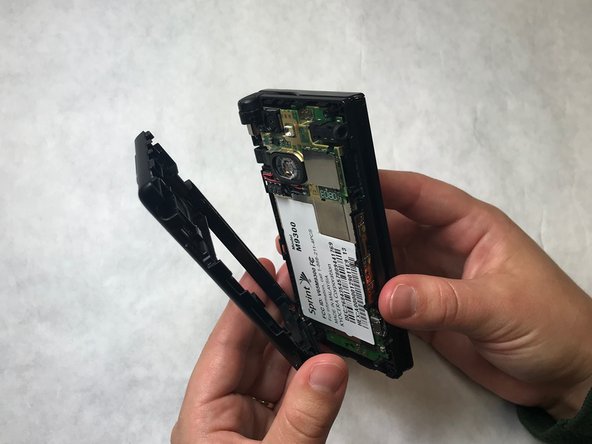
    • Orient the phone so that the screen is face down.

    • Place one or both thumbs near the small arrow at the bottom of the phone and firmly push the cover up.

  2. Kyocera Echo Flash and Motherboard Replacement: 2 단계, 이미지 1/1
    • Pull up on the back cover and lift the top to separate it from the phone.

  3. Kyocera Echo Flash and Motherboard Replacement: 3 단계, 이미지 1/1
    • Pull the battery out of the device with a thin object such as your nail or credit card.

  4. Kyocera Echo Flash and Motherboard Replacement, Flash and Motherboard: 4 단계, 이미지 1/1
    • Unscrew four 4.3mm Phillips #000 screws.

  5. Kyocera Echo Flash and Motherboard Replacement: 5 단계, 이미지 1/1
    • Unscrew 2 Y1000 4.8 mm screws.

  6. Kyocera Echo Flash and Motherboard Replacement: 6 단계, 이미지 1/2 Kyocera Echo Flash and Motherboard Replacement: 6 단계, 이미지 2/2
    • Wedge a plastic opening tool under the black outer casing of the phone. Push the plastic opening tool down and outward while rotating the phone to pry the black outer casing off.

    • Do not apply too much pressure to the outer casing, as it could damage internal components.

  7. Kyocera Echo Flash and Motherboard Replacement: 7 단계, 이미지 1/1
    • Wedge a plastic opening tool under the motherboard directly above the flash. Additionally, use a plastic opening tool to unhook corner labeled in a red square.

  8. Kyocera Echo Flash and Motherboard Replacement: 8 단계, 이미지 1/2 Kyocera Echo Flash and Motherboard Replacement: 8 단계, 이미지 2/2
    • Gently pull the motherboard out of its compartment.

결론

To reassemble your device, follow these instructions in reverse order.

Alex Kinstedt

회원 가입일: 11/05/18

483 평판

안내서 4개 작성하였습니다

IUPUI, Team S2-G6, Baechle Fall 2018 IUPUI, Team S2-G6, Baechle Fall 2018 회원

IUPUI-BAECHLE-F18S2G6

3 회원들

안내서 4개 작성하였습니다

댓글 0개

댓글 쓰기

조회 통계:

24 시간 전: 0

7일 전: 1

30일 전: 1

전체 시간: 173