이 버전에는 잘못된 편집 사항이 있을 수 있습니다. 최신 확인된 스냅샷으로 전환하십시오.
필요한 것
-
이 단계는 번역되지 않았습니다. 번역을 도와주십시오
-
Find a sliding button on the lower back side of the device and with your finger, slide it to the left firmly.
-
-
이 단계는 번역되지 않았습니다. 번역을 도와주십시오
-
Use a Phillips #00 screwdriver to unscrew the four Phillips #00 screws on the four corners under the battery to unfasten the back case from the phone.
-
-
이 단계는 번역되지 않았습니다. 번역을 도와주십시오
-
Take the case off by using a plastic opening tool.
-
Continue using the plastic opening tool around the sides of the device, unhooking the eight tabs securing the back cover to the rest of the phone as shown in the second photo.
-
The back speaker will be connected to the motherboard, and must be disconnected to remove the case.
-
-
이 단계는 번역되지 않았습니다. 번역을 도와주십시오
-
Unscrew the 4 Phillips 00 screws that connect the two halves of the phone together.
-
-
이 단계는 번역되지 않았습니다. 번역을 도와주십시오
-
Between the two halves is a ribbon. Use a plastic opening tool to flip up the lock and disconnect it.
-
-
-
이 단계는 번역되지 않았습니다. 번역을 도와주십시오
-
Pry off the plastic tabs that cover two screws, as shown in the first picture.
-
Then, remove the 6 Phillips 00 screws from the back of the case, as shown in the second picture.
-
-
이 단계는 번역되지 않았습니다. 번역을 도와주십시오
-
Pry off the back cover from the front of the case using a plastic opening tool.
-
-
이 단계는 번역되지 않았습니다. 번역을 도와주십시오
-
Pry the front speaker and wireless receiver out of the front case using a spudger.
-
-
이 단계는 번역되지 않았습니다. 번역을 도와주십시오
-
Starting with the side that has the speaker and receiver, carefully lift the LCD Board out of the case.
-
-
이 단계는 번역되지 않았습니다. 번역을 도와주십시오
-
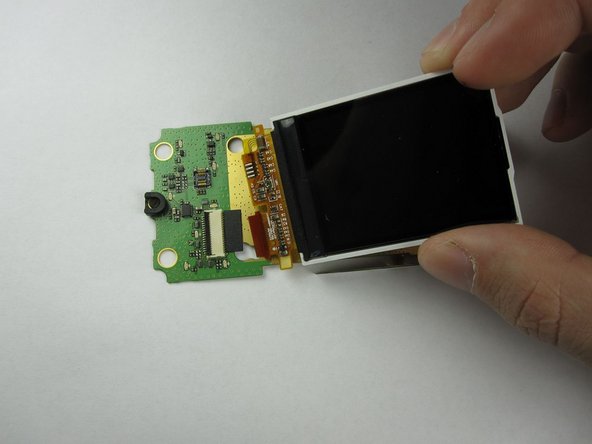
Finally, flip up the black switch to unhook the LCD screen from the LCD board using a spudger.
-
The LCD Board in now accessible.
-


팀

Cal Poly, Team 19-46, Regan Winter 2013 Cal Poly, Team 19-46, Regan Winter 2013 회원
CPSU-REGAN-W13S19G46
4 회원들
안내서 22개 작성하였습니다