주요 콘텐츠로 건너뛰기

LG Chocolate LCD Board Replacement

필요한 것

  1. LG Chocolate LCD Board Replacement, Battery: 1 단계, 이미지 2개 중 1개 LG Chocolate LCD Board Replacement, Battery: 1 단계, 이미지 2개 중 2개
    • Find a sliding button on the lower back side of the device and with your finger, slide it to the left firmly.

    • The battery should pop out fairly easily. If not, slide the button further or grab and pull it while sliding the button.

  2. LG Chocolate LCD Board Replacement, Back Cover: 2 단계, 이미지 1개 중 1개
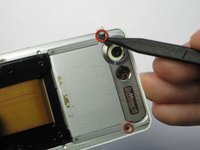
    • You will need to use a Phillips #00 screwdriver.

    • Remove the four screws located at the corners beneath the battery.

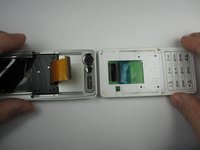
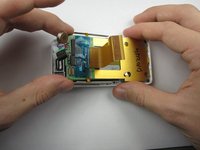
    • Detach the back case from the phone.

  3. LG Chocolate LCD Board Replacement: 3 단계, 이미지 3개 중 1개 LG Chocolate LCD Board Replacement: 3 단계, 이미지 3개 중 2개 LG Chocolate LCD Board Replacement: 3 단계, 이미지 3개 중 3개
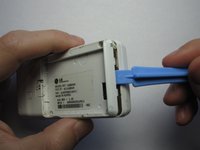
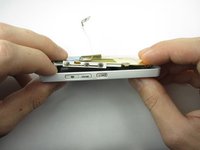
    • Take the case off by using a plastic opening tool.

    • Continue using the plastic opening tool around the sides of the device.

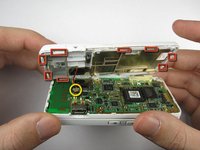
    • Unhook the eight tabs securing the back cover to the rest of the phone as seen in the second photo.

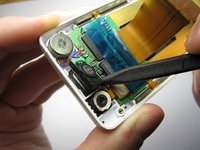
    • The back speaker will be connected to the motherboard.

    • This must be disconnected in order to remove the case

  4. LG Chocolate LCD Board Replacement, Sliding Front: 4 단계, 이미지 1개 중 1개
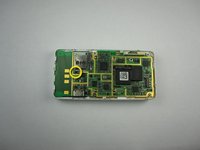
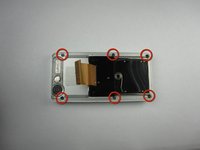
    • Unscrew the 4 Phillips 00 screws that connect the two halves of the phone together.

  5. LG Chocolate LCD Board Replacement: 5 단계, 이미지 2개 중 1개 LG Chocolate LCD Board Replacement: 5 단계, 이미지 2개 중 2개
    • Between the two halves is a ribbon. Use a plastic opening tool to flip up the lock and disconnect it.

  6. LG Chocolate LCD Board Replacement: 6 단계, 이미지 2개 중 1개 LG Chocolate LCD Board Replacement: 6 단계, 이미지 2개 중 2개
    • Pry off the plastic tabs that cover two screws, as shown in the first picture.

    • Then, remove the 6 Phillips 00 screws from the back of the case, as shown in the second picture.

  7. LG Chocolate LCD Board Replacement: 7 단계, 이미지 1개 중 1개
    • Pry off the back cover from the front of the case using a plastic opening tool.

  8. LG Chocolate LCD Board Replacement, LCD Board: 8 단계, 이미지 3개 중 1개 LG Chocolate LCD Board Replacement, LCD Board: 8 단계, 이미지 3개 중 2개 LG Chocolate LCD Board Replacement, LCD Board: 8 단계, 이미지 3개 중 3개
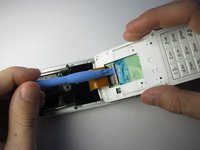
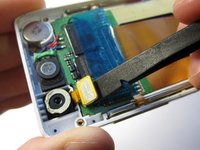
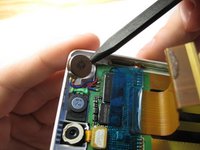
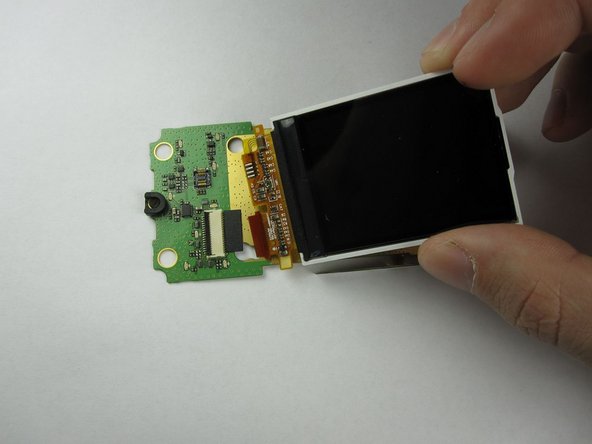
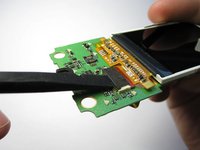
    • Pry the front speaker and wireless receiver out of the front case using a spudger.

    • They may be taped into the case, so don't be afraid to pry hard.

  9. LG Chocolate LCD Board Replacement: 9 단계, 이미지 2개 중 1개 LG Chocolate LCD Board Replacement: 9 단계, 이미지 2개 중 2개
    • Starting with the side that has the speaker and receiver, carefully lift the LCD Board out of the case.

  10. LG Chocolate LCD Board Replacement: 10 단계, 이미지 1개 중 1개
    • Unhook the ribbon cable using that flat side of a spudger.

  11. LG Chocolate LCD Board Replacement: 11 단계, 이미지 1개 중 1개
    • Next, carefully remove the tape from the LCD board.

  12. LG Chocolate LCD Board Replacement: 12 단계, 이미지 2개 중 1개 LG Chocolate LCD Board Replacement: 12 단계, 이미지 2개 중 2개
    • Finally, flip up the black switch to unhook the LCD screen from the LCD board using a spudger.

    • The LCD Board in now accessible.

결론

To reassemble your device, follow these instructions in reverse order.

작성자

8다른 기여자 명과 함께

Thomas

회원 가입일: 01/18/13

91 평판

안내서 4개를 작성함

Cal Poly, Team 19-46, Regan Winter 2013 Cal Poly, Team 19-46, Regan Winter 2013 회원

CPSU-REGAN-W13S19G46

4 회원들

안내서 22개를 작성함

0가이드 댓글

댓글 쓰기

조회 통계:

지난 24시간: 1

지난 7일: 4

지난 30일: 9

전체 시간: 502