주요 콘텐츠로 건너뛰기

LG G2 Sprint Battery Replacement

필요한 것

  1. LG G2 Sprint Battery Replacement, Charger Port: 1 단계, 이미지 1/2 LG G2 Sprint Battery Replacement, Charger Port: 1 단계, 이미지 2/2
    • Use a plastic opening tool to pry open your phone case. Flip the phone over and start by sliding your tool between the two sides of your phone case. Work the tool towards the bottom of the phone case, gently prying the case open. There is a clip that will pop open after applying gentle but consistent pressure.

    • Make sure to release the clip on the top left corner of the phone case carefully. This is usually the most difficult clip to release.

  2. LG G2 Sprint Battery Replacement: 2 단계, 이미지 1/1
    • After removing the outer phone case, you will need two Phillips head bits. One J0 and one J000 size.

    • There are 11 silver screws for which you have to use J0 head bits, and 1 small black screw for which you have to use a J000 head bit.

  3. LG G2 Sprint Battery Replacement: 3 단계, 이미지 1/3 LG G2 Sprint Battery Replacement: 3 단계, 이미지 2/3 LG G2 Sprint Battery Replacement: 3 단계, 이미지 3/3
    • There is a clip on the upper left side of the upper panel. Use the plastic opening tool to pry the clip off of the phone.

    • The upper inside panel flips up easily off of the phone case once all the clips and screws are removed. If the panel does not pull off easily, check that you have removed all of the screws.

    • There are ribbons that need to be removed as well. Be sure to carefully pry them off of the board

  4. LG G2 Sprint Battery Replacement: 4 단계, 이미지 1/3 LG G2 Sprint Battery Replacement: 4 단계, 이미지 2/3 LG G2 Sprint Battery Replacement: 4 단계, 이미지 3/3
    • The bottom inside panel should pry back easily after you take out the screws. Again, if the panel does not pull off easily, you may have missed a screw.

  5. LG G2 Sprint Battery Replacement: 5 단계, 이미지 1/3 LG G2 Sprint Battery Replacement: 5 단계, 이미지 2/3 LG G2 Sprint Battery Replacement: 5 단계, 이미지 3/3
    • There are several clips and circuits that need to be released. They are circled in the images above. Be careful not to break any of the attached ribbon or wires. (circle ribbons etc.)

    • Be careful to use your tools to disconnect the cables at the connectors and not along the wire.

  6. LG G2 Sprint Battery Replacement: 6 단계, 이미지 1/3 LG G2 Sprint Battery Replacement: 6 단계, 이미지 2/3 LG G2 Sprint Battery Replacement: 6 단계, 이미지 3/3
    • There are several clips and circuits that need to be released. They are circled in the images above. Be careful not to break any of the attached ribbon or wires.

    • The orange materials is meant to bend along the dotted line labeled “bend.” Try to make the bend as close to this line as possible.

  7. LG G2 Sprint Battery Replacement: 7 단계, 이미지 1/3 LG G2 Sprint Battery Replacement: 7 단계, 이미지 2/3 LG G2 Sprint Battery Replacement: 7 단계, 이미지 3/3
    • After you have disconnected all of the ribbon and antennae connections, you can remove the board. Gently pry the board up from the bottom of the case and slide it back out.

    • Make sure to remove all ribbon connectors from the board prior to removing the board.

  8. LG G2 Sprint Battery Replacement, Battery: 8 단계, 이미지 1/2 LG G2 Sprint Battery Replacement, Battery: 8 단계, 이미지 2/2
    • Now you are ready to remove the battery. Make sure to adhere to ESD prevention guidelines, use a plastic tool as to not damage the battery.

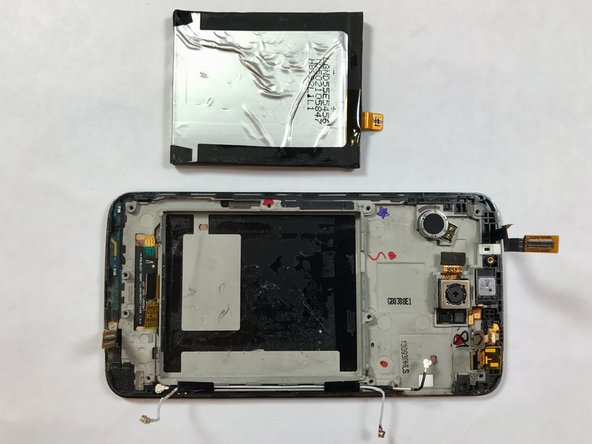
    • Start at the top left of the battery and slide your nylon Uspudger under the battery. There is a layer of adhesive that keeps the battery in the case. Use steady, firm pressure to pull the battery up. If the battery case begins to bend, you may need to use less force.

결론

To reassemble your device, follow these instructions in reverse order.

다른 6명이 해당 안내서를 완성하였습니다.

Roberta Spathari

회원 가입일: 10/06/16

479 평판

안내서 3개 작성하였습니다

USF Tampa, Team 5-2, Lacy Fall 2016 USF Tampa, Team 5-2, Lacy Fall 2016 회원

USFT-LACY-F16S5G2

4 회원들

안내서 10개 작성하였습니다

댓글 2개

The adhesive holding my battery was a big pain to get through, definitely go slow and carefully so you don’t damage the battery.

Cresny - 답글

Agree with Cresny on the adhesive. So strong in my case, and it required patience and steady, medium pressure to get it to release.

Added comments to some steps in the guide, and feel it’s overall lacking some info. I stopped referring to it around Step 5 because of this. (If this was my first go at a battery swap I’d have been frustrated; luckily it was my third.) But how many more people will try to replace a battery in a 2013 phone in 2020 and beyond? Probably not many! :-)

No special screw head sizes were needed to remove all 12 screws. I used the very typical Phillips 00 that people use on teeny electronics screws and it worked great. Take your time, pay attention and look at all attachments so you don’t miss any!

This is the only phone I had to do a soft reset on after changing the battery. If you don’t get beyond the LG logo screen when you test it before putting it back together, hold the Power button and Volume Down button down together for 10–12 seconds until you see the logo appear.

Greta Schmidt - 답글

댓글 쓰기

조회 통계:

24 시간 전: 2

7일 전: 3

30일 전: 5

전체 시간: 1,795