주요 콘텐츠로 건너뛰기

LG G3 Power & Volume Button Cable Replacement

필요한 것

  1. LG G3 Power & Volume Button Cable Replacement, Back Cover: 1 단계, 이미지 1/2 LG G3 Power & Volume Button Cable Replacement, Back Cover: 1 단계, 이미지 2/2
    • Power off your phone before beginning disassembly.

    • Insert a thumbnail, or a prying tool like a spudger, into the notch at the bottom left of the back cover.

    • Pry the back cover up to separate its plastic clips.

  2. LG G3 Power & Volume Button Cable Replacement: 2 단계, 이미지 1/2 LG G3 Power & Volume Button Cable Replacement: 2 단계, 이미지 2/2
    • Lift the back cover to release the rest of the plastic clips and remove it.

    • In case you can't lift the back cover completely, slide your fingernail or your prying tool around the midframe to release the remaining clips.

    • To reinstall the back cover, press it firmly into place until you hear a snap from the plastic clips to form a seamless connection with the rear side of the phone.

  3. LG G3 Power & Volume Button Cable Replacement, Battery: 3 단계, 이미지 1/2 LG G3 Power & Volume Button Cable Replacement, Battery: 3 단계, 이미지 2/2
    • Use a fingernail or a prying tool at the marked notch to lever the battery out of its recess.

  4. LG G3 Power & Volume Button Cable Replacement: 4 단계, 이미지 1/2 LG G3 Power & Volume Button Cable Replacement: 4 단계, 이미지 2/2
    • Lift the battery out of its recess and remove it.

  5. LG G3 Power & Volume Button Cable Replacement, Loudspeaker: 5 단계, 이미지 1/1
    • Remove the four Phillips #00 screws (4 mm length).

  6. LG G3 Power & Volume Button Cable Replacement: 6 단계, 이미지 1/2 LG G3 Power & Volume Button Cable Replacement: 6 단계, 이미지 2/2
    • Insert a thumbnail, or a prying tool like a spudger, into the notch at the bottom left of the back cover you used earlier to remove the back cover.

    • Pry up the plastic panel, including the loudspeaker, until you can get a good grip.

  7. LG G3 Power & Volume Button Cable Replacement: 7 단계, 이미지 1/3 LG G3 Power & Volume Button Cable Replacement: 7 단계, 이미지 2/3 LG G3 Power & Volume Button Cable Replacement: 7 단계, 이미지 3/3
    • Carefully remove the plastic panel including the loudspeaker by gently pulling it away from the phone assembly.

  8. LG G3 Power & Volume Button Cable Replacement, Motherboard Cover Assembly: 8 단계, 이미지 1/1
    • Remove the eight Phillips #00 screws (4 mm length).

  9. LG G3 Power & Volume Button Cable Replacement: 9 단계, 이미지 1/3 LG G3 Power & Volume Button Cable Replacement: 9 단계, 이미지 2/3 LG G3 Power & Volume Button Cable Replacement: 9 단계, 이미지 3/3
    • Insert an opening pick between the bottom right corner of the motherboard cover and the motherboard.

    • Pry up the motherboard cover to open the plastic clips which hold the cover in its place.

    • The clips can be a bit resistive. If you're having trouble prying up the motherboard cover, slightly rotate the opening pick sideways to make the process easier.

    • Work your way along the right edge.

  10. LG G3 Power & Volume Button Cable Replacement: 10 단계, 이미지 1/3 LG G3 Power & Volume Button Cable Replacement: 10 단계, 이미지 2/3 LG G3 Power & Volume Button Cable Replacement: 10 단계, 이미지 3/3
    • Carefully lift the right edge of the motherboard cover.

    • The remaining plastic clips should open during this process or can be unhinged easily by hand.

    • Remove the motherboard assembly.

  11. LG G3 Power & Volume Button Cable Replacement, Power & Volume Button Flex Cable: 11 단계, 이미지 1/2 LG G3 Power & Volume Button Cable Replacement, Power & Volume Button Flex Cable: 11 단계, 이미지 2/2
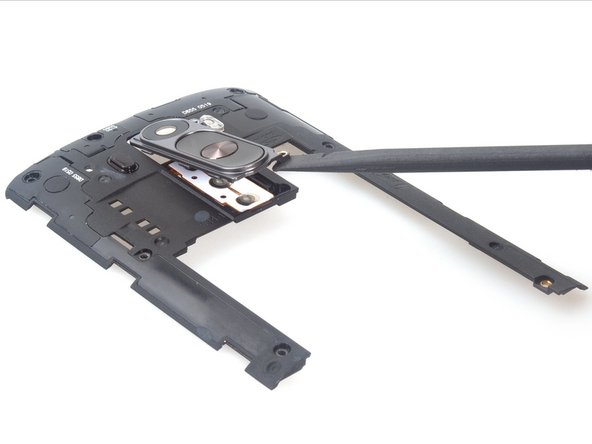
    • Remove the last screw attaching the rear camera lens to the frame.

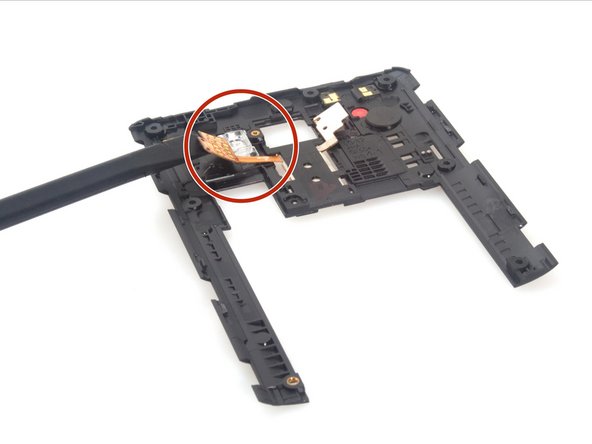
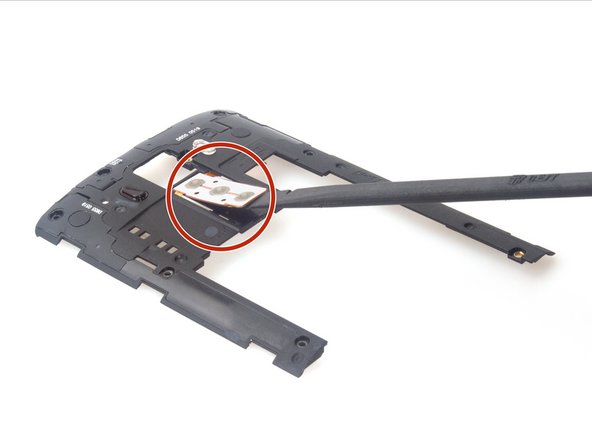
    • Now use a plastic spudger to carefully remove the camera lens.

  12. LG G3 Power & Volume Button Cable Replacement: 12 단계, 이미지 1/3 LG G3 Power & Volume Button Cable Replacement: 12 단계, 이미지 2/3 LG G3 Power & Volume Button Cable Replacement: 12 단계, 이미지 3/3
    • Using the spudger, release power & volume button flex from adhesive carefully.

  13. LG G3 Power & Volume Button Cable Replacement: 13 단계, 이미지 1/1
    • Finally, remove the flex.

결론

To reassemble your device, follow these instructions in reverse order.

다른 9명이 해당 안내서를 완성하였습니다.

Sophia

회원 가입일: 03/25/14

43,810 평판

안내서 62개 작성하였습니다

댓글 한 개

I bought a more powerful battery. 6800 mah .instead of the 3000mah OEM . Ia there any problem using it?

mitoll - 답글

댓글 쓰기

조회 통계:

24 시간 전: 1

7일 전: 2

30일 전: 11

전체 시간: 21,997