주요 콘텐츠로 건너뛰기

LG G5 Rear Camera Replacement

필요한 것

  1. LG G5 Rear Camera Replacement, Front Panel Assembly: 1 단계, 이미지 1/2 LG G5 Rear Camera Replacement, Front Panel Assembly: 1 단계, 이미지 2/2
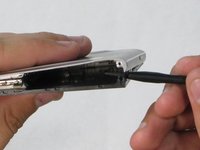
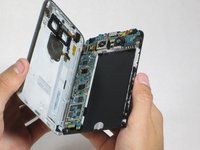
    • While holding the battery release button, pull the bottom end of the phone out of the body.

  2. LG G5 Rear Camera Replacement: 2 단계, 이미지 1/3 LG G5 Rear Camera Replacement: 2 단계, 이미지 2/3 LG G5 Rear Camera Replacement: 2 단계, 이미지 3/3
    • Insert the sim card eject tool (0.8mm sim card eject head) into the small hole on the sim card tray.

    • Press inward with some force to eject the tray.

    • Pull the sim card tray out of the phone.

  3. LG G5 Rear Camera Replacement: 3 단계, 이미지 1/2 LG G5 Rear Camera Replacement: 3 단계, 이미지 2/2
    • Remove the two 5.5mm Phillips #00 screws from the base of the phone.

  4. LG G5 Rear Camera Replacement: 4 단계, 이미지 1/1
    • Insert the plastic opening tool into the seam between the glass screen and the metal body.

    • Pry the glass from the body only a slight amount.

  5. LG G5 Rear Camera Replacement: 5 단계, 이미지 1/2 LG G5 Rear Camera Replacement: 5 단계, 이미지 2/2
    • Insert the Spudger into the now open space between the body and screen.

    • Push inward to separate the screen even more.

    • Slowly slide the nylon spudger up the edge the phone till the screen pops out of the body.

    • When putting the screen back in, press the edges down from the top of the phone to the bottom. The screen should "pop" into place.

  6. LG G5 Rear Camera Replacement: 6 단계, 이미지 1/2 LG G5 Rear Camera Replacement: 6 단계, 이미지 2/2
    • Peel the screen away from the body. The two parts should be completely separated.

  7. LG G5 Rear Camera Replacement, Rear Camera: 7 단계, 이미지 1/3 LG G5 Rear Camera Replacement, Rear Camera: 7 단계, 이미지 2/3 LG G5 Rear Camera Replacement, Rear Camera: 7 단계, 이미지 3/3
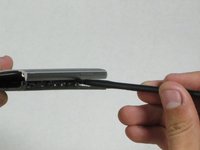
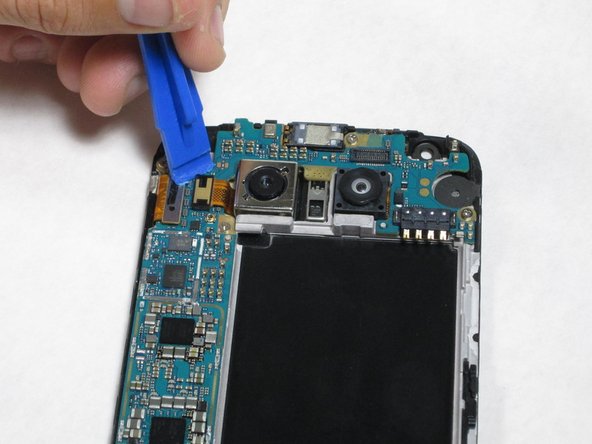
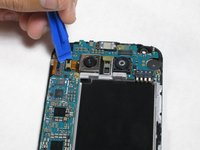
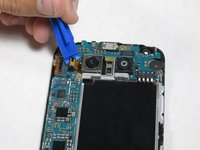
    • Insert the plastic opening tool between the camera-ribbon connector and the motherboard, then pull up. It should pop out easily.

  8. LG G5 Rear Camera Replacement: 8 단계, 이미지 1/2 LG G5 Rear Camera Replacement: 8 단계, 이미지 2/2
    • After detaching the ribbon, carefully remove the camera using tweezers

결론

To reassemble your device, follow these instructions in reverse order.

다른 34명이 해당 안내서를 완성하였습니다.

Parker Reynolds

회원 가입일: 10/03/16

932 평판

안내서 2개 작성하였습니다

Cal Poly, Team 18-2, Forte Fall 2016 Cal Poly, Team 18-2, Forte Fall 2016 회원

CPSU-FORTE-F16S18G2

4 회원들

안내서 15개 작성하였습니다

댓글 6개

This worked great and took me about 10 minutes!

Mark - 답글

Great instructions. This was my first time taking apart any phone. Everything went smoothly and my camera now works! thank you

Christopher Piatt - 답글

the camera is held down with sticky tape and I wasn’t comfortable pulling hard under the processing board, so I pulled the six screws holding that down and removed it first. Unfortunately for me the new camera still doesn’t focus…

Ray White - 답글

This worked great for me. I was a little nervous prying on my phone, especially when I heard the first POP. But after that, it was not hard at all. The new camera focuses great for me now and I can get back to taking great pictures with my G5!

Thanks for the detailed instructions, tools and affordable part!

Brad - 답글

You may want to mention that the original camera is glued in. It takes a bit of prying to pop it out.

Ryan - 답글

댓글 쓰기

조회 통계:

24 시간 전: 0

7일 전: 0

30일 전: 7

전체 시간: 17,171