주요 콘텐츠로 건너뛰기

LG Optimus Dynamic II L39C Screen Replacement

필요한 것

  1. LG Optimus Dynamic II L39C Screen Replacement, Remove the back case: 1 단계, 이미지 1/2 LG Optimus Dynamic II L39C Screen Replacement, Remove the back case: 1 단계, 이미지 2/2
    • Make sure not to push the tool into the USB port. Doing so may cause damage to your phone.

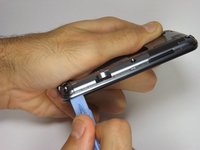
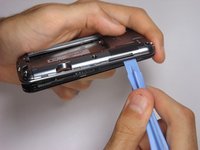
    • Hold the blue plastic opening tool at the edge of the USB opening. Push down and pry the case off the phone gently.

  2. LG Optimus Dynamic II L39C Screen Replacement, Remove the Battery: 2 단계, 이미지 1/1
    • Lift the battery out of the phone and replace with your new one.

  3. LG Optimus Dynamic II L39C Screen Replacement, Remove the SD Card: 3 단계, 이미지 1/1
    • Grab the end of the SD Card and pull it out of the phone.

  4. LG Optimus Dynamic II L39C Screen Replacement, Remove the screws from the midframe: 4 단계, 이미지 1/2 LG Optimus Dynamic II L39C Screen Replacement, Remove the screws from the midframe: 4 단계, 이미지 2/2
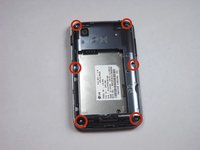
    • Use the PH #000 screwdriver to remove the six screws from the midframe

  5. LG Optimus Dynamic II L39C Screen Replacement, Remove the midframe: 5 단계, 이미지 1/2 LG Optimus Dynamic II L39C Screen Replacement, Remove the midframe: 5 단계, 이미지 2/2
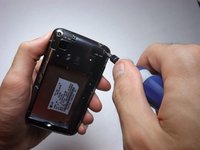
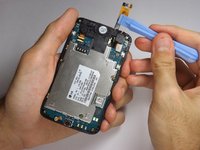
    • Using the plastic opening tool, work gently to go around the perimeter of the phone and remove the midframe.

  6. LG Optimus Dynamic II L39C Screen Replacement, Disconnect the screen from the motherboard: 6 단계, 이미지 1/3 LG Optimus Dynamic II L39C Screen Replacement, Disconnect the screen from the motherboard: 6 단계, 이미지 2/3 LG Optimus Dynamic II L39C Screen Replacement, Disconnect the screen from the motherboard: 6 단계, 이미지 3/3
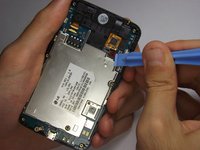
    • Use the plastic opening tool to disconnect the small orange tab from the motherboard.

    • Next disconnect the silver tab slightly above where the orange tab was.

  7. LG Optimus Dynamic II L39C Screen Replacement, Separate the screen and motherboard: 7 단계, 이미지 1/1
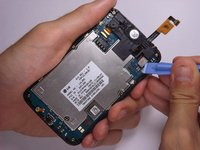
    • Gently feed the orange and silver tabbed ribbons through the hole in the motherboard and the screen will be free.

결론

To reassemble your device, follow these instructions in reverse order.

다른 6명이 해당 안내서를 완성하였습니다.

Patrick Barron

회원 가입일: 10/08/14

158 평판

안내서 1개 작성함

USF Tampa, Team 14-3, Leahy Fall 2014 USF Tampa, Team 14-3, Leahy Fall 2014 회원

USFT-LEAHY-F14S14G3

4 회원들

안내서 3개 작성하였습니다

댓글 한 개

My screen is black but everything else works (even the touch screen -- I can use it to answer calls). I used this guide to change the screens from a working phone - but my screen is still black! Anyone have any ideas?

Jack - 답글

댓글 쓰기

조회 통계:

24 시간 전: 0

7일 전: 0

30일 전: 2

전체 시간: 2,272