주요 콘텐츠로 건너뛰기

LG Refrigerator Water Inlet Valve Assembly Test and Replacement

필요한 것

  1. LG Refrigerator Water Inlet Valve Assembly Test and Replacement, Unplug your refrigerator: 1 단계, 이미지 1/1
    • Unplug your refrigerator before you begin your repair.
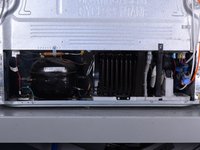
    • If you are testing or repairing the following items, you may also need to shut off and disconnect the water supply:

    • Condenser fan motor

    • Compressor motor and thermal overload device

    • Water supply valve assembly

  2. LG Refrigerator Water Inlet Valve Assembly Test and Replacement, Unfasten the condenser cover: 2 단계, 이미지 1/1
    • Use a Phillips screwdriver to remove the screws securing the condenser cover to the rear of the refrigerator.

  3. LG Refrigerator Water Inlet Valve Assembly Test and Replacement, Remove the condenser cover: 3 단계, 이미지 1/3 LG Refrigerator Water Inlet Valve Assembly Test and Replacement, Remove the condenser cover: 3 단계, 이미지 2/3 LG Refrigerator Water Inlet Valve Assembly Test and Replacement, Remove the condenser cover: 3 단계, 이미지 3/3
    • Tilt the top edge of the condenser cover toward you.

    • Lift and remove the condenser cover.

  4. LG Refrigerator Water Inlet Valve Assembly Test and Replacement, Disconnect the water inlet valve assembly: 4 단계, 이미지 1/3 LG Refrigerator Water Inlet Valve Assembly Test and Replacement, Disconnect the water inlet valve assembly: 4 단계, 이미지 2/3 LG Refrigerator Water Inlet Valve Assembly Test and Replacement, Disconnect the water inlet valve assembly: 4 단계, 이미지 3/3
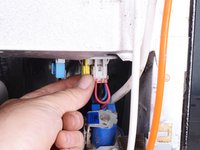
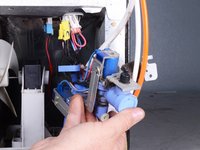
    • Squeeze and pull down the connectors for the valve assembly harness to disconnect them.

  5. LG Refrigerator Water Inlet Valve Assembly Test and Replacement, Reposition the water inlet valve assembly: 5 단계, 이미지 1/1
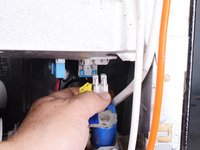
    • Use a Phillips screwdriver to remove the screw(s) securing the water inlet valve assembly.

  6. LG Refrigerator Water Inlet Valve Assembly Test and Replacement: 6 단계, 이미지 1/2 LG Refrigerator Water Inlet Valve Assembly Test and Replacement: 6 단계, 이미지 2/2
    • Pull the water inlet valve assembly out of the refrigerator for better access to electrical connections and water tubing connections.

    • Don't try to remove the inlet valve assembly completely because it is still attached by tubes and wires.

  7. LG Refrigerator Water Inlet Valve Assembly Test and Replacement, Disconnect the remaining electrical connection(s): 7 단계, 이미지 1/2 LG Refrigerator Water Inlet Valve Assembly Test and Replacement, Disconnect the remaining electrical connection(s): 7 단계, 이미지 2/2
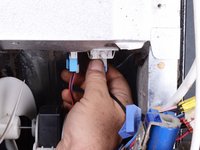
    • Squeeze and pull downward the remaining water inlet valve assembly connector(s) to disconnect it.

  8. LG Refrigerator Water Inlet Valve Assembly Test and Replacement, Disconnect the water tubing connections: 8 단계, 이미지 1/2 LG Refrigerator Water Inlet Valve Assembly Test and Replacement, Disconnect the water tubing connections: 8 단계, 이미지 2/2
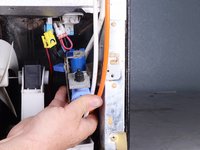
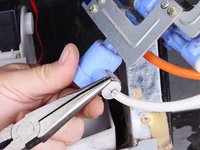
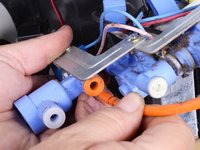
    • Use long nose pliers to pull and remove the locking clip from a tubing connector.

  9. LG Refrigerator Water Inlet Valve Assembly Test and Replacement: 9 단계, 이미지 1/3 LG Refrigerator Water Inlet Valve Assembly Test and Replacement: 9 단계, 이미지 2/3 LG Refrigerator Water Inlet Valve Assembly Test and Replacement: 9 단계, 이미지 3/3
    • Use your fingers to squeeze the flange surrounding the water tube toward the valve to release the tube.

    • While you squeeze the flange, pull the tubing straight out of the connector.

  10. LG Refrigerator Water Inlet Valve Assembly Test and Replacement, Remove the inlet valve assembly: 10 단계, 이미지 1/3 LG Refrigerator Water Inlet Valve Assembly Test and Replacement, Remove the inlet valve assembly: 10 단계, 이미지 2/3 LG Refrigerator Water Inlet Valve Assembly Test and Replacement, Remove the inlet valve assembly: 10 단계, 이미지 3/3
    • Repeat this procedure for the remaining tubes.

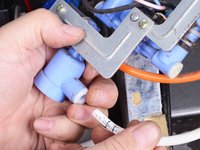
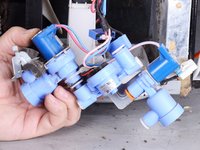
    • Remove the inlet valve assembly.

  11. LG Refrigerator Water Inlet Valve Assembly Test and Replacement, Test the inlet valve assembly: 11 단계, 이미지 1/3 LG Refrigerator Water Inlet Valve Assembly Test and Replacement, Test the inlet valve assembly: 11 단계, 이미지 2/3 LG Refrigerator Water Inlet Valve Assembly Test and Replacement, Test the inlet valve assembly: 11 단계, 이미지 3/3
    • If you have a multimeter, you can use it to test the inlet valve assembly components.

    • Set the multimeter to the ohm (Ω) setting.

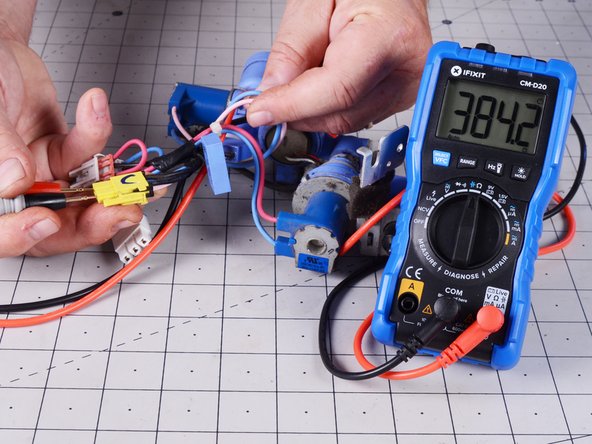
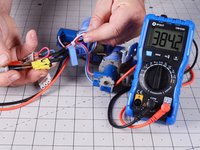
    • For the first solenoid, test the resistance between the wires from it at the connector.

    • The acceptable resistance is 360 to 420 Ω.

    • Repeat the test on the connector for the other solenoid.

    • The acceptable resistance is 360 to 420 Ω.

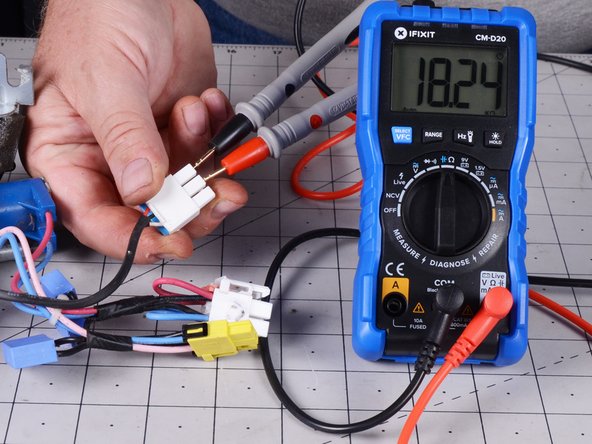
    • To test the flow meter, test the resistance between the wires from it at the connector.

    • The acceptable resistance is 4 kΩ to 30 kΩ.

결론

To reassemble your device, follow these instructions in reverse order.

Take your e-waste to an R2 or e-Stewards certified recycler.

Repair didn’t go as planned? Try some basic troubleshooting, or ask our  Answers community for help.

Bill Gilbert

회원 가입일: 06/30/22

30,088 평판

안내서 213개 작성하였습니다

iFixit iFixit 회원

Staff

136 회원들

안내서 17,410개 작성하였습니다

댓글 0개

댓글 쓰기

조회 통계:

24 시간 전: 6

7일 전: 26

30일 전: 166

전체 시간: 659