주요 콘텐츠로 건너뛰기

LG Stylo 3 Plus Motherboard Replacement

필요한 것

  1. LG Stylo 3 Plus Motherboard Replacement, Back Cover: 1 단계, 이미지 1/3 LG Stylo 3 Plus Motherboard Replacement, Back Cover: 1 단계, 이미지 2/3 LG Stylo 3 Plus Motherboard Replacement, Back Cover: 1 단계, 이미지 3/3
    • Power off the phone before beginning disassembly.

    • Place the phone face down.

    • Insert a fingernail or a plastic opening tool into the gap on the side of the phone.

    • Carefully slide your finger or the tool throughout the edge of the phone to ease the back case off.

  2. LG Stylo 3 Plus Motherboard Replacement, Battery: 2 단계, 이미지 1/3 LG Stylo 3 Plus Motherboard Replacement, Battery: 2 단계, 이미지 2/3 LG Stylo 3 Plus Motherboard Replacement, Battery: 2 단계, 이미지 3/3
    • Place the back cover off to the side.

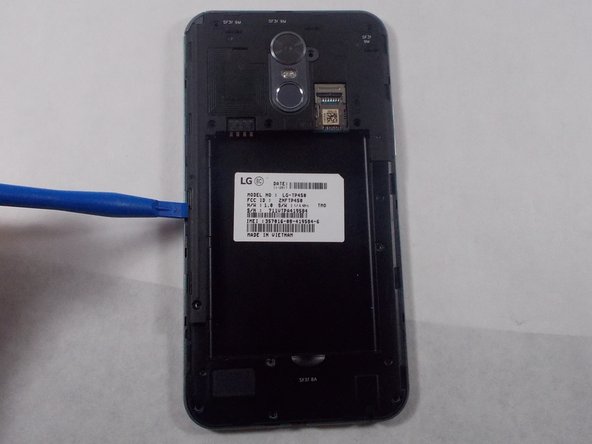
    • Insert the opening tool into the small gap below the battery.

    • Carefully pop the battery out to prevent damage.

  3. LG Stylo 3 Plus Motherboard Replacement, Rear Camera: 3 단계, 이미지 1/3 LG Stylo 3 Plus Motherboard Replacement, Rear Camera: 3 단계, 이미지 2/3 LG Stylo 3 Plus Motherboard Replacement, Rear Camera: 3 단계, 이미지 3/3
    • Remove the twelve 4mm screws using the Phillips #000 screwdriver.

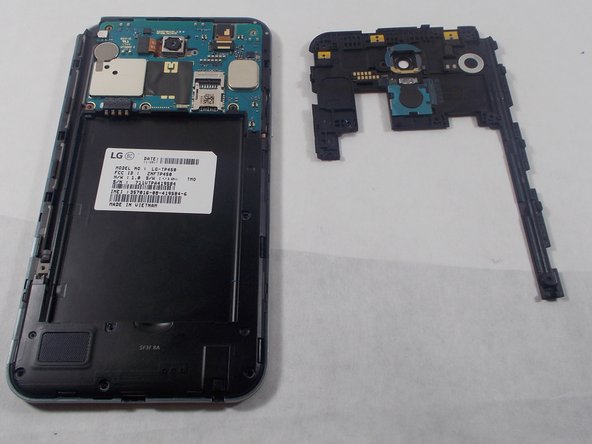
    • Use the plastic opening tool to remove the inner case.

    • Carefully remove the inner case.

  4. LG Stylo 3 Plus Motherboard Replacement: 4 단계, 이미지 1/2 LG Stylo 3 Plus Motherboard Replacement: 4 단계, 이미지 2/2
    • Use your fingernail or the plastic opening tool to flip the flex cable.

    • Use the precision tweezers to carefully grasp and pull out the camera.

  5. LG Stylo 3 Plus Motherboard Replacement, Front Camera: 5 단계, 이미지 1/2 LG Stylo 3 Plus Motherboard Replacement, Front Camera: 5 단계, 이미지 2/2
    • Carefully flip open the flex cable box with the plastic opening tool.

    • Using precision tweezers, carefully lift the front camera off the device.

  6. LG Stylo 3 Plus Motherboard Replacement, Motherboard: 6 단계, 이미지 1/3 LG Stylo 3 Plus Motherboard Replacement, Motherboard: 6 단계, 이미지 2/3 LG Stylo 3 Plus Motherboard Replacement, Motherboard: 6 단계, 이미지 3/3
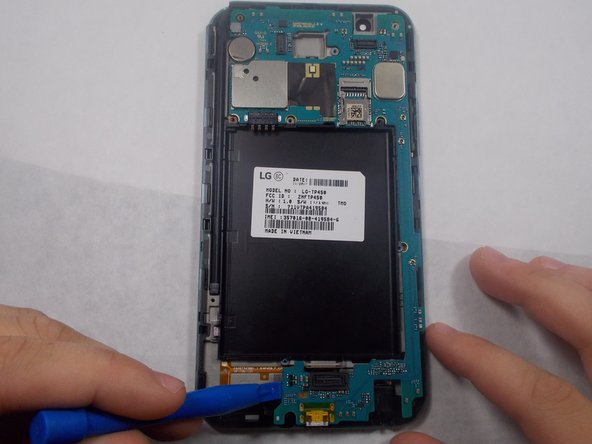
    • Gently flip open the flex cable box using a blue plastic opening tool.

    • Carefully remove the motherboard with your hands or a blue plastic opening tool.

    • Make sure all parts are secure while taking out motherboard.

결론

To reassemble your device, follow these instructions in reverse order.

다른 4명이 해당 안내서를 완성하였습니다.

Patricia Pires Dias

회원 가입일: 10/26/18

900 평판

안내서 5개 작성하였습니다

UMass Dartmouth, Team S2-G6, Peak Fall 2018 UMass Dartmouth, Team S2-G6, Peak Fall 2018 회원

UMASSD-PEAK-F18S2G6

3 회원들

안내서 15개 작성하였습니다

댓글 0개

댓글 쓰기

조회 통계:

24 시간 전: 0

7일 전: 1

30일 전: 8

전체 시간: 3,356