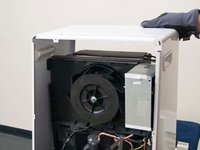
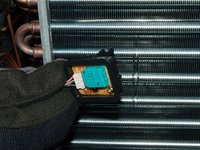
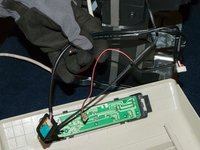
주요 콘텐츠로 건너뛰기

LG UD501KOJ5 Dehumidifier Sensor Replacement

필요한 것

  1. LG UD501KOJ5 Dehumidifier Sensor Replacement, Humidity Sensor: 1 단계, 이미지 1/2 LG UD501KOJ5 Dehumidifier Sensor Replacement, Humidity Sensor: 1 단계, 이미지 2/2
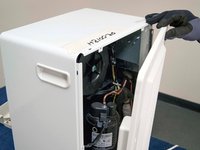
    • Unplug the dehumidifier then put on work gloves to protect your hands.

    • Remove the water collection bucket and set it aside.

    • Remove the air filter from the bottom of the front grille.

  2. LG UD501KOJ5 Dehumidifier Sensor Replacement: 2 단계, 이미지 1/2 LG UD501KOJ5 Dehumidifier Sensor Replacement: 2 단계, 이미지 2/2
    • Using your Phillips #0 screwdriver, remove the two screws which are attached at the bottom of the front grille.

    • Lift the front grille up and off the front of the frame, carefully set it in front of the dehumidifier.

    • The control board wire harness is still attached to the back of the front grille.

  3. LG UD501KOJ5 Dehumidifier Sensor Replacement: 3 단계, 이미지 1/3 LG UD501KOJ5 Dehumidifier Sensor Replacement: 3 단계, 이미지 2/3 LG UD501KOJ5 Dehumidifier Sensor Replacement: 3 단계, 이미지 3/3
    • Remove the screws that secure the back panel to the dehumidifier.

    • Carefully remove the back panel from the dehumidifier.

    • Remove the screws at the side.

  4. LG UD501KOJ5 Dehumidifier Sensor Replacement: 4 단계, 이미지 1/3 LG UD501KOJ5 Dehumidifier Sensor Replacement: 4 단계, 이미지 2/3 LG UD501KOJ5 Dehumidifier Sensor Replacement: 4 단계, 이미지 3/3
    • Remove the screws located at both sides of the back panel.

    • Remove the screws on the top left and top right which are connected to the control box.

    • Carefully remove the outer case.

  5. LG UD501KOJ5 Dehumidifier Sensor Replacement: 5 단계, 이미지 1/3 LG UD501KOJ5 Dehumidifier Sensor Replacement: 5 단계, 이미지 2/3 LG UD501KOJ5 Dehumidifier Sensor Replacement: 5 단계, 이미지 3/3
    • Disconnect the sensor wire harness from the electronic control board.

    • Disconnect the wire harness from the collection bucket float switch.

    • Pull the evaporator thermistor out of the copper sleeve on the side of the evaporator coil.

  6. LG UD501KOJ5 Dehumidifier Sensor Replacement: 6 단계, 이미지 1/2 LG UD501KOJ5 Dehumidifier Sensor Replacement: 6 단계, 이미지 2/2
    • Remove the humidity sensor from the evaporator fins.

    • Pull the sensor assembly out of the dehumidifier.

    • Remove any dust build-up with a dry cloth.

    • Push the new humidity sensor in place on the front of the evaporator fins.

결론

To reassemble your device, follow these instructions in reverse order.

Gabrielle Campbell

회원 가입일: 05/12/21

133 평판

안내서 1개 작성함

York University, Team S1-G3, O'Regan Summer 2021 York University, Team S1-G3, O'Regan Summer 2021 회원

YORK-O'REGAN-SU21S1G3

1 회원

안내서 1개 작성하였습니다

댓글 한 개

댓글 쓰기

조회 통계:

24 시간 전: 1

7일 전: 11

30일 전: 35

전체 시간: 1,851