주요 콘텐츠로 건너뛰기

LG Voyager Antenna Replacement

필요한 것

  1. LG Voyager Antenna Replacement, Battery: 1 단계, 이미지 1/1
    • Turn over the phone so the front screen is facing down and the back side is up.

  2. LG Voyager Antenna Replacement: 2 단계, 이미지 1/1
    • Pull down on the button at the bottom of the phone. The battery will pop up and can then be safely removed.

  3. LG Voyager Antenna Replacement: 3 단계, 이미지 1/1
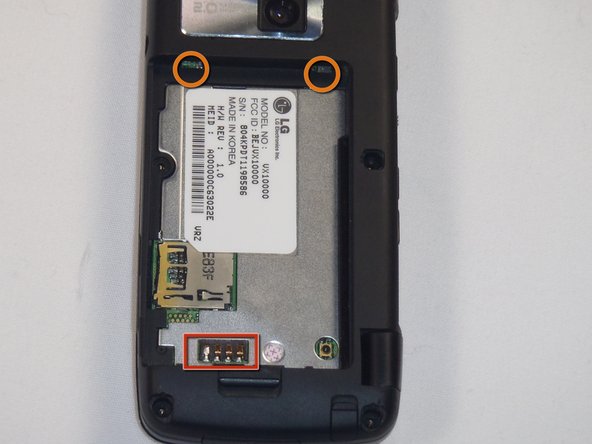
    • To install the new battery, position the battery so that the three small metal contacts of the battery are facing the three metal contacts of the phone

    • Insert the top of the battery, with the two plastic tabs, into their respective holes in the top

    • Then press down on the bottom of the battery and it should snap into place

  4. LG Voyager Antenna Replacement, Antenna: 4 단계, 이미지 1/1
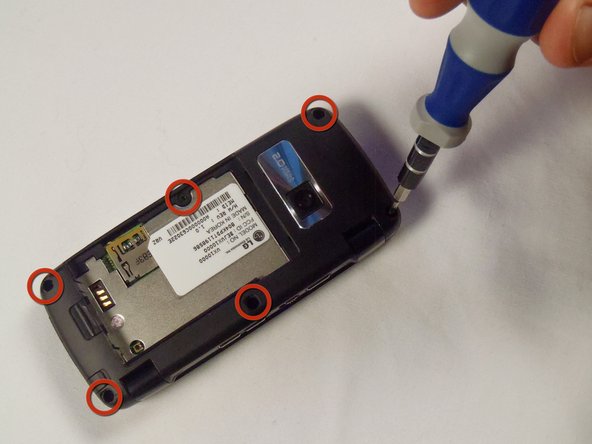
    • First remove the battery by pulling the tab away from the device

    • Next remove the 5 rubber modules by gently prying underneath them. This will expose the screws underneath

  5. LG Voyager Antenna Replacement: 5 단계, 이미지 1/2 LG Voyager Antenna Replacement: 5 단계, 이미지 2/2
    • Next remove the 6 #00 Phillips screws holding the back in place

    • screws: 1.43mm head, 3.61mm length

  6. LG Voyager Antenna Replacement: 6 단계, 이미지 1/3 LG Voyager Antenna Replacement: 6 단계, 이미지 2/3 LG Voyager Antenna Replacement: 6 단계, 이미지 3/3
    • Now, slide a plastic opening tool in between the two plastic pieces that form the outside of the back case

    • Gently work the plastic opening tool around the edge of the case to separate the two pieces

    • Once the case has been separated you should be able to see the circuitry inside the phone

  7. LG Voyager Antenna Replacement: 7 단계, 이미지 1/3 LG Voyager Antenna Replacement: 7 단계, 이미지 2/3 LG Voyager Antenna Replacement: 7 단계, 이미지 3/3
    • Remove the #00 Philips screw holding the antenna in place

    • Screw: 4.52mm length, 2.68mm head

    • Once the screw is removed, lift the small case around the antenna off

  8. LG Voyager Antenna Replacement: 8 단계, 이미지 1/2 LG Voyager Antenna Replacement: 8 단계, 이미지 2/2
    • Now that you have the antenna exposed, you can remove it

결론

To reassemble your device, follow these instructions in reverse order.

다른 한 분이 해당 안내서를 완성하였습니다.

Paul Heckler II

회원 가입일: 04/12/12

40 평판

안내서 1개 작성함

Cal Poly, Team 17-26, Amido Spring 2012 Cal Poly, Team 17-26, Amido Spring 2012 회원

CPSU-AMIDO-S12S17G26

4 회원들

안내서 4개 작성하였습니다

댓글 0개

댓글 쓰기

조회 통계:

24 시간 전: 0

7일 전: 2

30일 전: 3

전체 시간: 291