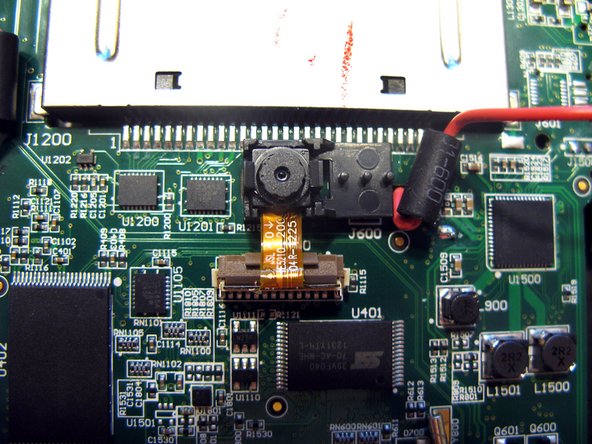
주요 콘텐츠로 건너뛰기

LeapFrog LeapPad2 Explorer Back Camera Replacement

필요한 것

  1. LeapFrog LeapPad2 Explorer Back Camera Replacement, Battery: 1 단계, 이미지 1/2 LeapFrog LeapPad2 Explorer Back Camera Replacement, Battery: 1 단계, 이미지 2/2
    • Before disassembling your LeapPad, ensure your device is shut off.

    • Push outward on the plastic side panels to remove and reveal battery.

    • The panels should detach fully from the main device.

  2. LeapFrog LeapPad2 Explorer Back Camera Replacement: 2 단계, 이미지 1/3 LeapFrog LeapPad2 Explorer Back Camera Replacement: 2 단계, 이미지 2/3 LeapFrog LeapPad2 Explorer Back Camera Replacement: 2 단계, 이미지 3/3
    • Push down from the positive end of the battery towards the negative end to pry the battery up out of its dispenser.

    • Remove all four AA alkaline batteries from the device.

  3. LeapFrog LeapPad2 Explorer Back Camera Replacement, Back Cover: 3 단계, 이미지 1/2 LeapFrog LeapPad2 Explorer Back Camera Replacement, Back Cover: 3 단계, 이미지 2/2
    • This step will void your device warranty.

    • Remove the following screws securing the back cover to the main device:

    • Two 10.0 mm Phillips screws

    • Four 4.0 mm Phillips screws

    • Three 3.0 mm Phillips screws

  4. LeapFrog LeapPad2 Explorer Back Camera Replacement: 4 단계, 이미지 1/3 LeapFrog LeapPad2 Explorer Back Camera Replacement: 4 단계, 이미지 2/3 LeapFrog LeapPad2 Explorer Back Camera Replacement: 4 단계, 이미지 3/3
    • Insert a plastic opening tool into the seam between the front and rear covers to detach the back cover from the rest of the device.

    • Move the plastic opening tool around the perimeter of the LeapPad2.

    • Lift up and remove the rear case from the tablet.

    • A butter knife can help when prying the device.

  5. LeapFrog LeapPad2 Explorer Back Camera Replacement, Back Camera: 5 단계, 이미지 1/2 LeapFrog LeapPad2 Explorer Back Camera Replacement, Back Camera: 5 단계, 이미지 2/2
    • Locate the back camera below the game cartridge.

  6. LeapFrog LeapPad2 Explorer Back Camera Replacement: 6 단계, 이미지 1/2 LeapFrog LeapPad2 Explorer Back Camera Replacement: 6 단계, 이미지 2/2
    • To safely remove the ribbon cable, first you must pull up the retaining flap.

    • Removing or reinserting the cable by brute force can damage it.

  7. LeapFrog LeapPad2 Explorer Back Camera Replacement: 7 단계, 이미지 1/2 LeapFrog LeapPad2 Explorer Back Camera Replacement: 7 단계, 이미지 2/2
    • Pull up using a thin plastic tool to disconnect the ribbon connecting the camera to the motherboard.

  8. LeapFrog LeapPad2 Explorer Back Camera Replacement: 8 단계, 이미지 1/1
    • Gently remove the back camera from your motherboard by pushing the black casing away from the camera.

결론

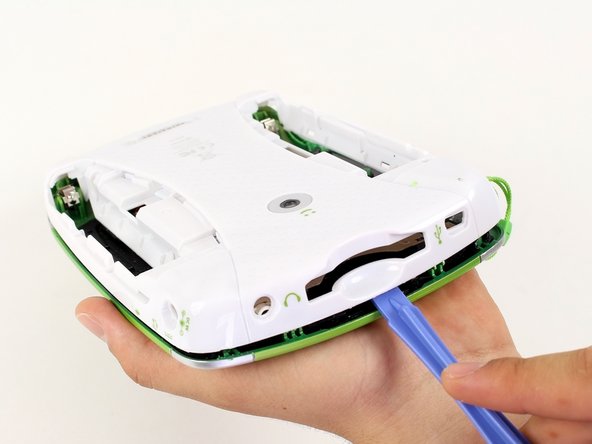
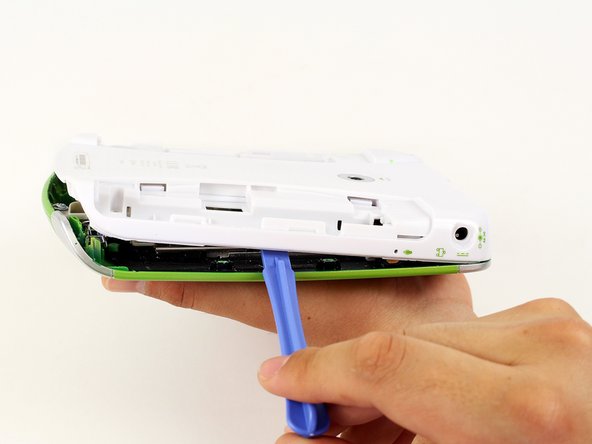
To reassemble your device, follow these instructions in reverse order.

Nupur Garg

회원 가입일: 04/12/14

867 평판

안내서 7개 작성하였습니다

Cal Poly, Team 8-10, Regan Spring 2014 Cal Poly, Team 8-10, Regan Spring 2014 회원

CPSU-REGAN-S14S8G10

4 회원들

안내서 16개 작성하였습니다

댓글 0개

댓글 쓰기

조회 통계:

24 시간 전: 0

7일 전: 0

30일 전: 1

전체 시간: 1,180