주요 콘텐츠로 건너뛰기

Lenovo G50-80 80E5 Power Supply Jack Replacement

필요한 것

  1. Lenovo G50-80 80E5 Power Supply Jack Replacement, Battery: 1 단계, 이미지 1/1
    • Place laptop on a flat surface with the back cover facing up and the hinges facing you.

  2. Lenovo G50-80 80E5 Power Supply Jack Replacement: 2 단계, 이미지 1/3 Lenovo G50-80 80E5 Power Supply Jack Replacement: 2 단계, 이미지 2/3 Lenovo G50-80 80E5 Power Supply Jack Replacement: 2 단계, 이미지 3/3
    • Slide the tab positioned on the right side to the right.

    • You will know this has been done correctly when you can see the red surface beneath the tab.

  3. Lenovo G50-80 80E5 Power Supply Jack Replacement: 3 단계, 이미지 1/3 Lenovo G50-80 80E5 Power Supply Jack Replacement: 3 단계, 이미지 2/3 Lenovo G50-80 80E5 Power Supply Jack Replacement: 3 단계, 이미지 3/3
    • Move the left tab to the left to release the battery.

    • You will hear an audible 'click' and see the battery separate from the rest of the laptop.

  4. Lenovo G50-80 80E5 Power Supply Jack Replacement: 4 단계, 이미지 1/3 Lenovo G50-80 80E5 Power Supply Jack Replacement: 4 단계, 이미지 2/3 Lenovo G50-80 80E5 Power Supply Jack Replacement: 4 단계, 이미지 3/3
    • Hold the battery at the top seam between it and the laptop.

    • Roll the battery towards yourself.

    • Lift the battery out of the laptop.

  5. Lenovo G50-80 80E5 Power Supply Jack Replacement, Bottom Access Panel: 5 단계, 이미지 1/2 Lenovo G50-80 80E5 Power Supply Jack Replacement, Bottom Access Panel: 5 단계, 이미지 2/2
    • Remove the three screws securing the outer cover of the laptop using a Phillips #0 screwdriver.

  6. Lenovo G50-80 80E5 Power Supply Jack Replacement: 6 단계, 이미지 1/2 Lenovo G50-80 80E5 Power Supply Jack Replacement: 6 단계, 이미지 2/2
    • Slide the cover away from the hinges and lift the panel off.

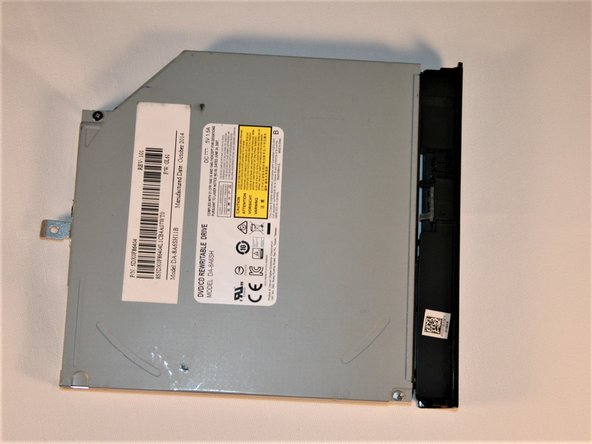
  7. Lenovo G50-80 80E5 Power Supply Jack Replacement, CD Drive: 7 단계, 이미지 1/2 Lenovo G50-80 80E5 Power Supply Jack Replacement, CD Drive: 7 단계, 이미지 2/2
    • Locate the CD drive.

    • Remove the single #00 Phillips 5.5 mm screw on the centermost side of the drive.

  8. Lenovo G50-80 80E5 Power Supply Jack Replacement: 8 단계, 이미지 1/2 Lenovo G50-80 80E5 Power Supply Jack Replacement: 8 단계, 이미지 2/2
    • Move the drive towards the outside of the laptop to remove the connector.

    • Pull the drive out of the laptop.

  9. Lenovo G50-80 80E5 Power Supply Jack Replacement, Keyboard: 9 단계, 이미지 1/3 Lenovo G50-80 80E5 Power Supply Jack Replacement, Keyboard: 9 단계, 이미지 2/3 Lenovo G50-80 80E5 Power Supply Jack Replacement, Keyboard: 9 단계, 이미지 3/3
    • Locate the 3 screws on the bottom, securing the keyboard.

    • One Screw will be located under Lenovo sticker. Break sticker to gain access to screw.

  10. Lenovo G50-80 80E5 Power Supply Jack Replacement: 10 단계, 이미지 1/1
    • Starting on side, gently pry up using spudge.

  11. Lenovo G50-80 80E5 Power Supply Jack Replacement: 11 단계, 이미지 1/2 Lenovo G50-80 80E5 Power Supply Jack Replacement: 11 단계, 이미지 2/2
    • Continue prying around top of keyboard

  12. Lenovo G50-80 80E5 Power Supply Jack Replacement: 12 단계, 이미지 1/1
    • Once the top of keyboard is loose, gently lift up

  13. Lenovo G50-80 80E5 Power Supply Jack Replacement: 13 단계, 이미지 1/1
    • lift up bottom of keyboard slightly, to access keyboard ribbon

  14. Lenovo G50-80 80E5 Power Supply Jack Replacement: 14 단계, 이미지 1/1
    • Using tweezers, lift up clip to remove keyboard ribbon cable.

  15. Lenovo G50-80 80E5 Power Supply Jack Replacement: 15 단계, 이미지 1/2 Lenovo G50-80 80E5 Power Supply Jack Replacement: 15 단계, 이미지 2/2
    • Keyboard ribbon cable removed

    • Once ribbon is removed, keyboard can be lifted out

  16. Lenovo G50-80 80E5 Power Supply Jack Replacement, Removing top panel: 16 단계, 이미지 1/1
    • Remove wifi wires by lifting up

  17. Lenovo G50-80 80E5 Power Supply Jack Replacement: 17 단계, 이미지 1/1
    • locate power and monitor cable on bottom side next to fan

  18. Lenovo G50-80 80E5 Power Supply Jack Replacement: 18 단계, 이미지 1/1
    • remove power cable with tweezers by gently pullying

  19. Lenovo G50-80 80E5 Power Supply Jack Replacement: 19 단계, 이미지 1/1
    • remove monitor cable by gently pulling on tab straight up

  20. Lenovo G50-80 80E5 Power Supply Jack Replacement: 20 단계, 이미지 1/1
    • Monitor and power cable disconnected

  21. Lenovo G50-80 80E5 Power Supply Jack Replacement: 21 단계, 이미지 1/1
    • Disconnect the fan wires from the motherboard by lifting upwards

  22. Lenovo G50-80 80E5 Power Supply Jack Replacement: 22 단계, 이미지 1/3 Lenovo G50-80 80E5 Power Supply Jack Replacement: 22 단계, 이미지 2/3 Lenovo G50-80 80E5 Power Supply Jack Replacement: 22 단계, 이미지 3/3
    • Locate the 3 screws holding fan in place

    • Remove 3 screws

    • fan should lift out of place

  23. Lenovo G50-80 80E5 Power Supply Jack Replacement: 23 단계, 이미지 1/1
    • lift clip to remove ribbon cable for think pad.

  24. Lenovo G50-80 80E5 Power Supply Jack Replacement: 24 단계, 이미지 1/2 Lenovo G50-80 80E5 Power Supply Jack Replacement: 24 단계, 이미지 2/2
    • lift clip to remove power button ribbon cable.

  25. Lenovo G50-80 80E5 Power Supply Jack Replacement: 25 단계, 이미지 1/1
    • Begin by locating screws on bottom panel

  26. Lenovo G50-80 80E5 Power Supply Jack Replacement: 26 단계, 이미지 1/1
    • Remove screws using a 001 phillips screw driver.

  27. Lenovo G50-80 80E5 Power Supply Jack Replacement: 27 단계, 이미지 1/3 Lenovo G50-80 80E5 Power Supply Jack Replacement: 27 단계, 이미지 2/3 Lenovo G50-80 80E5 Power Supply Jack Replacement: 27 단계, 이미지 3/3
    • Once screws are removed, begin by gently prying up in one corner using a spudge

    • Continue to center and then around to opposite side.

    • once all sides have been pried open, lift top half off

  28. Lenovo G50-80 80E5 Power Supply Jack Replacement: 28 단계, 이미지 1/1
    • Top covered removed

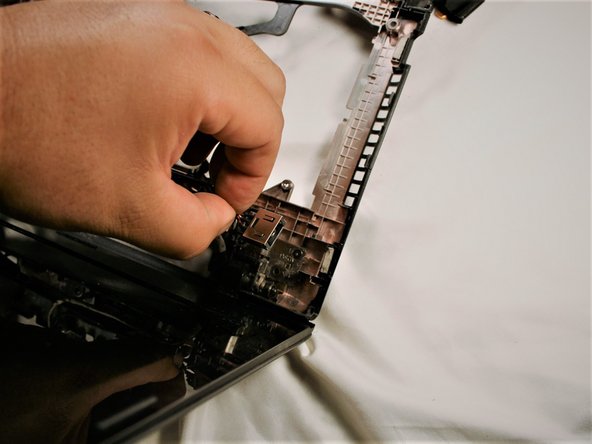
  29. Lenovo G50-80 80E5 Power Supply Jack Replacement, Power Supply Jack: 29 단계, 이미지 1/2 Lenovo G50-80 80E5 Power Supply Jack Replacement, Power Supply Jack: 29 단계, 이미지 2/2
    • lift up power jack and remove from holding tabs

  30. Lenovo G50-80 80E5 Power Supply Jack Replacement: 30 단계, 이미지 1/1
    • power jack removed

결론

To reassemble your device, follow these instructions in reverse order.

다른 11명이 해당 안내서를 완성하였습니다.

Victor

회원 가입일: 10/17/17

1,282 평판

안내서 4개 작성하였습니다

UMass Dartmouth, Team S1-G6, Simcock Fall 2017 UMass Dartmouth, Team S1-G6, Simcock Fall 2017 회원

UMASSD-SIMCOCK-F17S1G6

4 회원들

안내서 10개 작성하였습니다

댓글 4개

TY TY fixed myself for 7$

manx_44709 - 답글

Should the new Power Jack look exactly the same as the manufacturer one? My original Power Jack has prongs but the new one does not and the laptop will not power on.

gifts.fromgod - 답글

Does this require soldering as well ?

Explorer Gurus - 답글

I would not rate this as a difficult task and I managed to complete the dismantle and reassemble within the 45 Minutes, Overall a pretty good description. The hardest bit was reattaching the wifi wires. I found I did not need tweezers and used a small electrical flat head instead of a spudge. No soldering or other tools. Having bought a new battery and charger (circa $50) the replacement part ($5) and this guide solved the issue. @gifts.fromgod my part was not identical (colour and size of the mid wire join) but fitted more or less and works a charm.

Stephen Connell - 답글

댓글 쓰기

조회 통계:

24 시간 전: 0

7일 전: 7

30일 전: 21

전체 시간: 9,053