주요 콘텐츠로 건너뛰기

Lenovo IdeaCentre AIO 510S-23ISU WiFi Card Replacement

필요한 것

  1. Lenovo IdeaCentre AIO 510S-23ISU WiFi Card Replacement, Stand Base: 1 단계, 이미지 1/1
    • Turn off the computer, unplug all cables, and let it cool down. Lay the computer flat on its screen.

    • Make sure that the work surface is flat and has nothing sharp on it.

  2. Lenovo IdeaCentre AIO 510S-23ISU WiFi Card Replacement: 2 단계, 이미지 1/2 Lenovo IdeaCentre AIO 510S-23ISU WiFi Card Replacement: 2 단계, 이미지 2/2
    • Remove the monitor stand screw in the bottom of the stand, and remove the stand completely.

  3. Lenovo IdeaCentre AIO 510S-23ISU WiFi Card Replacement, Back Cover: 3 단계, 이미지 1/1
    • Remove the two screws on the bottom of the computer, one on each side.

  4. Lenovo IdeaCentre AIO 510S-23ISU WiFi Card Replacement: 4 단계, 이미지 1/3 Lenovo IdeaCentre AIO 510S-23ISU WiFi Card Replacement: 4 단계, 이미지 2/3 Lenovo IdeaCentre AIO 510S-23ISU WiFi Card Replacement: 4 단계, 이미지 3/3
    • Locate the slot on the right side of the computer next to the screw hole. Use a plastic opening tool or spudger to pry off the rear cover. (Don’t be afraid to use a little force.)

  5. Lenovo IdeaCentre AIO 510S-23ISU WiFi Card Replacement: 5 단계, 이미지 1/2 Lenovo IdeaCentre AIO 510S-23ISU WiFi Card Replacement: 5 단계, 이미지 2/2
    • Once it has been separated, lift to remove.

  6. Lenovo IdeaCentre AIO 510S-23ISU WiFi Card Replacement, Arm Stand: 6 단계, 이미지 1/2 Lenovo IdeaCentre AIO 510S-23ISU WiFi Card Replacement, Arm Stand: 6 단계, 이미지 2/2
    • Remove the four screws that secure the arm stand.

  7. Lenovo IdeaCentre AIO 510S-23ISU WiFi Card Replacement: 7 단계, 이미지 1/2 Lenovo IdeaCentre AIO 510S-23ISU WiFi Card Replacement: 7 단계, 이미지 2/2
    • Lift up to remove the arm stand.

  8. Lenovo IdeaCentre AIO 510S-23ISU WiFi Card Replacement, EMI Cover: 8 단계, 이미지 1/3 Lenovo IdeaCentre AIO 510S-23ISU WiFi Card Replacement, EMI Cover: 8 단계, 이미지 2/3 Lenovo IdeaCentre AIO 510S-23ISU WiFi Card Replacement, EMI Cover: 8 단계, 이미지 3/3
    • Remove the 5 screws that secure the EMI cover.

    • Remove the cover.

  9. Lenovo IdeaCentre AIO 510S-23ISU WiFi Card Replacement, WiFi Card: 9 단계, 이미지 1/2 Lenovo IdeaCentre AIO 510S-23ISU WiFi Card Replacement, WiFi Card: 9 단계, 이미지 2/2
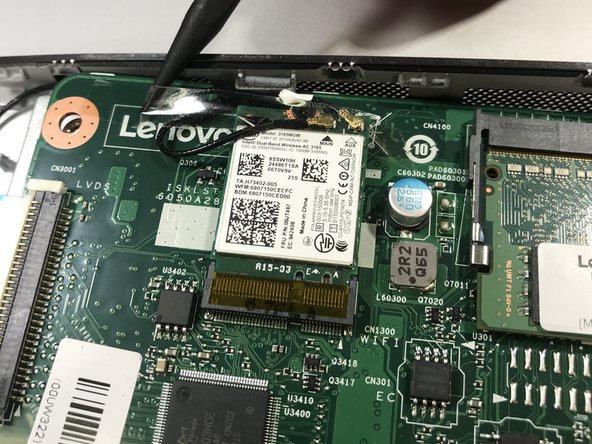
    • Remove any tape that secures the WiFi antenna cables.

  10. Lenovo IdeaCentre AIO 510S-23ISU WiFi Card Replacement: 10 단계, 이미지 1/2 Lenovo IdeaCentre AIO 510S-23ISU WiFi Card Replacement: 10 단계, 이미지 2/2
    • Remove the single screw that secures that WiFi card to the motherboard.

  11. Lenovo IdeaCentre AIO 510S-23ISU WiFi Card Replacement: 11 단계, 이미지 1/2 Lenovo IdeaCentre AIO 510S-23ISU WiFi Card Replacement: 11 단계, 이미지 2/2
    • Lift the wifi card and then pull out the card.

  12. Lenovo IdeaCentre AIO 510S-23ISU WiFi Card Replacement: 12 단계, 이미지 1/1
    • Locate the two small cables connected to the wifi card and pull gently to disconnect them.

결론

To reassemble your device, follow these instructions in reverse order.

다른 2명이 해당 안내서를 완성하였습니다.

Jackson Blake

회원 가입일: 01/22/18

1,119 평판

안내서 9개 작성하였습니다

Cal Poly, Team S16-G3, Banghart Winter 2018 Cal Poly, Team S16-G3, Banghart Winter 2018 회원

CPSU-BANGHART-W18S16G3

4 회원들

안내서 9개 작성하였습니다

댓글 0개

댓글 쓰기

조회 통계:

24 시간 전: 1

7일 전: 1

30일 전: 23

전체 시간: 1,552