주요 콘텐츠로 건너뛰기

Lenovo IdeaPad 110-15ISK Cooling Fan Replacement

필요한 것

  1. Lenovo IdeaPad 110-15ISK Cooling Fan Replacement, Keyboard: 1 단계, 이미지 1/1
    • Flip the IdeaPad bottom side up.

    • Using a Phillips #1 screwdriver, remove the two 6.0mm screws on the back panel, that hold the keyboard.

    • Flip the computer back to top facing.

  2. Lenovo IdeaPad 110-15ISK Cooling Fan Replacement: 2 단계, 이미지 1/1
    • Open the lid.

    • Use the plastic opening tool to pry the keyboard up and away from the bottom assembly.

  3. Lenovo IdeaPad 110-15ISK Cooling Fan Replacement: 3 단계, 이미지 1/1
    • Next disconnect the keyboard cable by using the tip of the spudger or your finger to lightly push out the ribbon from the contact port.

    • Completely remove the keyboard from the bottom assembly.

    • Unlock the ZIF conector before pulling the cable out

  4. Lenovo IdeaPad 110-15ISK Cooling Fan Replacement, Optical Drive: 5 단계, 이미지 1/1
    • Using a Phillips #1 screwdriver, unscrew the one 5.0mm screw on the back panel.

  5. Lenovo IdeaPad 110-15ISK Cooling Fan Replacement: 6 단계, 이미지 1/1
    • Flip the laptop to its back and the optical drive is located at the top left corner.

    • Remove the optical CD DVD drive by lightly pulling it out of the assembly.

  6. Lenovo IdeaPad 110-15ISK Cooling Fan Replacement, Upper Case: 7 단계, 이미지 1/1
    • Place the laptop bottom facing up.

    • Using a Phillips #1 screwdriver, remove the remaining eight 6.0mm screws on the back panel.

    • Flip the computer back to top facing.

  7. Lenovo IdeaPad 110-15ISK Cooling Fan Replacement: 8 단계, 이미지 1/1
    • Separate the top case from the bottom using a plastic opening tool.

    • Continue prying the top and bottom case from each other all around the perimeter of the laptop.

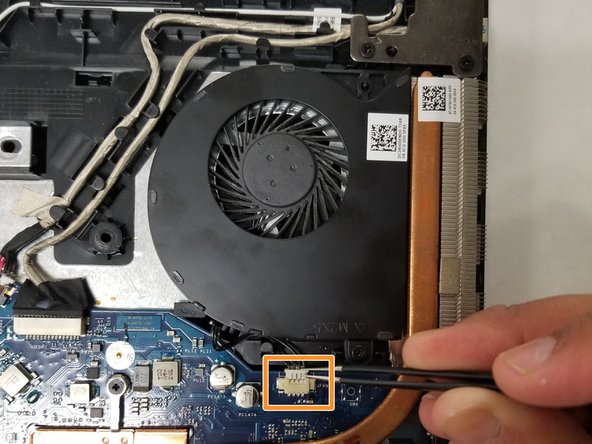
  8. Lenovo IdeaPad 110-15ISK Cooling Fan Replacement, Cooling Fan: 9 단계, 이미지 1/2 Lenovo IdeaPad 110-15ISK Cooling Fan Replacement, Cooling Fan: 9 단계, 이미지 2/2
    • On the back panel, the cooling fan is located at the top right.

    • Unscrew the 6.0mm screw using the Phillips #1 screwdriver.

    • Push the plastic piece towards the direction the wires are in with the tweezers to completely disconnect it from the back panel.

결론

To reassemble your device, follow these instructions in reverse order.

다른 한 분이 해당 안내서를 완성하였습니다.

Jakub Szark

회원 가입일: 10/17/18

513 평판

안내서 5개 작성하였습니다

UW Tacoma, Team S1-G5, Rose Fall 2018 UW Tacoma, Team S1-G5, Rose Fall 2018 회원

UWT-ROSE-F18S1G5

4 회원들

안내서 39개 작성하였습니다

댓글 0개

댓글 쓰기

조회 통계:

24 시간 전: 0

7일 전: 2

30일 전: 16

전체 시간: 1,660