주요 콘텐츠로 건너뛰기

Lenovo IdeaPad 110-15ISK Hard Drive Replacement

필요한 것

  1. Lenovo IdeaPad 110-15ISK Hard Drive Replacement, Back Keyboard Screws: 1 단계, 이미지 1/1
    • Remove the two keyboard screws on the back of the device(the two on the same row)

  2. Lenovo IdeaPad 110-15ISK Hard Drive Replacement, Remove the Keyboard: 2 단계, 이미지 1/1
    • Insert a prying tool in the crack between the keyboard and frame. Start by the power button and go all the way round the keyboard.

  3. Lenovo IdeaPad 110-15ISK Hard Drive Replacement, Keyboard Ribbon Cable: 3 단계, 이미지 1/1
    • Remover the ribbon cable and remove the keyboard afterward.

  4. Lenovo IdeaPad 110-15ISK Hard Drive Replacement, Under Keyboard: 4 단계, 이미지 1/1
    • After the keyboard is removed, remove the screw and the battery connector.

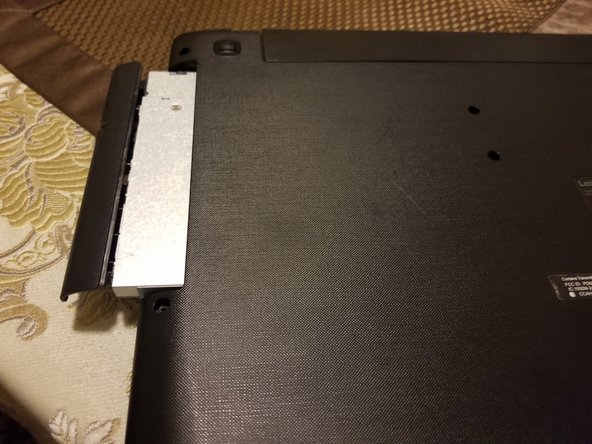
  5. Lenovo IdeaPad 110-15ISK Hard Drive Replacement, Disk Drive: 5 단계, 이미지 1/1
    • Remove the screw that is under the two keyboard screws and pull the disk drive out.

  6. Lenovo IdeaPad 110-15ISK Hard Drive Replacement, Outer Screws: 6 단계, 이미지 1/1
    • Remove all of the screws on the outside edge of the bottom.

  7. Lenovo IdeaPad 110-15ISK Hard Drive Replacement, Separating the Case: 7 단계, 이미지 1/1
    • Flip the laptop over and in the crack between the two case pieces slide a prying tool in between and follow the perimeter until the two pieces are separated.

  8. Lenovo IdeaPad 110-15ISK Hard Drive Replacement, Drive Bay: 8 단계, 이미지 1/1
    • Remove the four screws securing the drive bay into the case.

  9. Lenovo IdeaPad 110-15ISK Hard Drive Replacement, Removing the Drive: 9 단계, 이미지 1/1
    • Remove the four screws the hold the metal cage onto the drive to separate them.

결론

To reassemble your device, follow these instructions in reverse order.

다른 한 분이 해당 안내서를 완성하였습니다.

Stuart Luhigo

회원 가입일: 11/20/18

169 평판

안내서 1개 작성함

댓글 0개

댓글 쓰기

조회 통계:

24 시간 전: 2

7일 전: 4

30일 전: 8

전체 시간: 513