주요 콘텐츠로 건너뛰기

Lenovo IdeaPad S340-15IWL Keyboard Replacement

필요한 것

  1. Lenovo IdeaPad S340-15IWL Keyboard Replacement, Back Panel: 1 단계, 이미지 1/2 Lenovo IdeaPad S340-15IWL Keyboard Replacement, Back Panel: 1 단계, 이미지 2/2
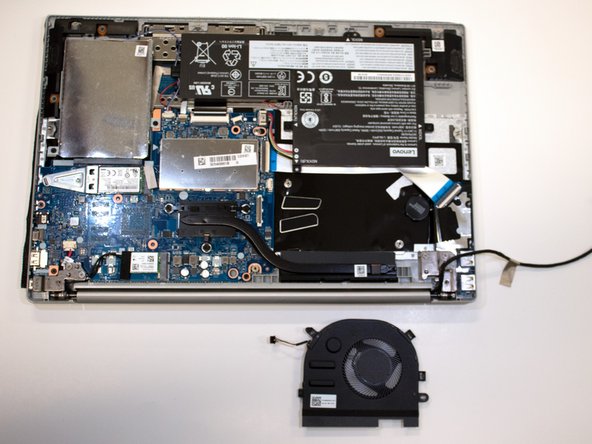
    • Power off the laptop and place it face-down on a non-scratching surface.

    • Using a Torx T5 screwdriver head, remove all ten 6 mm screws holding the back panel in place.

  2. Lenovo IdeaPad S340-15IWL Keyboard Replacement: 2 단계, 이미지 1/1
    • Slide a plastic opening tool underneath the back case near the screen hinges.

    • Gently pry up on either side of the case.

    • You may hear popping sounds as you pry up the back case. This is normal. If the case does not open, try prying at a different angle/position.

  3. Lenovo IdeaPad S340-15IWL Keyboard Replacement, Battery: 3 단계, 이미지 1/2 Lenovo IdeaPad S340-15IWL Keyboard Replacement, Battery: 3 단계, 이미지 2/2
    • Disconnect the battery cable by gently pulling it straight out of the connector.

    • Be sure to pull parallel to the device to avoid bending the motherboard connector.

    • The battery connector does not lock and only requires light pressure to insert and remove.

    • Remove the battery from the laptop.

  4. Lenovo IdeaPad S340-15IWL Keyboard Replacement, Fan: 4 단계, 이미지 1/1
    • Remove the two 3 mm screws connecting the fan to the casing using a Phillips #0 screwdriver.

  5. Lenovo IdeaPad S340-15IWL Keyboard Replacement: 5 단계, 이미지 1/2 Lenovo IdeaPad S340-15IWL Keyboard Replacement: 5 단계, 이미지 2/2
    • Using a spudger, gently disconnect the fan's cable from the motherboard.

  6. Lenovo IdeaPad S340-15IWL Keyboard Replacement: 6 단계, 이미지 1/1
    • Carefully unwind the black cable that runs between the top of the battery and the bottom of the fan from the grooves along the side of the fan.

    • In order to do so, you will need to pull up the metallic tape that holds the cable in place using either your fingers or a plastic prying tool to lift up the edge.

    • If you attempt to remove the device’s fan without removing the battery, the black cable may be wedged underneath the top of the battery. In this scenario, it is recommended that you at least loosen the screws holding the battery in place to allow for the cable to be removed with less resistance.

  7. Lenovo IdeaPad S340-15IWL Keyboard Replacement: 7 단계, 이미지 1/3 Lenovo IdeaPad S340-15IWL Keyboard Replacement: 7 단계, 이미지 2/3 Lenovo IdeaPad S340-15IWL Keyboard Replacement: 7 단계, 이미지 3/3
    • Carefully pick up the fan by the corners and detach the small connector wire by pulling parallel to the device.

    • Remove the fan from the laptop.

  8. Lenovo IdeaPad S340-15IWL Keyboard Replacement, Speakers: 8 단계, 이미지 1/3 Lenovo IdeaPad S340-15IWL Keyboard Replacement, Speakers: 8 단계, 이미지 2/3 Lenovo IdeaPad S340-15IWL Keyboard Replacement, Speakers: 8 단계, 이미지 3/3
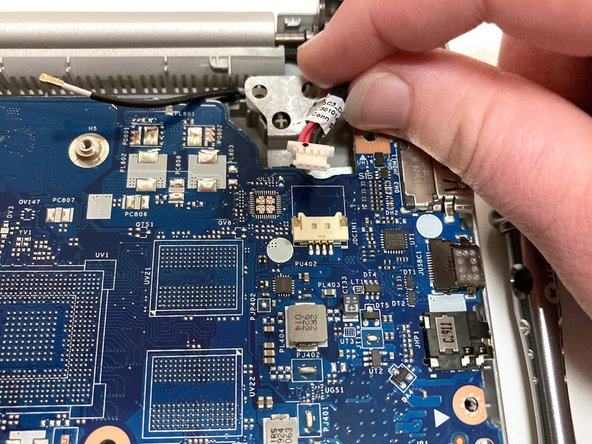
    • Unplug the wire connecting the speakers to the motherboard.

    • Remove the speakers from each side of the laptop.

  9. Lenovo IdeaPad S340-15IWL Keyboard Replacement, Hard Drive: 9 단계, 이미지 1/3 Lenovo IdeaPad S340-15IWL Keyboard Replacement, Hard Drive: 9 단계, 이미지 2/3 Lenovo IdeaPad S340-15IWL Keyboard Replacement, Hard Drive: 9 단계, 이미지 3/3
    • Remove the four 3 mm screws holding the hard drive expansion slot in place using a Phillips #0 screwdriver.

  10. Lenovo IdeaPad S340-15IWL Keyboard Replacement, RAM: 10 단계, 이미지 1/2 Lenovo IdeaPad S340-15IWL Keyboard Replacement, RAM: 10 단계, 이미지 2/2
    • Using the opening tool, gently pop off the metal cover for the RAM stick.

  11. Lenovo IdeaPad S340-15IWL Keyboard Replacement: 11 단계, 이미지 1/2 Lenovo IdeaPad S340-15IWL Keyboard Replacement: 11 단계, 이미지 2/2
    • Using your thumbs, gently pull the two metal prongs that secure the RAM outwards.

    • The RAM will pop up at an angle.

    • Remove the RAM from the laptop.

  12. Lenovo IdeaPad S340-15IWL Keyboard Replacement, Heat Sink: 12 단계, 이미지 1/3 Lenovo IdeaPad S340-15IWL Keyboard Replacement, Heat Sink: 12 단계, 이미지 2/3 Lenovo IdeaPad S340-15IWL Keyboard Replacement, Heat Sink: 12 단계, 이미지 3/3
    • Remove the three 3 mm screws that secure the black heat sink near the top of the computer using a Phillips #0 screwdriver.

    • Lift the heat sink vertically to remove it from the laptop.

  13. Lenovo IdeaPad S340-15IWL Keyboard Replacement, Video Cable: 13 단계, 이미지 1/3 Lenovo IdeaPad S340-15IWL Keyboard Replacement, Video Cable: 13 단계, 이미지 2/3 Lenovo IdeaPad S340-15IWL Keyboard Replacement, Video Cable: 13 단계, 이미지 3/3
    • Using an opening tool, carefully flip up the retaining flaps holding the silver video cable in place.

    • Slide the ribbon cable out of each connector.

  14. Lenovo IdeaPad S340-15IWL Keyboard Replacement, Wi-Fi Card: 14 단계, 이미지 1/2 Lenovo IdeaPad S340-15IWL Keyboard Replacement, Wi-Fi Card: 14 단계, 이미지 2/2
    • Pull up the black foam adhesive that covers the screw and connectors holding the Wi-Fi card in place.

  15. Lenovo IdeaPad S340-15IWL Keyboard Replacement: 15 단계, 이미지 1/2 Lenovo IdeaPad S340-15IWL Keyboard Replacement: 15 단계, 이미지 2/2
    • Using an opening tool, lift up on the black and white coaxial cables on the Wi-Fi card and gently pull upward to unplug them.

    • When reconnecting the cables, be sure to match the colors to the arrows on the Wi-Fi card.

  16. Lenovo IdeaPad S340-15IWL Keyboard Replacement: 16 단계, 이미지 1/2 Lenovo IdeaPad S340-15IWL Keyboard Replacement: 16 단계, 이미지 2/2
    • Remove the single 3 mm screw holding the Wi-Fi card in place using a Phillips #0 screwdriver.

    • Gently lift the Wi-Fi card out of the computer.

  17. Lenovo IdeaPad S340-15IWL Keyboard Replacement, Motherboard: 17 단계, 이미지 1/3 Lenovo IdeaPad S340-15IWL Keyboard Replacement, Motherboard: 17 단계, 이미지 2/3 Lenovo IdeaPad S340-15IWL Keyboard Replacement, Motherboard: 17 단계, 이미지 3/3
    • Using an opening tool, flip up the retaining flap that holds the connector to the thin black ribbon cable at the bottom of the motherboard.

    • Gently remove the ribbon cable from its connector.

    • The cable is folded over and connected to itself with an adhesive. Be careful to only pull at the top fold of the cable.

  18. Lenovo IdeaPad S340-15IWL Keyboard Replacement: 18 단계, 이미지 1/2 Lenovo IdeaPad S340-15IWL Keyboard Replacement: 18 단계, 이미지 2/2
    • Remove the three total silver 6 mm screws from the hinges of the screen in the top corners of the device using a Phillips #0 screwdriver.

  19. Lenovo IdeaPad S340-15IWL Keyboard Replacement: 19 단계, 이미지 1/3 Lenovo IdeaPad S340-15IWL Keyboard Replacement: 19 단계, 이미지 2/3 Lenovo IdeaPad S340-15IWL Keyboard Replacement: 19 단계, 이미지 3/3
    • Use an opening tool to flip up the hinges.

    • You may have to apply some force.

  20. Lenovo IdeaPad S340-15IWL Keyboard Replacement: 20 단계, 이미지 1/2 Lenovo IdeaPad S340-15IWL Keyboard Replacement: 20 단계, 이미지 2/2
    • Remove the three 3 mm screws holding the motherboard in place using a Phillips #0 screwdriver.

  21. Lenovo IdeaPad S340-15IWL Keyboard Replacement: 21 단계, 이미지 1/2 Lenovo IdeaPad S340-15IWL Keyboard Replacement: 21 단계, 이미지 2/2
    • Carefully unplug the black and red wires connected to the upper right corner of the motherboard.

    • These wires connect to the device’s charging port.

  22. Lenovo IdeaPad S340-15IWL Keyboard Replacement: 22 단계, 이미지 1/2 Lenovo IdeaPad S340-15IWL Keyboard Replacement: 22 단계, 이미지 2/2
    • Carefully lift the motherboard from the base of the computer and remove it from the laptop.

  23. Lenovo IdeaPad S340-15IWL Keyboard Replacement, Charging Port: 23 단계, 이미지 1/2 Lenovo IdeaPad S340-15IWL Keyboard Replacement, Charging Port: 23 단계, 이미지 2/2
    • Disconnect the battery cable by gently pulling it straight out of the connector.

    • Be sure to pull parallel to the device to avoid bending the motherboard connector.

    • The battery connector does not lock and only requires light pressure to insert and remove.

  24. Lenovo IdeaPad S340-15IWL Keyboard Replacement: 24 단계, 이미지 1/1
    • Remove the three total silver 6 mm screws from the hinge of the screen in the top right corner of the device using a Phillips #0 screwdriver.

  25. Lenovo IdeaPad S340-15IWL Keyboard Replacement: 25 단계, 이미지 1/2 Lenovo IdeaPad S340-15IWL Keyboard Replacement: 25 단계, 이미지 2/2
    • Use an opening tool to flip up the hinges.

    • You may have to apply some force.

  26. Lenovo IdeaPad S340-15IWL Keyboard Replacement: 26 단계, 이미지 1/2 Lenovo IdeaPad S340-15IWL Keyboard Replacement: 26 단계, 이미지 2/2
    • Unplug the charging port cable by sliding it out of its motherboard socket.

  27. Lenovo IdeaPad S340-15IWL Keyboard Replacement: 27 단계, 이미지 1/2 Lenovo IdeaPad S340-15IWL Keyboard Replacement: 27 단계, 이미지 2/2
    • Remove the charging port by pulling vertically at the base of the wires.

  28. Lenovo IdeaPad S340-15IWL Keyboard Replacement, CMOS Battery: 28 단계, 이미지 1/3 Lenovo IdeaPad S340-15IWL Keyboard Replacement, CMOS Battery: 28 단계, 이미지 2/3 Lenovo IdeaPad S340-15IWL Keyboard Replacement, CMOS Battery: 28 단계, 이미지 3/3
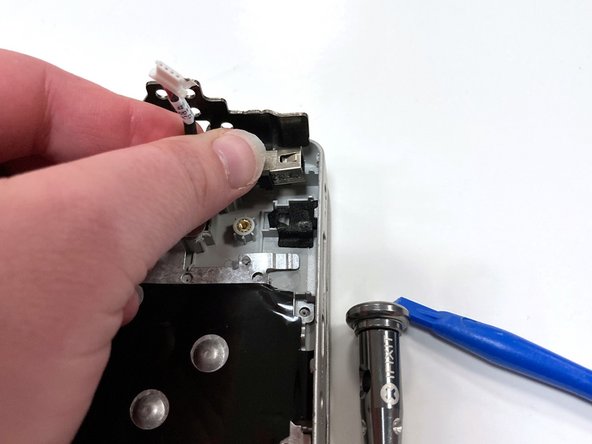
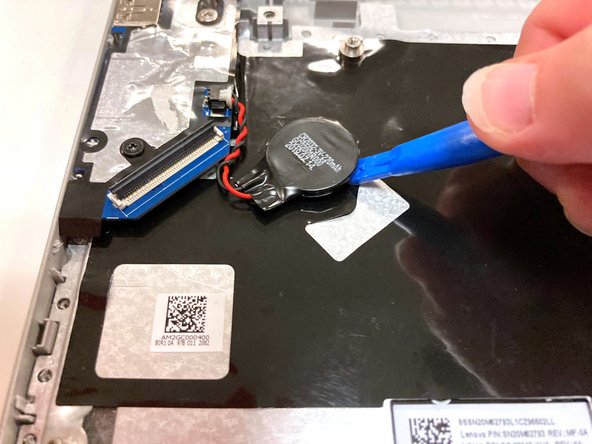
    • Remove the circular CMOS battery on the far left side of the computer by lifting it with your finger or an opening tool.

    • This is only attached with adhesive, so it does not require extensive force.

  29. Lenovo IdeaPad S340-15IWL Keyboard Replacement: 29 단계, 이미지 1/2 Lenovo IdeaPad S340-15IWL Keyboard Replacement: 29 단계, 이미지 2/2
    • Unplug the bundled red and black wires connecting the CMOS battery to the side of the device.

    • Remove the CMOS battery from the laptop.

  30. Lenovo IdeaPad S340-15IWL Keyboard Replacement, USB Port Board: 30 단계, 이미지 1/3 Lenovo IdeaPad S340-15IWL Keyboard Replacement, USB Port Board: 30 단계, 이미지 2/3 Lenovo IdeaPad S340-15IWL Keyboard Replacement, USB Port Board: 30 단계, 이미지 3/3
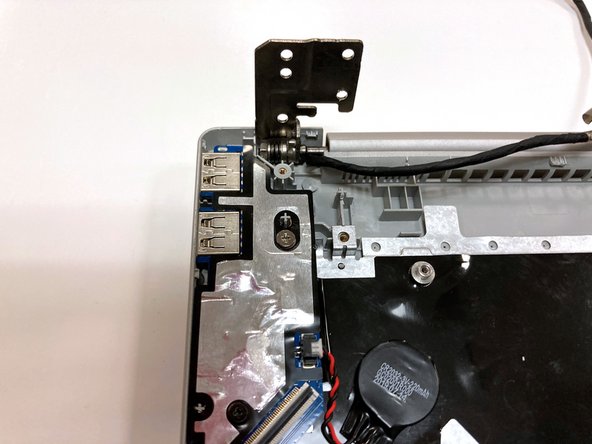
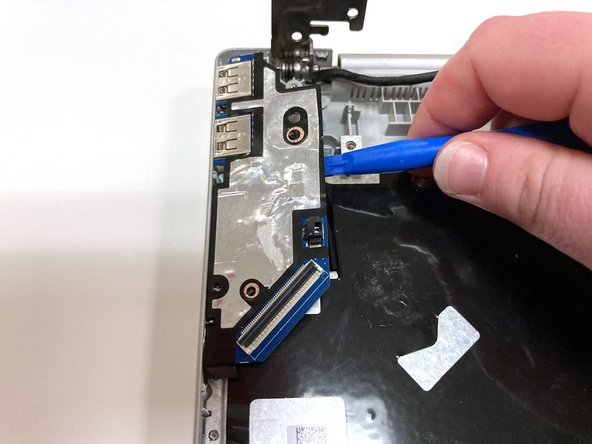
    • Remove the silver 6 mm screw holding the USB and SD card slots in place in the upper left corner of the device using a Phillips #0 screwdriver.

    • Remove the black 3 mm screw holding the USB and SD card slots in place in the upper left corner of the device using a Phillips #0 screwdriver.

    • Use an opening tool to pry the port out of the device.

  31. Lenovo IdeaPad S340-15IWL Keyboard Replacement, Keyboard: 31 단계, 이미지 1/3 Lenovo IdeaPad S340-15IWL Keyboard Replacement, Keyboard: 31 단계, 이미지 2/3 Lenovo IdeaPad S340-15IWL Keyboard Replacement, Keyboard: 31 단계, 이미지 3/3
    • Pry up the metal plate covering the keyboard using an opening tool.

    • The keyboard will likely be held in place by a series of plastic pegs. These pegs are not designed to be removed, and must be broken or scraped off.

    • Do not worry about breaking these pegs, as they are not vital to the keyboard’s physical integrity.

  32. Lenovo IdeaPad S340-15IWL Keyboard Replacement: 32 단계, 이미지 1/2 Lenovo IdeaPad S340-15IWL Keyboard Replacement: 32 단계, 이미지 2/2
    • Unthread the wide black plastic cable through the slot of the metal plate.

  33. Lenovo IdeaPad S340-15IWL Keyboard Replacement: 33 단계, 이미지 1/1
    • Gently push up on the keyboard from underneath the device to separate it from the plastic casing.

    • Remove the keyboard from the laptop.

결론

To reassemble your device, follow these instructions in reverse order.

다른 한 분이 해당 안내서를 완성하였습니다.

Christine Robbins

회원 가입일: 09/17/21

522 평판

안내서 4개 작성하였습니다

댓글 4개

I would say that the best repair for a keyboard replacement on this laptop is to replace the entire top cover with the keyboard attached to the plastic pegs and top cover assembly.

I've done a lot of these for quite a few customers and they always come back complaining that the keyboard was bouncy after replacement.

Well, that would be because there are no screws to bolt the laptop to the chassis, and where the complete machined part assembly of the top cover can give you a perfect repair.

Sure its more expensive and more work, but it will help the customer out the most in the long run. If you're doing this repair yourself, feel free to do the keyboard only, but if you're doing it professionally for a client; Get a complete top cover assembly.

sales - 답글

Hi

Does anyone have a link to purchase a reliable replacement parts for the keyboard/top cover?

@robbins451

Nathan Low Foon - 답글

Thanks for the guide...it proved very helpful in cleaning out the keyboard. My wife seemed to think the laptop sitting on the kitchen counter while reading a recipe was a great idea, until the sauce landed on the keyboard. Next time I hope she sticks with the tablet. Hopefully it won't be to bouncy without the plastic supports. There's probably enough plastic left to use a soldering iron and melt some of the pegs to offer more strength.

Pat Loudenback - 답글

Thank you for the guide. However, I've decided to sent my laptop to the professional. Just to replace a keyboard need to dismantle everything. Not worth my time.

Khai Baha - 답글

댓글 쓰기

조회 통계:

24 시간 전: 7

7일 전: 40

30일 전: 202

전체 시간: 5,184