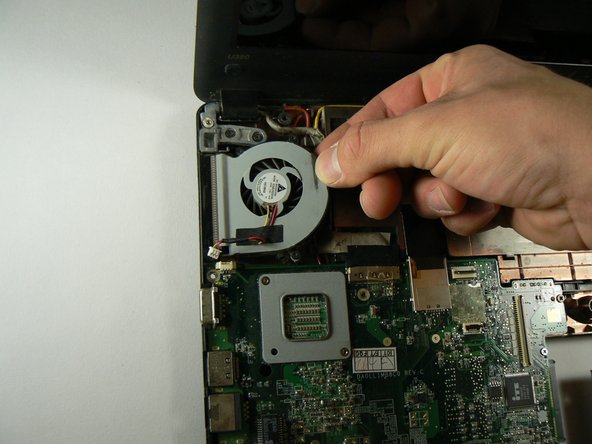
주요 콘텐츠로 건너뛰기

Lenovo IdeaPad U350 Fan Replacement

필요한 것

  1. Lenovo IdeaPad U350 Fan Replacement, Battery: 1 단계, 이미지 1/1
    • Locate the battery by turning the laptop over.

  2. Lenovo IdeaPad U350 Fan Replacement: 2 단계, 이미지 1/3 Lenovo IdeaPad U350 Fan Replacement: 2 단계, 이미지 2/3 Lenovo IdeaPad U350 Fan Replacement: 2 단계, 이미지 3/3
    • Locate the lock switch and slide toward the outside edge of the laptop until it clicks into place and the battery unit pops up.

    • Remove the battery unit from the laptop and set it aside.

  3. Lenovo IdeaPad U350 Fan Replacement, Keyboard: 3 단계, 이미지 1/1
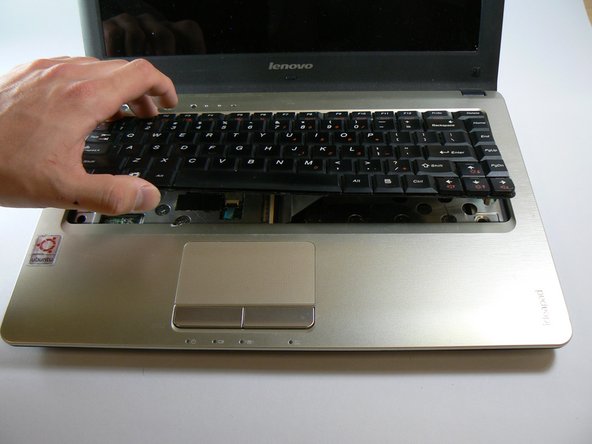
    • Unscrew the three screws on the bottom of the laptop that have small keyboard logos next to them using a PH1 screwdriver. These screws are 5.8mm long.

  4. Lenovo IdeaPad U350 Fan Replacement: 4 단계, 이미지 1/2 Lenovo IdeaPad U350 Fan Replacement: 4 단계, 이미지 2/2
    • Flip the computer over and open the screen.

    • Use a spudger to carefully press in the clip that is found here while prying the keyboard upward from the same side.

    • This clip is very stiff and also made of thin, brittle plastic. This means that it is easy to break off, which is what we did during our disassembly.

  5. Lenovo IdeaPad U350 Fan Replacement: 5 단계, 이미지 1/1
    • Slightly lift the bottom of the keyboard towards the screen to locate the keyboard's ribbon cable.

    • Use the tip of the spudger to lift the black retaining flap on the ZIF connector.

    • You should now be able to lift out the keyboard easily.

  6. Lenovo IdeaPad U350 Fan Replacement, Hard Drive: 6 단계, 이미지 1/1
    • Unscrew the six screws on the back panel of the laptop using a PH1 Phillips bit.

    • These screws are attached to the panel. When unscrewing, be sure to stop when you here a click.

  7. Lenovo IdeaPad U350 Fan Replacement: 7 단계, 이미지 1/1
    • Lift the back panel from the side closest to the battery and remove the panel.

  8. Lenovo IdeaPad U350 Fan Replacement: 8 단계, 이미지 1/2 Lenovo IdeaPad U350 Fan Replacement: 8 단계, 이미지 2/2
    • Slide the hard drive to the right, away from the RAM modules.

    • Lift the hard drive from the side closest to the RAM modules.

    • When re-inserting the hard drive, ensure that the copper contacts on the drive's connector are facing upwards.

  9. Lenovo IdeaPad U350 Fan Replacement, Remove the screws: 9 단계, 이미지 1/1
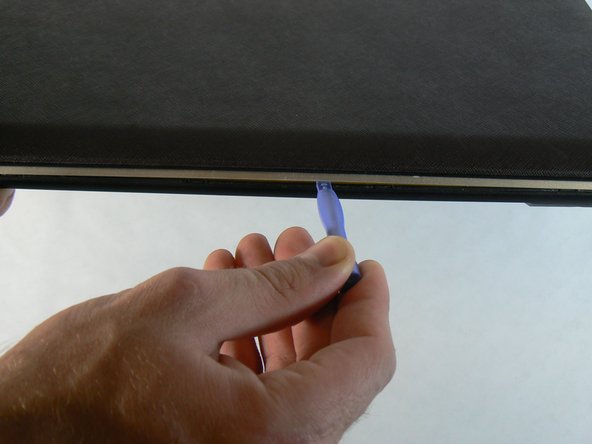
    • Unscrew the nine screws that are around the edge of the laptop using a PH00 screwdriver. These screws are 5.7mm long.

    • Unscrew the remaining two M2.5X3 screws that were under the battery using a PH1 screwdriver. These screws are 3.7mm long.

    • Unscrew the three M2X3 screws that were under the hard drive using a PH1 screwdriver. These screws are 3.7mm long.

  10. Lenovo IdeaPad U350 Fan Replacement: 10 단계, 이미지 1/3 Lenovo IdeaPad U350 Fan Replacement: 10 단계, 이미지 2/3 Lenovo IdeaPad U350 Fan Replacement: 10 단계, 이미지 3/3
    • Use the blue plastic opening tool to pry the silver plastic keyboard surround out from the black plastic bottom. You will need to do this around the entire perimeter of the laptop and will hear a pop every time one of the retention clips is unlatched.

  11. Lenovo IdeaPad U350 Fan Replacement: 11 단계, 이미지 1/1
    • Unscrew the two M2X3 screws that were under the keyboard.

  12. Lenovo IdeaPad U350 Fan Replacement: 12 단계, 이미지 1/2 Lenovo IdeaPad U350 Fan Replacement: 12 단계, 이미지 2/2
    • Use the spudger to unlatch the retention clip on the power button and status LEDs ZIF connector.

    • This ribbon cable is glued to the case. Carefully pull up on it from the right side until it is no longer sticking to the case.

  13. Lenovo IdeaPad U350 Fan Replacement: 13 단계, 이미지 1/1
    • Use the spudger to unlatch the retention clip on the touchpad ZIF connector.

    • Lift the silver plastic keyboard surround away from the base of the laptop. There shouldn't be any resistance.

  14. Lenovo IdeaPad U350 Fan Replacement: 14 단계, 이미지 1/1
    • Unplug the fan wire from the motherboard.

  15. Lenovo IdeaPad U350 Fan Replacement: 15 단계, 이미지 1/1
    • Unscrew the three fan screws using a PH1 bit.

    • These screws are attached to the fan. When unscrewing, be sure to stop when you here a click.

  16. Lenovo IdeaPad U350 Fan Replacement: 16 단계, 이미지 1/3 Lenovo IdeaPad U350 Fan Replacement: 16 단계, 이미지 2/3 Lenovo IdeaPad U350 Fan Replacement: 16 단계, 이미지 3/3
    • Grip the fan from as far to the right (towards the center of the laptop) as possible and lift up.

    • As soon as the right side of the fan clears the bump in the case where the battery is housed, pull the fan to the right. This should dislodge it from the heatsink.

결론

To reassemble your device, follow these instructions in reverse order.

다른 2명이 해당 안내서를 완성하였습니다.

James Morizzo

회원 가입일: 09/29/14

496 평판

안내서 3개 작성하였습니다

USF Tampa, Team 1-4, Hickman Fall 2014 USF Tampa, Team 1-4, Hickman Fall 2014 회원

USFT-HICKMAN-F14S1G4

3 회원들

안내서 5개 작성하였습니다

댓글 0개

댓글 쓰기

조회 통계:

24 시간 전: 0

7일 전: 0

30일 전: 3

전체 시간: 2,055