주요 콘텐츠로 건너뛰기

이 안내서에는 최근 변경 사항이 더 있습니다. 최신 비검증 버전으로 전환하십시오.

Lenovo IdeaPad U430 Touch Motherboard Replacement

필요한 것

  1. Lenovo IdeaPad U430 Touch Motherboard Replacement, Bottom Cover: 1 단계, 이미지 1/1
    • Power off your computer before you begin.

    • Find and remove the 10 Phillips style body screws on the bottom of the laptop case.

    • Remove 2 screws, 1 located on the left hinge cover and one located on the right hinge cover.

  2. Lenovo IdeaPad U430 Touch Motherboard Replacement: 3 단계, 이미지 1/2 Lenovo IdeaPad U430 Touch Motherboard Replacement: 3 단계, 이미지 2/2
    • Starting from the front, use a plastic opening tool to separate the bottom of the case from the body of the laptop.

  3. Lenovo IdeaPad U430 Touch Motherboard Replacement, Battery: 4 단계, 이미지 1/2 Lenovo IdeaPad U430 Touch Motherboard Replacement, Battery: 4 단계, 이미지 2/2
    • Remove the five 2.8 mm #1 Phillips head screws that hold down the battery pack.

  4. Lenovo IdeaPad U430 Touch Motherboard Replacement: 5 단계, 이미지 1/2 Lenovo IdeaPad U430 Touch Motherboard Replacement: 5 단계, 이미지 2/2
    • Using a combination of plastic opening tool and spudger, press in on the clips on the sides of the battery connector and push the connector out

    • When you get the connector out far enough, grab behind the connector tabs with tweezers and wiggle the connector the rest of the way out.

    • The battery connector is very tight fitting, you may need to use a metal spudger in order to get the connector out far enough.

  5. Lenovo IdeaPad U430 Touch Motherboard Replacement: 6 단계, 이미지 1/2 Lenovo IdeaPad U430 Touch Motherboard Replacement: 6 단계, 이미지 2/2
    • Once the battery is disconnected, lift up on the front of the battery and remove it from the laptop body.

  6. Lenovo IdeaPad U430 Touch Motherboard Replacement, Motherboard: 7 단계, 이미지 1/2 Lenovo IdeaPad U430 Touch Motherboard Replacement, Motherboard: 7 단계, 이미지 2/2
    • Disconnect all 5 ZIF ribbon connectors from the motherboard.

    • To disconnect a ZIF connector, use your fingernail or a plastic spudger to flip the retainer up, and gently pull the ribbon cable out.

  7. Lenovo IdeaPad U430 Touch Motherboard Replacement: 8 단계, 이미지 1/3 Lenovo IdeaPad U430 Touch Motherboard Replacement: 8 단계, 이미지 2/3 Lenovo IdeaPad U430 Touch Motherboard Replacement: 8 단계, 이미지 3/3
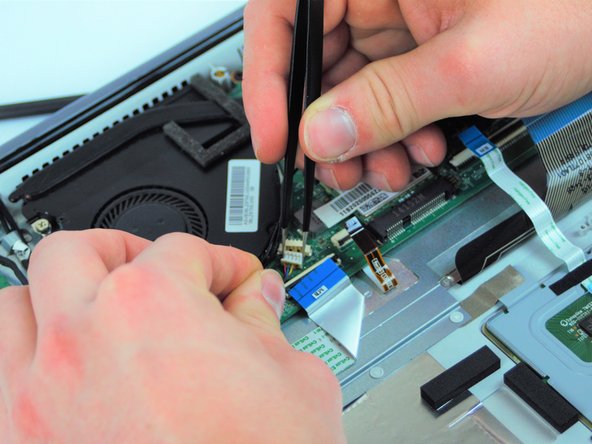
    • Using a plastic spudger, liift up and remove the hard drive and screen flat-topped connectors

    • Use the spudger and metal tweezers to remove the two cable connectors and two bundled cable connectors.

    • Use the plastic spudger to lift up and remove the two antenna connectors.

  8. Lenovo IdeaPad U430 Touch Motherboard Replacement: 9 단계, 이미지 1/3 Lenovo IdeaPad U430 Touch Motherboard Replacement: 9 단계, 이미지 2/3 Lenovo IdeaPad U430 Touch Motherboard Replacement: 9 단계, 이미지 3/3
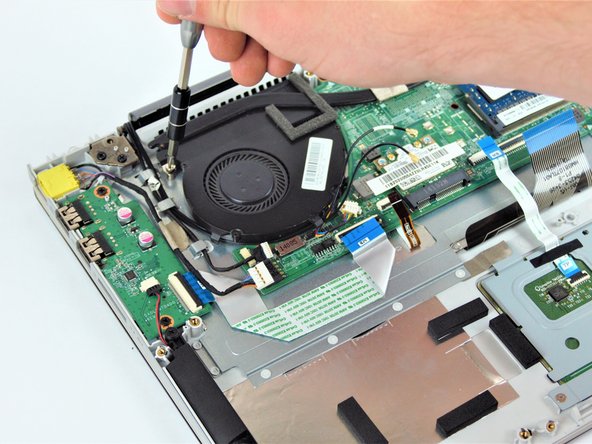
    • Unscrew the three 3mm #1 Phillips head screws holding down the cooling assembly and fan.

    • These screws remain secured with the assembly.

    • Remove the cooling assembly from the motherboard.

  9. Lenovo IdeaPad U430 Touch Motherboard Replacement: 10 단계, 이미지 1/1
    • Unscrew all seven 2.8mm #1 Phillips head screws that secure the motherboard to the laptop.

  10. Lenovo IdeaPad U430 Touch Motherboard Replacement: 11 단계, 이미지 1/1
    • Lift the motherboard out of the laptop case.

결론

To reassemble your device, follow these instructions in reverse order.

다른 3명이 해당 안내서를 완성하였습니다.

Babar Ali

회원 가입일: 02/28/17

152 평판

안내서 1개 작성함

USF Tampa, Team S2-G6, Nance Spring 2017 USF Tampa, Team S2-G6, Nance Spring 2017 회원

USFT-NANCE-S17S2G6

3 회원들

안내서 15개 작성하였습니다

댓글 0개

댓글 쓰기

조회 통계:

24 시간 전: 0

7일 전: 1

30일 전: 8

전체 시간: 2,432