주요 콘텐츠로 건너뛰기

Lenovo IdeaPad Y500 Motherboard Replacement

필요한 것

  1. Lenovo IdeaPad Y500 Motherboard Replacement, Battery: 1 단계, 이미지 1/3 Lenovo IdeaPad Y500 Motherboard Replacement, Battery: 1 단계, 이미지 2/3 Lenovo IdeaPad Y500 Motherboard Replacement, Battery: 1 단계, 이미지 3/3
    • Slide the lock on the right side until you hear a click. Once you hear a click , you should see the color red.

  2. Lenovo IdeaPad Y500 Motherboard Replacement: 2 단계, 이미지 1/1
    • Unlike the first lock, this lock is spring loaded and must be held in place when used.

    • Slide the lock to the left (in the direction of the arrow below the lock) and hold in place.

  3. Lenovo IdeaPad Y500 Motherboard Replacement: 3 단계, 이미지 1/1
    • Gently pull battery away from the computer while holding open the lock.

  4. Lenovo IdeaPad Y500 Motherboard Replacement, Keyboard: 4 단계, 이미지 1/3 Lenovo IdeaPad Y500 Motherboard Replacement, Keyboard: 4 단계, 이미지 2/3 Lenovo IdeaPad Y500 Motherboard Replacement, Keyboard: 4 단계, 이미지 3/3
    • Unlock the battery latch by pulling it up.

    • It should reveal red underneath when it's unlocked.

  5. Lenovo IdeaPad Y500 Motherboard Replacement: 5 단계, 이미지 1/3 Lenovo IdeaPad Y500 Motherboard Replacement: 5 단계, 이미지 2/3 Lenovo IdeaPad Y500 Motherboard Replacement: 5 단계, 이미지 3/3
    • Push the latch down and then hold in position.

    • Pull the optical drive out.

  6. Lenovo IdeaPad Y500 Motherboard Replacement: 6 단계, 이미지 1/3 Lenovo IdeaPad Y500 Motherboard Replacement: 6 단계, 이미지 2/3 Lenovo IdeaPad Y500 Motherboard Replacement: 6 단계, 이미지 3/3
    • Remove nine screws with a Phillips #1 screwdriver.

  7. Lenovo IdeaPad Y500 Motherboard Replacement: 7 단계, 이미지 1/3 Lenovo IdeaPad Y500 Motherboard Replacement: 7 단계, 이미지 2/3 Lenovo IdeaPad Y500 Motherboard Replacement: 7 단계, 이미지 3/3
    • Pull up on the loosened cover to remove.

    • Remove two screws with a Phillips #1 screwdriver.

  8. Lenovo IdeaPad Y500 Motherboard Replacement: 8 단계, 이미지 1/3 Lenovo IdeaPad Y500 Motherboard Replacement: 8 단계, 이미지 2/3 Lenovo IdeaPad Y500 Motherboard Replacement: 8 단계, 이미지 3/3
    • Pull the tab straight to the left until part releases.

    • Lift up the part to remove completely.

  9. Lenovo IdeaPad Y500 Motherboard Replacement: 9 단계, 이미지 1/3 Lenovo IdeaPad Y500 Motherboard Replacement: 9 단계, 이미지 2/3 Lenovo IdeaPad Y500 Motherboard Replacement: 9 단계, 이미지 3/3
    • To release the DIMM, pull the tabs on either side away from each other simultaneously.

    • The DIMM will pop out on its own.

  10. Lenovo IdeaPad Y500 Motherboard Replacement: 10 단계, 이미지 1/3 Lenovo IdeaPad Y500 Motherboard Replacement: 10 단계, 이미지 2/3 Lenovo IdeaPad Y500 Motherboard Replacement: 10 단계, 이미지 3/3
    • To disconnect the Wi-Fi cables, use a spudger to gently push up under them.

    • Wi-Fi cables are delicate.

  11. Lenovo IdeaPad Y500 Motherboard Replacement: 11 단계, 이미지 1/3 Lenovo IdeaPad Y500 Motherboard Replacement: 11 단계, 이미지 2/3 Lenovo IdeaPad Y500 Motherboard Replacement: 11 단계, 이미지 3/3
    • Using a Phillips #1 screwdriver, remove the two screws.

    • Once screws are out, the card will just pop out.

  12. Lenovo IdeaPad Y500 Motherboard Replacement: 12 단계, 이미지 1/1
    • Remove three screws using a Phillips #1 screwdriver.

  13. Lenovo IdeaPad Y500 Motherboard Replacement: 13 단계, 이미지 1/3 Lenovo IdeaPad Y500 Motherboard Replacement: 13 단계, 이미지 2/3 Lenovo IdeaPad Y500 Motherboard Replacement: 13 단계, 이미지 3/3
    • With the laptop upside down, open slightly.

    • To remove the keyboard, push the back of the keyboard forward with your thumb while pulling away from the laptop on the other side.

    • You will not be able to pull the keyboard completely away. The cables are still connected to the laptop.

  14. Lenovo IdeaPad Y500 Motherboard Replacement: 14 단계, 이미지 1/3 Lenovo IdeaPad Y500 Motherboard Replacement: 14 단계, 이미지 2/3 Lenovo IdeaPad Y500 Motherboard Replacement: 14 단계, 이미지 3/3
    • To release the cables, use the spudger to push both ends on the side of the cable.

    • Gently pull the cables up to disconnect.

  15. Lenovo IdeaPad Y500 Motherboard Replacement: 15 단계, 이미지 1/2 Lenovo IdeaPad Y500 Motherboard Replacement: 15 단계, 이미지 2/2
    • Pull the keyboard up and away from the laptop to remove it.

  16. Lenovo IdeaPad Y500 Motherboard Replacement, Touchpad: 16 단계, 이미지 1/2 Lenovo IdeaPad Y500 Motherboard Replacement, Touchpad: 16 단계, 이미지 2/2
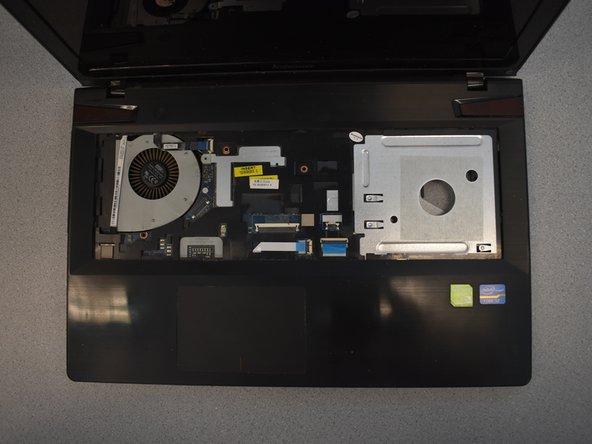
    • Remove a total of 8 screws.

    • Red circles are m2.5 x 10 mm flathead screws.

    • Orange circles m2 x 3mm flathead screws.

    • Yellow circle is m2.5 x 4mm flathead screw.

  17. Lenovo IdeaPad Y500 Motherboard Replacement: 17 단계, 이미지 1/3 Lenovo IdeaPad Y500 Motherboard Replacement: 17 단계, 이미지 2/3 Lenovo IdeaPad Y500 Motherboard Replacement: 17 단계, 이미지 3/3
    • Flip up black tabs at the ends of each cable.

    • With fingers, gently remove the cables underneath from their ports.

  18. Lenovo IdeaPad Y500 Motherboard Replacement: 18 단계, 이미지 1/3 Lenovo IdeaPad Y500 Motherboard Replacement: 18 단계, 이미지 2/3 Lenovo IdeaPad Y500 Motherboard Replacement: 18 단계, 이미지 3/3
    • By unlatching the sides and pulling up, remove the top case from the device.

    • Casing is fragile, be careful not to twist when pulling up.

  19. Lenovo IdeaPad Y500 Motherboard Replacement, Motherboard: 19 단계, 이미지 1/3 Lenovo IdeaPad Y500 Motherboard Replacement, Motherboard: 19 단계, 이미지 2/3 Lenovo IdeaPad Y500 Motherboard Replacement, Motherboard: 19 단계, 이미지 3/3
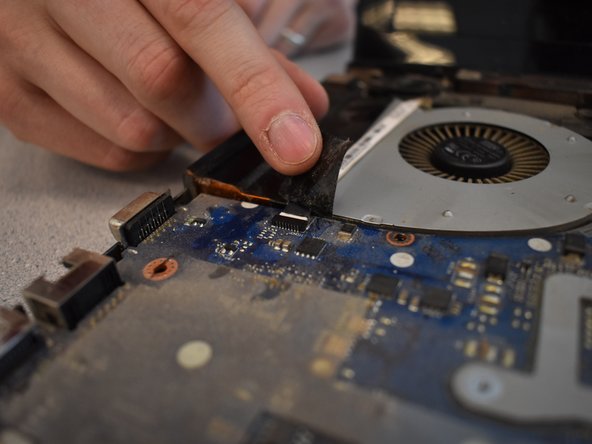
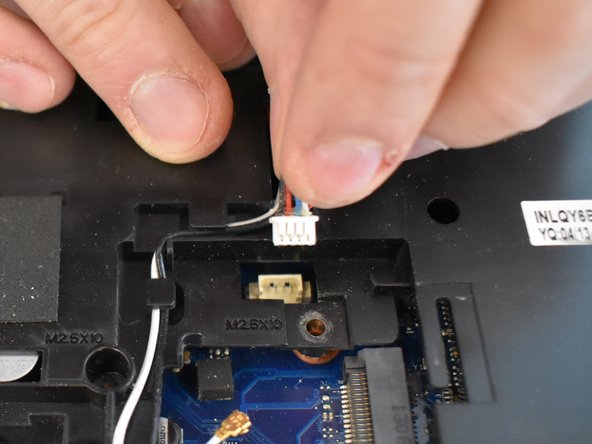
    • Peel up the black tab and remove the tape completely.

    • Remove the cable revealed underneath while pulling up the tape.

    • When reassembled, you will have to stick the tape back down in its original location in order to reinsert the cable.

  20. Lenovo IdeaPad Y500 Motherboard Replacement: 20 단계, 이미지 1/3 Lenovo IdeaPad Y500 Motherboard Replacement: 20 단계, 이미지 2/3 Lenovo IdeaPad Y500 Motherboard Replacement: 20 단계, 이미지 3/3
    • Flip the laptop back over.

    • Gently pull the cable free by pulling up.

  21. Lenovo IdeaPad Y500 Motherboard Replacement: 21 단계, 이미지 1/3 Lenovo IdeaPad Y500 Motherboard Replacement: 21 단계, 이미지 2/3 Lenovo IdeaPad Y500 Motherboard Replacement: 21 단계, 이미지 3/3
    • Peel back the black tape.

    • Gently pull out both cables revealed underneath from their sockets.

    • When reassembling, you will have to paste the tape back over the cables again.

  22. Lenovo IdeaPad Y500 Motherboard Replacement: 22 단계, 이미지 1/3 Lenovo IdeaPad Y500 Motherboard Replacement: 22 단계, 이미지 2/3 Lenovo IdeaPad Y500 Motherboard Replacement: 22 단계, 이미지 3/3
    • By gently pulling up, remove the final cable.

  23. Lenovo IdeaPad Y500 Motherboard Replacement: 23 단계, 이미지 1/2 Lenovo IdeaPad Y500 Motherboard Replacement: 23 단계, 이미지 2/2
    • Pull motherboard down, away from the case, while lifting the base of the case up.

결론

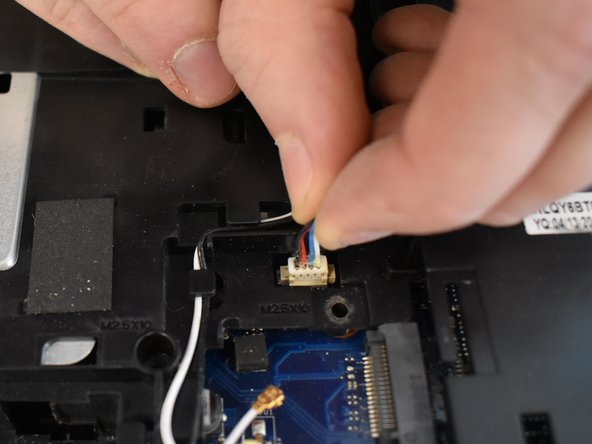
To reassemble your device, follow these instructions in reverse order.

다른 3명이 해당 안내서를 완성하였습니다.

Tatum Hennige

회원 가입일: 04/22/19

687 평판

안내서 4개 작성하였습니다

UW Tacoma, Team S1-G2, Cardinal Spring 2019 UW Tacoma, Team S1-G2, Cardinal Spring 2019 회원

UWT-CARDINAL-S19S1G2

4 회원들

안내서 5개 작성하였습니다

댓글 0개

댓글 쓰기

조회 통계:

24 시간 전: 1

7일 전: 1

30일 전: 6

전체 시간: 2,226