주요 콘텐츠로 건너뛰기

Lenovo IdeaPad Y500 Touchpad Replacement

필요한 것

  1. Lenovo IdeaPad Y500 Touchpad  Replacement, Battery: 1 단계, 이미지 1/3 Lenovo IdeaPad Y500 Touchpad  Replacement, Battery: 1 단계, 이미지 2/3 Lenovo IdeaPad Y500 Touchpad  Replacement, Battery: 1 단계, 이미지 3/3
    • Slide the lock on the right side until you hear a click. Once you hear a click , you should see the color red.

  2. Lenovo IdeaPad Y500 Touchpad  Replacement: 2 단계, 이미지 1/1
    • Unlike the first lock, this lock is spring loaded and must be held in place when used.

    • Slide the lock to the left (in the direction of the arrow below the lock) and hold in place.

  3. Lenovo IdeaPad Y500 Touchpad  Replacement: 3 단계, 이미지 1/1
    • Gently pull battery away from the computer while holding open the lock.

  4. Lenovo IdeaPad Y500 Touchpad  Replacement, Keyboard: 4 단계, 이미지 1/3 Lenovo IdeaPad Y500 Touchpad  Replacement, Keyboard: 4 단계, 이미지 2/3 Lenovo IdeaPad Y500 Touchpad  Replacement, Keyboard: 4 단계, 이미지 3/3
    • Unlock the battery latch by pulling it up.

    • It should reveal red underneath when it's unlocked.

  5. Lenovo IdeaPad Y500 Touchpad  Replacement: 5 단계, 이미지 1/3 Lenovo IdeaPad Y500 Touchpad  Replacement: 5 단계, 이미지 2/3 Lenovo IdeaPad Y500 Touchpad  Replacement: 5 단계, 이미지 3/3
    • Push the latch down and then hold in position.

    • Pull the optical drive out.

  6. Lenovo IdeaPad Y500 Touchpad  Replacement: 6 단계, 이미지 1/3 Lenovo IdeaPad Y500 Touchpad  Replacement: 6 단계, 이미지 2/3 Lenovo IdeaPad Y500 Touchpad  Replacement: 6 단계, 이미지 3/3
    • Remove nine screws with a Phillips #1 screwdriver.

  7. Lenovo IdeaPad Y500 Touchpad  Replacement: 7 단계, 이미지 1/3 Lenovo IdeaPad Y500 Touchpad  Replacement: 7 단계, 이미지 2/3 Lenovo IdeaPad Y500 Touchpad  Replacement: 7 단계, 이미지 3/3
    • Pull up on the loosened cover to remove.

    • Remove two screws with a Phillips #1 screwdriver.

  8. Lenovo IdeaPad Y500 Touchpad  Replacement: 8 단계, 이미지 1/3 Lenovo IdeaPad Y500 Touchpad  Replacement: 8 단계, 이미지 2/3 Lenovo IdeaPad Y500 Touchpad  Replacement: 8 단계, 이미지 3/3
    • Pull the tab straight to the left until part releases.

    • Lift up the part to remove completely.

  9. Lenovo IdeaPad Y500 Touchpad  Replacement: 9 단계, 이미지 1/3 Lenovo IdeaPad Y500 Touchpad  Replacement: 9 단계, 이미지 2/3 Lenovo IdeaPad Y500 Touchpad  Replacement: 9 단계, 이미지 3/3
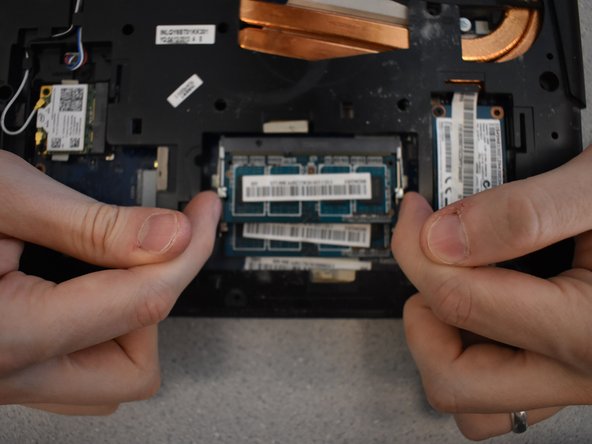
    • To release the DIMM, pull the tabs on either side away from each other simultaneously.

    • The DIMM will pop out on its own.

  10. Lenovo IdeaPad Y500 Touchpad  Replacement: 10 단계, 이미지 1/3 Lenovo IdeaPad Y500 Touchpad  Replacement: 10 단계, 이미지 2/3 Lenovo IdeaPad Y500 Touchpad  Replacement: 10 단계, 이미지 3/3
    • To disconnect the Wi-Fi cables, use a spudger to gently push up under them.

    • Wi-Fi cables are delicate.

  11. Lenovo IdeaPad Y500 Touchpad  Replacement: 11 단계, 이미지 1/3 Lenovo IdeaPad Y500 Touchpad  Replacement: 11 단계, 이미지 2/3 Lenovo IdeaPad Y500 Touchpad  Replacement: 11 단계, 이미지 3/3
    • Using a Phillips #1 screwdriver, remove the two screws.

    • Once screws are out, the card will just pop out.

  12. Lenovo IdeaPad Y500 Touchpad  Replacement: 12 단계, 이미지 1/1
    • Remove three screws using a Phillips #1 screwdriver.

  13. Lenovo IdeaPad Y500 Touchpad  Replacement: 13 단계, 이미지 1/3 Lenovo IdeaPad Y500 Touchpad  Replacement: 13 단계, 이미지 2/3 Lenovo IdeaPad Y500 Touchpad  Replacement: 13 단계, 이미지 3/3
    • With the laptop upside down, open slightly.

    • To remove the keyboard, push the back of the keyboard forward with your thumb while pulling away from the laptop on the other side.

    • You will not be able to pull the keyboard completely away. The cables are still connected to the laptop.

  14. Lenovo IdeaPad Y500 Touchpad  Replacement: 14 단계, 이미지 1/3 Lenovo IdeaPad Y500 Touchpad  Replacement: 14 단계, 이미지 2/3 Lenovo IdeaPad Y500 Touchpad  Replacement: 14 단계, 이미지 3/3
    • To release the cables, use the spudger to push both ends on the side of the cable.

    • Gently pull the cables up to disconnect.

  15. Lenovo IdeaPad Y500 Touchpad  Replacement: 15 단계, 이미지 1/2 Lenovo IdeaPad Y500 Touchpad  Replacement: 15 단계, 이미지 2/2
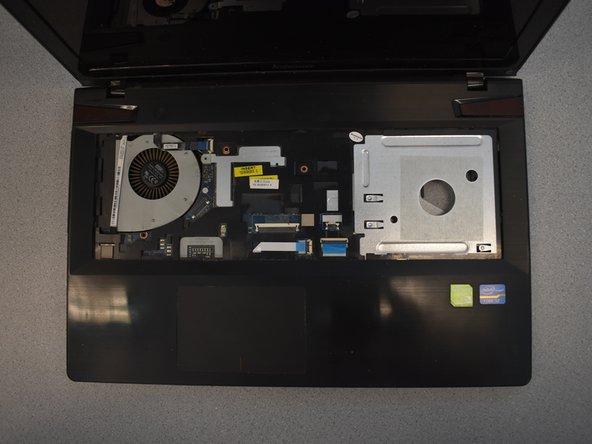
    • Pull the keyboard up and away from the laptop to remove it.

  16. Lenovo IdeaPad Y500 Touchpad  Replacement, Touchpad: 16 단계, 이미지 1/2 Lenovo IdeaPad Y500 Touchpad  Replacement, Touchpad: 16 단계, 이미지 2/2
    • Remove a total of 8 screws.

    • Red circles are m2.5 x 10 mm flathead screws.

    • Orange circles m2 x 3mm flathead screws.

    • Yellow circle is m2.5 x 4mm flathead screw.

  17. Lenovo IdeaPad Y500 Touchpad  Replacement: 17 단계, 이미지 1/3 Lenovo IdeaPad Y500 Touchpad  Replacement: 17 단계, 이미지 2/3 Lenovo IdeaPad Y500 Touchpad  Replacement: 17 단계, 이미지 3/3
    • Flip up black tabs at the ends of each cable.

    • With fingers, gently remove the cables underneath from their ports.

  18. Lenovo IdeaPad Y500 Touchpad  Replacement: 18 단계, 이미지 1/3 Lenovo IdeaPad Y500 Touchpad  Replacement: 18 단계, 이미지 2/3 Lenovo IdeaPad Y500 Touchpad  Replacement: 18 단계, 이미지 3/3
    • By unlatching the sides and pulling up, remove the top case from the device.

    • Casing is fragile, be careful not to twist when pulling up.

결론

To reassemble your device, follow these instructions in reverse order.

Tatum Hennige

회원 가입일: 04/22/19

687 평판

안내서 4개 작성하였습니다

UW Tacoma, Team S1-G2, Cardinal Spring 2019 UW Tacoma, Team S1-G2, Cardinal Spring 2019 회원

UWT-CARDINAL-S19S1G2

4 회원들

안내서 5개 작성하였습니다

댓글 0개

댓글 쓰기

조회 통계:

24 시간 전: 0

7일 전: 0

30일 전: 1

전체 시간: 560