주요 콘텐츠로 건너뛰기

Lenovo IdeaPad Yoga 11S Trackpad Replacement

필요한 것

  1. Lenovo IdeaPad Yoga 11S Trackpad Replacement, Top Assembly: 1 단계, 이미지 1/3 Lenovo IdeaPad Yoga 11S Trackpad Replacement, Top Assembly: 1 단계, 이미지 2/3 Lenovo IdeaPad Yoga 11S Trackpad Replacement, Top Assembly: 1 단계, 이미지 3/3
    • Remember to power off the device before removing any parts.

    • Position the laptop so that the bottom enclosure is facing upward.

    • Use a Phillips #0 Screwdriver to remove the ten 1.9mm screws holding the bottom enclosure in place.

    • Use an opening tool to carefully pry up the rubber pads.

    • Use a Phillips screwdriver to remove the two screws under the rubber pads, which secure the keyboard.

  2. Lenovo IdeaPad Yoga 11S Trackpad Replacement, Remove Keyboard: 2 단계, 이미지 1/1
    • Flip the laptop over and swing open the display.

    • Lift the edge of the keyboard closest to the trackpad up.

    • Carefully disconnect keyboard ribbon cable from the laptop.

    • Remove the keyboard.

  3. Lenovo IdeaPad Yoga 11S Trackpad Replacement: 3 단계, 이미지 1/1
    • Remove the two screws securing the midframe.

  4. Lenovo IdeaPad Yoga 11S Trackpad Replacement: 4 단계, 이미지 1/3 Lenovo IdeaPad Yoga 11S Trackpad Replacement: 4 단계, 이미지 2/3 Lenovo IdeaPad Yoga 11S Trackpad Replacement: 4 단계, 이미지 3/3
    • Grab the front edge of the top assembly and lift it up carefully.

    • There are three ribbon cables that attach the top assembly to the motherboard. Lift carefully to avoid damaging them.

    • Gently slide the three ribbon cables out of their slots.

    • Remove the top assembly completely by pulling it off of the device.

  5. Lenovo IdeaPad Yoga 11S Trackpad Replacement, Trackpad: 5 단계, 이미지 1/2 Lenovo IdeaPad Yoga 11S Trackpad Replacement, Trackpad: 5 단계, 이미지 2/2
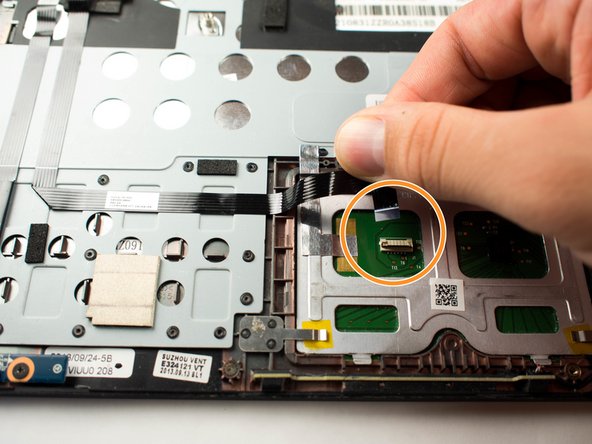
    • Position the removed top encasing where it sits on the keyboard and trackpad. The inside of the top encasing should be upward facing.

    • Use a plastic opening tool to lift the retaining flap to disconnect the ZIF connector.

    • Gently pull the trackpad cable out of the socket.

  6. Lenovo IdeaPad Yoga 11S Trackpad Replacement: 6 단계, 이미지 1/1
    • Locate the four 1.6mm screws that connect the trackpad to the top housing.

    • Use a Phillips #00 Screwdriver to remove the screws.

  7. Lenovo IdeaPad Yoga 11S Trackpad Replacement: 7 단계, 이미지 1/1
    • Flip the top assembly over so the keyboard is on top.

    • Gently push the trackpad out of its position.

결론

To reassemble your device, follow these instructions in reverse order.

다른 한 분이 해당 안내서를 완성하였습니다.

Landon Epps

회원 가입일: 03/26/15

982 평판

안내서 5개 작성하였습니다

Baylor, Team 7-11, Williams Spring 2015 Baylor, Team 7-11, Williams Spring 2015 회원

BU-WILLIAMS-S15S7G11

3 회원들

안내서 10개 작성하였습니다

댓글 0개

댓글 쓰기

조회 통계:

24 시간 전: 0

7일 전: 3

30일 전: 6

전체 시간: 4,097