주요 콘텐츠로 건너뛰기

Lenovo IdeaTab S2109A-F System Board Replacement

필요한 것

  1. Lenovo IdeaTab S2109A-F System Board Replacement, Battery: 1 단계, 이미지 1/2 Lenovo IdeaTab S2109A-F System Board Replacement, Battery: 1 단계, 이미지 2/2
    • Turn the tablet off before beginning this guide. It is dangerous to touch internal components while the tablet is on.

    • Place the tablet on its screen and use the opening tool to remove the back cover.

    • With the tool, place slight pressure on the tablet to pry the back panel off.

  2. Lenovo IdeaTab S2109A-F System Board Replacement: 2 단계, 이미지 1/2 Lenovo IdeaTab S2109A-F System Board Replacement: 2 단계, 이미지 2/2
    • Grab the battery and gently lift upwards. This will show a red and black coiled wire.

    • Pull the battery gently until the cord has no slack.

  3. Lenovo IdeaTab S2109A-F System Board Replacement: 3 단계, 이미지 1/1
    • Carefully hold the battery in one hand while your other hand's index finger and thumb grab the two wires nearest to their connection point.

    • Use your fingers to give a firm tug to the black and red wires, but do not yank them hard enough to damage the tablet.

    • Remove the battery from the device.

  4. Lenovo IdeaTab S2109A-F System Board Replacement, Unscrewing the System Board: 4 단계, 이미지 1/2 Lenovo IdeaTab S2109A-F System Board Replacement, Unscrewing the System Board: 4 단계, 이미지 2/2
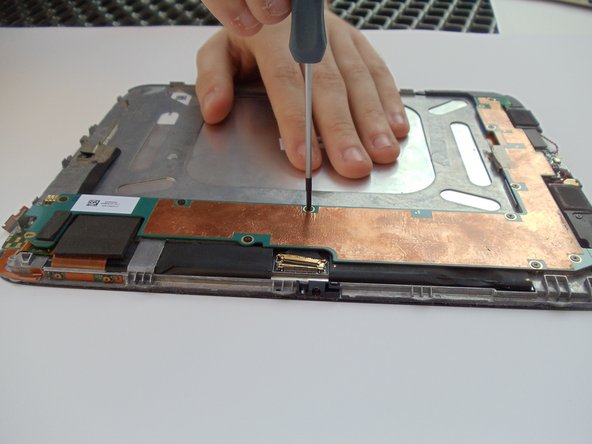
    • Locate the long, L-shaped system board; copper foil runs most of its length.

    • Remove the 10 2mm PH00 black screws located on the edges of the system board using a PH00 Screwdriver.

  5. Lenovo IdeaTab S2109A-F System Board Replacement, Disconnecting the First Connection to the System Board: 5 단계, 이미지 1/1
    • First Disconnect the gold connector by lifting the latch on it up and pulling it loose using the latch to pull.

  6. Lenovo IdeaTab S2109A-F System Board Replacement, Disconnecting the next three connections of the System Board: 6 단계, 이미지 1/2 Lenovo IdeaTab S2109A-F System Board Replacement, Disconnecting the next three connections of the System Board: 6 단계, 이미지 2/2
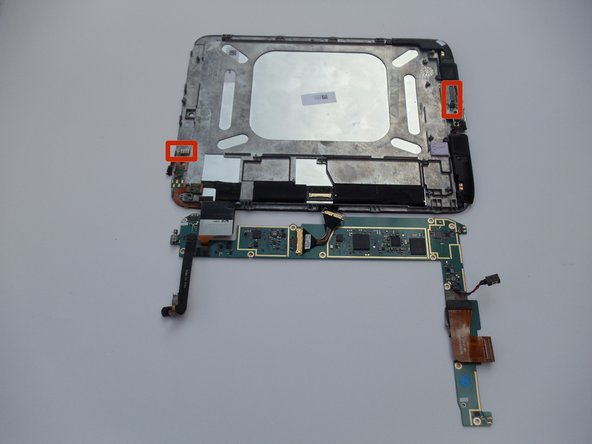
    • As you lift the board up you will notice two more connections, one near the power switch and one on the I/O Panel.

    • Remove each one with a minimal amount of upward pulling force as you flip the board over.

  7. Lenovo IdeaTab S2109A-F System Board Replacement, Disconnecting the final connector of the System Board.: 7 단계, 이미지 1/3 Lenovo IdeaTab S2109A-F System Board Replacement, Disconnecting the final connector of the System Board.: 7 단계, 이미지 2/3 Lenovo IdeaTab S2109A-F System Board Replacement, Disconnecting the final connector of the System Board.: 7 단계, 이미지 3/3
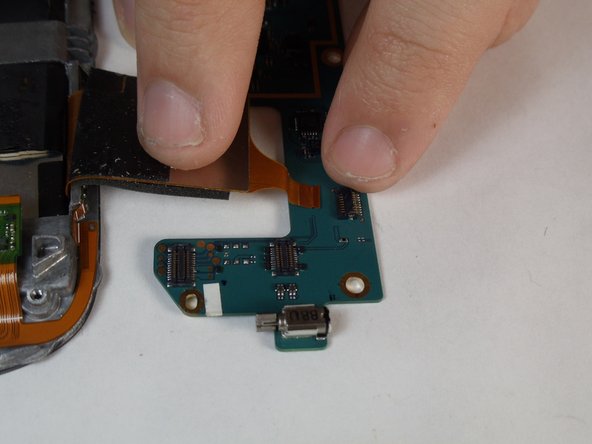
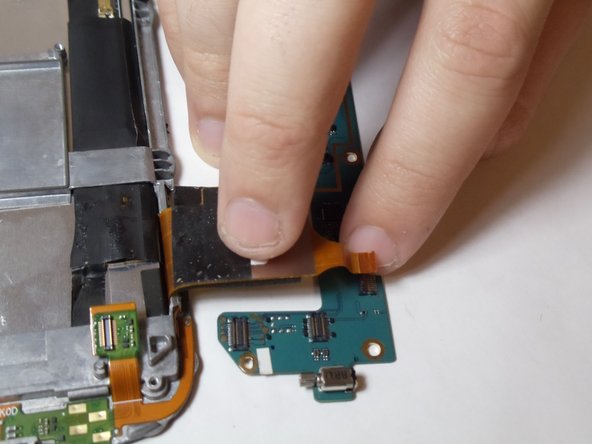
    • To disconnect the system board there is one last connection.

    • Lift up the back latch on this connection and the orange ribbon should slide right out without any effort thus disconnecting the board.

결론

To reassemble your device, follow these instructions in reverse order.

Timothy

회원 가입일: 01/30/15

301 평판

안내서 3개 작성하였습니다

USF Tampa, Team 17-3, Watkins Winter 2015 USF Tampa, Team 17-3, Watkins Winter 2015 회원

USFT-WATKINS-W15S17G3

4 회원들

안내서 10개 작성하였습니다

댓글 0개

댓글 쓰기

조회 통계:

24 시간 전: 0

7일 전: 5

30일 전: 9

전체 시간: 482