주요 콘텐츠로 건너뛰기

Lenovo Ideapad Flex 15 USB Header Adaptor Replacement

필요한 것

  1. Lenovo Ideapad Flex 15 USB Header Adaptor Replacement, Bottom Panel: 1 단계, 이미지 1/2 Lenovo Ideapad Flex 15 USB Header Adaptor Replacement, Bottom Panel: 1 단계, 이미지 2/2
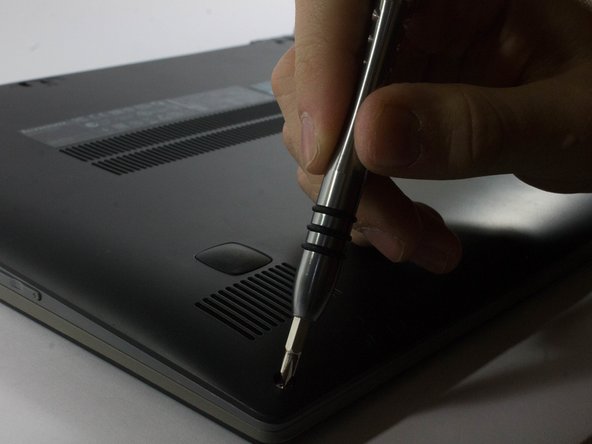
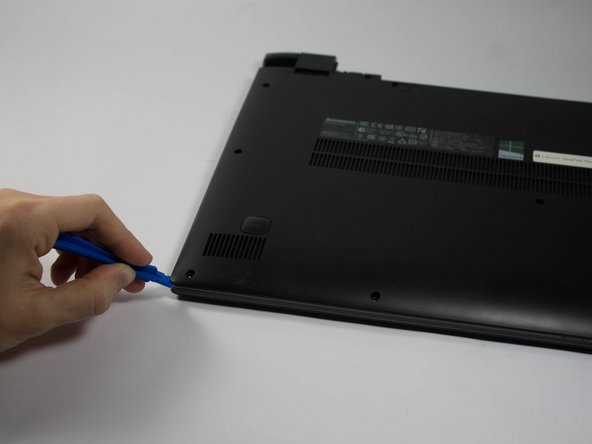
    • Start by removing the feet near the LCD hinge of the laptop to reveal two screws.

    • Using a Phillips #1 screwdriver, remove the top five (30 mm) screws underneath the battery.

  2. Lenovo Ideapad Flex 15 USB Header Adaptor Replacement: 2 단계, 이미지 1/2 Lenovo Ideapad Flex 15 USB Header Adaptor Replacement: 2 단계, 이미지 2/2
    • Once both feet are removed, two (40 mm) screws will reveal themselves. Unscrew these.

  3. Lenovo Ideapad Flex 15 USB Header Adaptor Replacement: 3 단계, 이미지 1/3 Lenovo Ideapad Flex 15 USB Header Adaptor Replacement: 3 단계, 이미지 2/3 Lenovo Ideapad Flex 15 USB Header Adaptor Replacement: 3 단계, 이미지 3/3
    • Working your way around the outer edges of the Flex 15, remove the 8 (30 mm) outer screws.

  4. Lenovo Ideapad Flex 15 USB Header Adaptor Replacement: 4 단계, 이미지 1/1
    • Remove the one (40 mm) screw in the middle of the Flex 15.

  5. Lenovo Ideapad Flex 15 USB Header Adaptor Replacement: 5 단계, 이미지 1/3 Lenovo Ideapad Flex 15 USB Header Adaptor Replacement: 5 단계, 이미지 2/3 Lenovo Ideapad Flex 15 USB Header Adaptor Replacement: 5 단계, 이미지 3/3
    • Using a plastic opening tool, make your way around the edge of the laptop.

    • There is a visible line between the bottom shell of the laptop and the laptop body itself.

  6. Lenovo Ideapad Flex 15 USB Header Adaptor Replacement: 6 단계, 이미지 1/2 Lenovo Ideapad Flex 15 USB Header Adaptor Replacement: 6 단계, 이미지 2/2
    • Make sure to pry evenly around this edge and only remove the bottom of the laptop when it is fully loose.

    • Using excessive force may break the bottom plastic. There are plastic clips along the edge of the laptop.

  7. Lenovo Ideapad Flex 15 USB Header Adaptor Replacement, USB Header Adaptor: 7 단계, 이미지 1/2 Lenovo Ideapad Flex 15 USB Header Adaptor Replacement, USB Header Adaptor: 7 단계, 이미지 2/2
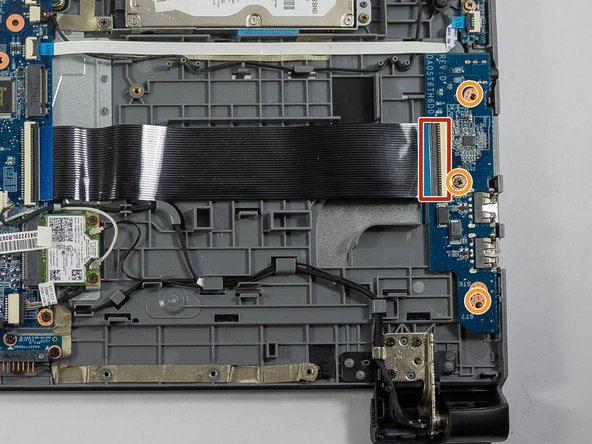
    • Locate the large blue circuit board on the leftmost side of the Flex 15.

    • This board is connected in two ways, by both a screw and a ribbon cable.

  8. Lenovo Ideapad Flex 15 USB Header Adaptor Replacement: 8 단계, 이미지 1/2 Lenovo Ideapad Flex 15 USB Header Adaptor Replacement: 8 단계, 이미지 2/2
    • The large black ribbon cable is attached to a header. With a blue opening tool, flip up the ZIF (zero insertion force) connector, then pry the header from a 0 degree angle to a 90 degree angle. Be sure not to snap the header while doing it, it is very delicate.

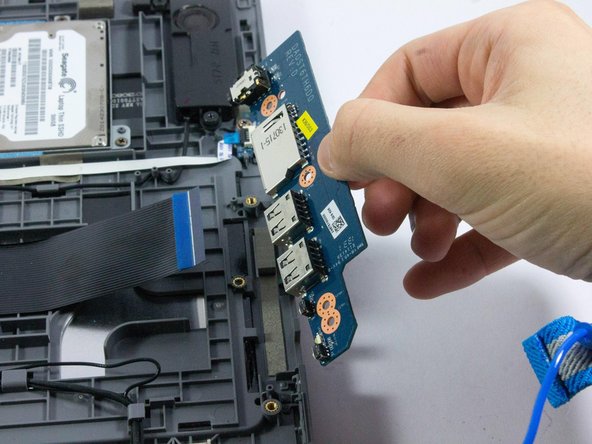
    • Once the ribbon cable is freed, gently pull it out of the header.

  9. Lenovo Ideapad Flex 15 USB Header Adaptor Replacement: 9 단계, 이미지 1/2 Lenovo Ideapad Flex 15 USB Header Adaptor Replacement: 9 단계, 이미지 2/2
    • Locate the (20 mm) screws with the orange ring and the arrow on the PCB pointing to it. Remove these screws.

    • Once freed, pull the assembly upwards, away from the computer.

결론

To reassemble your device, follow these instructions in reverse order.

Brent

회원 가입일: 03/04/16

804 평판

안내서 6개 작성하였습니다

UMass Dartmouth, Team 6-6, Bhusal Spring 2016 UMass Dartmouth, Team 6-6, Bhusal Spring 2016 회원

UMASSD-BHUSAL-S16S6G6

3 회원들

안내서 6개 작성하였습니다

댓글 0개

댓글 쓰기

조회 통계:

24 시간 전: 0

7일 전: 0

30일 전: 1

전체 시간: 537