주요 콘텐츠로 건너뛰기

Lenovo Ideapad Yoga 2 11 Battery Replacement

필요한 것

  1. Lenovo Ideapad Yoga 2 11 Battery Replacement, Back Panel: 1 단계, 이미지 1/1
    • Begin by turning your closed laptop so that you are looking at the bottom panel.

  2. Lenovo Ideapad Yoga 2 11 Battery Replacement: 2 단계, 이미지 1/2 Lenovo Ideapad Yoga 2 11 Battery Replacement: 2 단계, 이미지 2/2
    • Locate the 10 screws (6mm) around the border of the panel.

    • Using the Torx T5 Screwdriver, remove the screws.

  3. Lenovo Ideapad Yoga 2 11 Battery Replacement: 3 단계, 이미지 1/1
    • Now that the screws are removed, gently lift the back panel upwards to detach it from the rest of your laptop.

  4. Lenovo Ideapad Yoga 2 11 Battery Replacement, Battery: 4 단계, 이미지 1/2 Lenovo Ideapad Yoga 2 11 Battery Replacement, Battery: 4 단계, 이미지 2/2
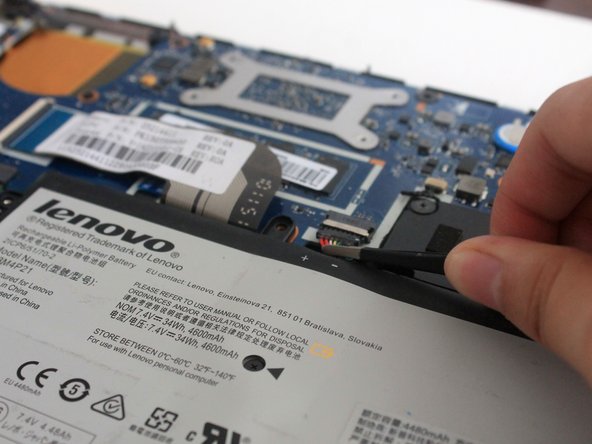
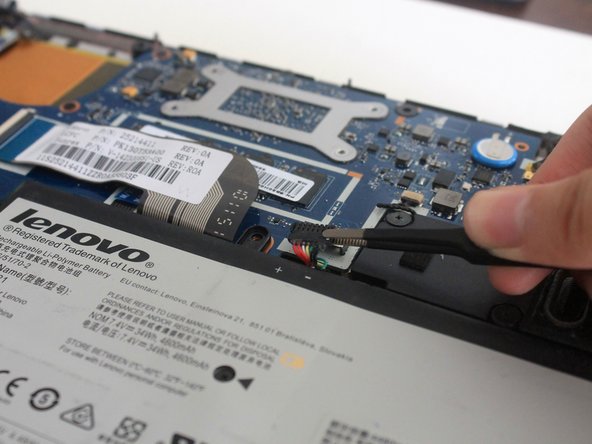
    • Locate the battery in the bottom right corner.

    • Using a Phillips #000, remove the 6 screws (3.5mm) on the border of the battery and the 7th screw (6.5mm) that is in the center of the battery.

  5. Lenovo Ideapad Yoga 2 11 Battery Replacement: 5 단계, 이미지 1/3 Lenovo Ideapad Yoga 2 11 Battery Replacement: 5 단계, 이미지 2/3 Lenovo Ideapad Yoga 2 11 Battery Replacement: 5 단계, 이미지 3/3
    이 단계에 사용된 도구:
    Tweezers
    $4.99
    구매
    • Locate the cable connecting to the battery. It is located at the top-center of the battery.

    • Use a pair of tweezers and place it so that the tweezer is around the cables. Gently pull the cables towards the battery to disconnect the cable.

  6. Lenovo Ideapad Yoga 2 11 Battery Replacement: 6 단계, 이미지 1/2 Lenovo Ideapad Yoga 2 11 Battery Replacement: 6 단계, 이미지 2/2
    • There may be tape around the edge of the battery to secure some wires. Use a pair of tweezers to remove the tape so that the wires are no longer attached to the battery.

  7. Lenovo Ideapad Yoga 2 11 Battery Replacement: 7 단계, 이미지 1/2 Lenovo Ideapad Yoga 2 11 Battery Replacement: 7 단계, 이미지 2/2
    • After you have unscrewed the screws, unplugged the cable, and removed the tape and wires, you can remove the battery from your laptop.

결론

To reassemble your device, follow these instructions in reverse order.

다른 2명이 해당 안내서를 완성하였습니다.

Andria Chen

회원 가입일: 10/17/17

624 평판

안내서 5개 작성하였습니다

UC Santa Barbara, Team S1-G5, Weedon Fall 2017 UC Santa Barbara, Team S1-G5, Weedon Fall 2017 회원

UCSB-WEEDON-F17S1G5

5 회원들

안내서 5개 작성하였습니다

댓글 한 개

Excellent instructions makes it easy even for novice

bhimanagouda patil - 답글

댓글 쓰기

조회 통계:

24 시간 전: 0

7일 전: 3

30일 전: 10

전체 시간: 1,815