주요 콘텐츠로 건너뛰기

Lenovo Legion Y530-15ICH Speaker Replacement

필요한 것

  1. Lenovo Legion Y530-15ICH Speaker  Replacement, Back Cover: 1 단계, 이미지 1/1
    • Ensure the device is powered off.

    • Use a PZ00 screwdriver bit to remove the eleven screws securing the back cover.

    • Five 7 mm screws

    • Six 4 mm screws

  2. Lenovo Legion Y530-15ICH Speaker  Replacement: 2 단계, 이미지 1/2 Lenovo Legion Y530-15ICH Speaker  Replacement: 2 단계, 이미지 2/2
    • Carefully pry the back cover off the computer using an opening pick.

    • Start at the corner of the laptop and work your way around the side. Gently pull up on the cover until it detaches.

  3. Lenovo Legion Y530-15ICH Speaker  Replacement, Battery: 3 단계, 이미지 1/1
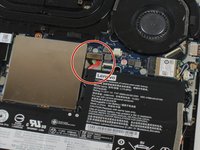
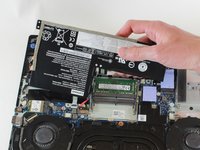
    • Use a Phillips screwdriver to remove the five 4 mm screws holding the battery in place.

  4. Lenovo Legion Y530-15ICH Speaker  Replacement: 4 단계, 이미지 1/2 Lenovo Legion Y530-15ICH Speaker  Replacement: 4 단계, 이미지 2/2
    • Disconnect the battery cable from its motherboard socket by gently pulling it towards the battery.

    • Pull parallel to the battery, not straight up.

    • Now you can safely remove the battery.

  5. Lenovo Legion Y530-15ICH Speaker  Replacement, Speaker: 5 단계, 이미지 1/1
    • Remove the five screws using the Phillips #0 screwdriver.

  6. Lenovo Legion Y530-15ICH Speaker  Replacement: 6 단계, 이미지 1/1
    • Gently peel up the copper adhesive.

  7. Lenovo Legion Y530-15ICH Speaker  Replacement: 7 단계, 이미지 1/1
    • Remove the speakers from the device.

결론

To reassemble your device, follow these instructions in reverse order.

다른 한 분이 해당 안내서를 완성하였습니다.

댓글 0개

댓글 쓰기

조회 통계:

24 시간 전: 5

7일 전: 19

30일 전: 48

전체 시간: 1,249