주요 콘텐츠로 건너뛰기

Lenovo N21 Chromebook Battery Replacement

필요한 것

  1. Lenovo N21 Chromebook Battery Replacement, Keyboard and Trackpad Panel: 1 단계, 이미지 1/2 Lenovo N21 Chromebook Battery Replacement, Keyboard and Trackpad Panel: 1 단계, 이미지 2/2
    • Power down the Chromebook before starting any repair.

    • Opening up your Chromebook voids the manufacturer warranty.

    • Use a screwdriver to remove the six 5.0mm Phillips screws from the bottom housing of the Chromebook.

    Where is write Protect Screw ???
    Please
    Lenovo N21 Chrome Book

    MAC IT - 답글

  2. Lenovo N21 Chromebook Battery Replacement: 2 단계, 이미지 1/2 Lenovo N21 Chromebook Battery Replacement: 2 단계, 이미지 2/2
    • Use a plastic opening tool to pry off the four rubber pegs from the bottom housing.

  3. Lenovo N21 Chromebook Battery Replacement: 3 단계, 이미지 1/2 Lenovo N21 Chromebook Battery Replacement: 3 단계, 이미지 2/2
    • Use a screwdriver to remove the four 5.0mm Phillips screws located under the rubber soles.

  4. Lenovo N21 Chromebook Battery Replacement: 4 단계, 이미지 1/3 Lenovo N21 Chromebook Battery Replacement: 4 단계, 이미지 2/3 Lenovo N21 Chromebook Battery Replacement: 4 단계, 이미지 3/3
    • Flip the laptop over and open the screen.

    • Gently pry the keyboard and trackpad panel away from the bottom housing using a plastic opening tool.

    • Once completely separated, do not immediately pull the panel completely away from the bottom housing. There are wires that are still connecting the panel to the rest of the internals of the Chromebook.

  5. Lenovo N21 Chromebook Battery Replacement: 5 단계, 이미지 1/2 Lenovo N21 Chromebook Battery Replacement: 5 단계, 이미지 2/2
    • Disconnect the keyboard ribbon cable by lifting the ZIF connector lock with a plastic opening tool or fingernail and gently pulling the ribbon cable straight out of its socket.

  6. Lenovo N21 Chromebook Battery Replacement: 6 단계, 이미지 1/3 Lenovo N21 Chromebook Battery Replacement: 6 단계, 이미지 2/3 Lenovo N21 Chromebook Battery Replacement: 6 단계, 이미지 3/3
    • Disconnect the trackpad ribbon cable by lifting the ZIF connector lock with a small prying tool or fingernail and gently pulling the ribbon cable straight out of its socket.

    My replacements did not come with the trackpad zif. I had to remove from the old part and move to the new part.

    Michael Selburg - 답글

  7. Lenovo N21 Chromebook Battery Replacement: 7 단계, 이미지 1/1
    • Remove the keyboard and trackpad panel away from the device.

    Has anyone gone through the experience of replacing JUST the keyboard? It looks like they are available as a separate component, e.g. https://www.ebay.com/itm/New-for-Lenovo-... but I haven’t found a tutorial on removing the keyboard from its bezel. Thanks!

    mbates - 답글

  8. Lenovo N21 Chromebook Battery Replacement, Battery: 8 단계, 이미지 1/3 Lenovo N21 Chromebook Battery Replacement, Battery: 8 단계, 이미지 2/3 Lenovo N21 Chromebook Battery Replacement, Battery: 8 단계, 이미지 3/3
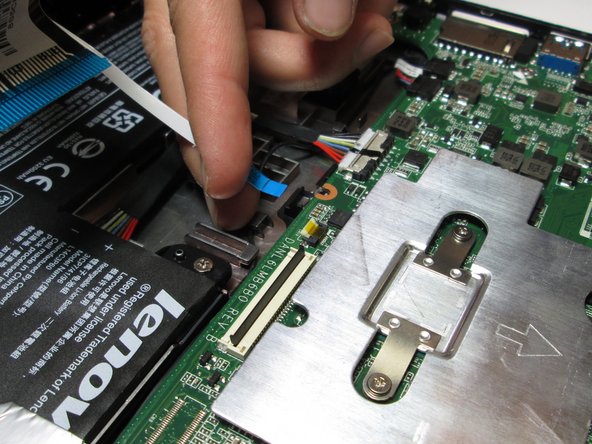
    • Disconnect the white charging cable connectors by pulling straight down on the connector.

  9. Lenovo N21 Chromebook Battery Replacement: 9 단계, 이미지 1/2 Lenovo N21 Chromebook Battery Replacement: 9 단계, 이미지 2/2
    • Use a Phillips screwdriver to remove the three 3mm screws located along the edge of the battery.

  10. Lenovo N21 Chromebook Battery Replacement: 10 단계, 이미지 1/1
    • Peel up on the silver cable enough to remove the adhesive to the battery.

    • When moving the adhesive cable, be careful not to disconnect or damage the cable and motherboard.

  11. Lenovo N21 Chromebook Battery Replacement: 11 단계, 이미지 1/1
    • Remove the battery by pulling back and up.

결론

To reassemble your device, follow these instructions in reverse order.

다른 7명이 해당 안내서를 완성하였습니다.

Jacob Taylor

회원 가입일: 04/26/17

260 평판

안내서 1개 작성함

Cal Poly, Team S21-G2, Livingston Spring 2017 Cal Poly, Team S21-G2, Livingston Spring 2017 회원

CPSU-LIVINGSTON-S17S21G2

4 회원들

안내서 12개 작성하였습니다

댓글 한 개

Great step by step instructions!

M Mikusa - 답글

댓글 쓰기

조회 통계:

24 시간 전: 0

7일 전: 2

30일 전: 43

전체 시간: 8,920