주요 콘텐츠로 건너뛰기

Lenovo Tab 2 A8 Motherboard Replacement

필요한 것

  1. Lenovo Tab 2 A8 Motherboard Replacement, Removing the Back Panel: 1 단계, 이미지 1/3 Lenovo Tab 2 A8 Motherboard Replacement, Removing the Back Panel: 1 단계, 이미지 2/3 Lenovo Tab 2 A8 Motherboard Replacement, Removing the Back Panel: 1 단계, 이미지 3/3
    • Place the tablet face down on a soft, stable surface that will protect the screen.

    • Next, Scrape off the seal over the screw in the back of the tablet with a Metal Spudger.

    • Use the Phillips #000 Screwdriver to remove the M1.4 × 2.5 screw.

    • If the seal covering the screw has already been removed, please proceed to the next step in the process.

    • As the screw is small, you may wish to extract it using a pair of tweezers.

  2. Lenovo Tab 2 A8 Motherboard Replacement: 2 단계, 이미지 1/3 Lenovo Tab 2 A8 Motherboard Replacement: 2 단계, 이미지 2/3 Lenovo Tab 2 A8 Motherboard Replacement: 2 단계, 이미지 3/3
    • Starting on the side, work your way around the the tablet to pop off the back cover. You will want to utilize a metal Spudger for this.

    • Some force may be required initially to pry the back cover off.

    • Note that the button tabs for this device are loose inside the case and will fall out when opening.

  3. Lenovo Tab 2 A8 Motherboard Replacement, Motherboard: 3 단계, 이미지 1/3 Lenovo Tab 2 A8 Motherboard Replacement, Motherboard: 3 단계, 이미지 2/3 Lenovo Tab 2 A8 Motherboard Replacement, Motherboard: 3 단계, 이미지 3/3
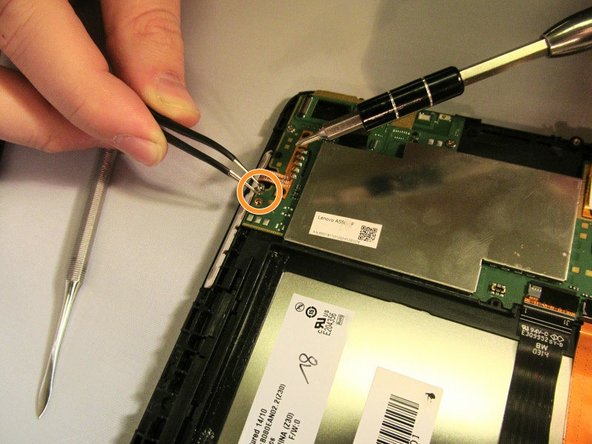
    • Using the Phillips #000 screwdriver, remove the four M1.4 × 2.5 screws holding the motherboard in place.

    • Because the screws are small, it is a good idea to remove them with a pair of tweezers.

  4. Lenovo Tab 2 A8 Motherboard Replacement: 4 단계, 이미지 1/3 Lenovo Tab 2 A8 Motherboard Replacement: 4 단계, 이미지 2/3 Lenovo Tab 2 A8 Motherboard Replacement: 4 단계, 이미지 3/3
    • Remove the M1.4 × 2.5 screw securing the battery lead to the battery with the Phillips #000 screwdriver.

    • With a pair of tweezers, gently move the battery lead so it will not obstruct the motherboard.

    • With a pair of tweezers, carefully unplug the strip connecting the screen to the motherboard.

    • The strip connecting the screen to the motherboard is firmly in place and may require some careful use of strength to unplug it.

  5. Lenovo Tab 2 A8 Motherboard Replacement: 5 단계, 이미지 1/1
    • Remove the motherboard by lifting the top edge and pulling outward to free it from the small tabs that hold it in place.

    • The small tabs can be broken if the motherboard is pried up too forcefully.

    • The button tabs are fastened to the motherboard by a small adhesive strip. Take care in removing the motherboard to avoid tearing the wires.

결론

To reassemble your device, follow these instructions in reverse order.

다른 3명이 해당 안내서를 완성하였습니다.

James Bailey

회원 가입일: 10/06/15

590 평판

안내서 3개 작성하였습니다

댓글 2개

Love the pictures . GREAT instructions!

I have a Lenovo TB3-850F tablet.

Now, can I upgrade the RAM from 1 gig to 2 gig or 4 gig? The picture procedure would be great if this is possible.

Thanks,

Lance Houser - 답글

[|hello, can you please help me.Because I loose the connection between display and balance board. I don't know what to do. So you kindly help us.]

Abhiram - 답글

댓글 쓰기

조회 통계:

24 시간 전: 2

7일 전: 4

30일 전: 7

전체 시간: 2,897