주요 콘텐츠로 건너뛰기

Lenovo ThinkPad Edge E420s Optical Drive Replacement

필요한 것

  1. Lenovo ThinkPad Edge E420s Optical Drive Replacement, Hard Drive: 1 단계, 이미지 1/1
    • There is no external access to the battery. Please make sure the at the battery has been drained or disabled through BIOS before beginning.

    • Flip the device over.

  2. Lenovo ThinkPad Edge E420s Optical Drive Replacement: 2 단계, 이미지 1/1
    • Use a Phillips #00 screwdriver to remove one M2 x 3mm screw from the side of the device.

  3. Lenovo ThinkPad Edge E420s Optical Drive Replacement: 3 단계, 이미지 1/3 Lenovo ThinkPad Edge E420s Optical Drive Replacement: 3 단계, 이미지 2/3 Lenovo ThinkPad Edge E420s Optical Drive Replacement: 3 단계, 이미지 3/3
    • Swing the cover out slightly like a hinge.

    • Pull the cover directly away from the case towards the base of the laptop.

    • Lift the cover up and away from the device to remove it.

    • You may hear a slight pop when you pull the cover off.

  4. Lenovo ThinkPad Edge E420s Optical Drive Replacement: 4 단계, 이미지 1/1
    • Use the clear tab to slide the hard drive out of the device.

  5. Lenovo ThinkPad Edge E420s Optical Drive Replacement: 5 단계, 이미지 1/3 Lenovo ThinkPad Edge E420s Optical Drive Replacement: 5 단계, 이미지 2/3 Lenovo ThinkPad Edge E420s Optical Drive Replacement: 5 단계, 이미지 3/3
    • To replace the hard drive, remove the four M2 × 4mm wafer-headed screws on the sides of the hard drive case using a Phillips #00 screwdriver.

    • Slide the old hard drive directly out.

    • When reassembling, make sure the hard drive is securely in the case before beginning.

  6. Lenovo ThinkPad Edge E420s Optical Drive Replacement, Top Case: 6 단계, 이미지 1/2 Lenovo ThinkPad Edge E420s Optical Drive Replacement, Top Case: 6 단계, 이미지 2/2
    • Use a Phillips #0 screwdriver to remove eight M2 × 3 mm screws near the front opening and scattered across the bottom of the laptop.

    • Remove three M2x3 mm screws using a Phillips #00 screwdriver from the base of the laptop near the opening.

  7. Lenovo ThinkPad Edge E420s Optical Drive Replacement: 7 단계, 이미지 1/1
    • Remove the M3 x 2mm screw from the hole left by the hard drive using a Phillips #00 screwdriver.

  8. Lenovo ThinkPad Edge E420s Optical Drive Replacement: 8 단계, 이미지 1/2 Lenovo ThinkPad Edge E420s Optical Drive Replacement: 8 단계, 이미지 2/2
    • Flip over the device.

    • Open the device normally.

  9. Lenovo ThinkPad Edge E420s Optical Drive Replacement: 9 단계, 이미지 1/1
    • Wedge the plastic opening tool between the upper and lower halves of the lower case.

    • Lift the end of the opening tool slowly until the case separates.

    • Hearing a small popping or cracking noise during this step is normal

  10. Lenovo ThinkPad Edge E420s Optical Drive Replacement: 10 단계, 이미지 1/1
    • Lift the upper half of the case up slowly.

    • Be sure not to yank any of the wires connected to the case as this could damage them.

  11. Lenovo ThinkPad Edge E420s Optical Drive Replacement: 11 단계, 이미지 1/3 Lenovo ThinkPad Edge E420s Optical Drive Replacement: 11 단계, 이미지 2/3 Lenovo ThinkPad Edge E420s Optical Drive Replacement: 11 단계, 이미지 3/3
    • Locate and disconnect the 4 ribbon wires from the top case.

    • Locate and disconnect the two additional connecting wires.

    • Some wires may be connected by a clamp. In order to remove the clamp, press upwards on the lever attached to the connector

    • Be careful to not yank on the wires when disconnecting them as they are easily damaged.

  12. Lenovo ThinkPad Edge E420s Optical Drive Replacement: 12 단계, 이미지 1/1
    • Lift the unattached case away from the device and place it to the side.

    • When reassembling ensure that all parts of the case are properly aligned.

  13. Lenovo ThinkPad Edge E420s Optical Drive Replacement, Optical Drive: 13 단계, 이미지 1/2 Lenovo ThinkPad Edge E420s Optical Drive Replacement, Optical Drive: 13 단계, 이미지 2/2
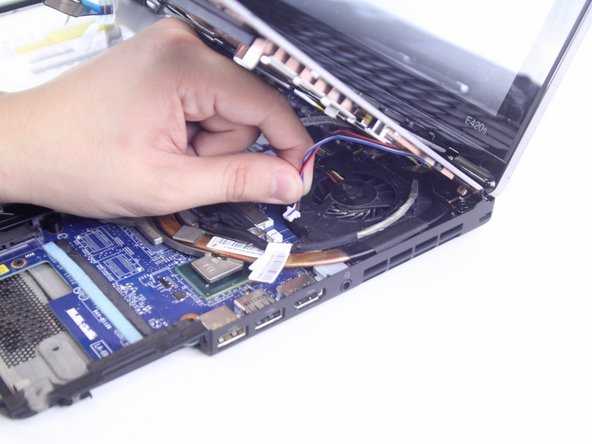
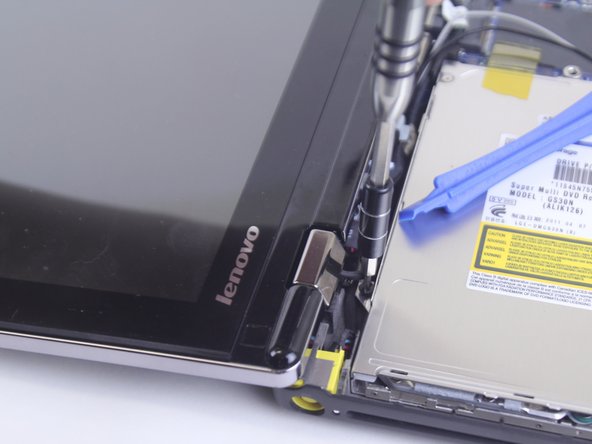
    • Remove the two M2 x 3mm securing the the optical drive to the device using a Phillips #000 screwdriver.

  14. Lenovo ThinkPad Edge E420s Optical Drive Replacement: 14 단계, 이미지 1/1
    • Slide the optical drive away from the motherboard in order to remove it.

결론

To reassemble your device, follow these instructions in reverse order.

Keyadri Summerlin

회원 가입일: 10/02/18

1,003 평판

안내서 7개 작성하였습니다

댓글 0개

댓글 쓰기

조회 통계:

24 시간 전: 0

7일 전: 0

30일 전: 0

전체 시간: 140