주요 콘텐츠로 건너뛰기

Lenovo ThinkPad Edge E520 USB Drive Replacement

필요한 것

  1. Lenovo ThinkPad Edge E520 USB Drive Replacement, Back Plate: 1 단계, 이미지 1/2 Lenovo ThinkPad Edge E520 USB Drive Replacement, Back Plate: 1 단계, 이미지 2/2
    • Flip over the laptop and position it with the battery being furthest away from you.

    • Remove the four screws on the edges of the T-Shaped plate with a Phillips #0 screwdriver.

    • Remove the T-Shaped plate from the back of the computer. It should come off easily if all four aforementioned screws are removed.

    • Screw length 6.35 mm, head 3.175 mm

  2. Lenovo ThinkPad Edge E520 USB Drive Replacement, Battery: 2 단계, 이미지 1/1
    • Power off and unplug the computer before the start of these steps.

    • Close the laptop lid.

  3. Lenovo ThinkPad Edge E520 USB Drive Replacement: 3 단계, 이미지 1/2 Lenovo ThinkPad Edge E520 USB Drive Replacement: 3 단계, 이미지 2/2
    • Flip the computer so that the back is facing upwards.

    • Locate the switch used to release the battery.

    • The switch should be located towards the hinge of the laptop near the battery pack and have a lock icon associated with it.

  4. Lenovo ThinkPad Edge E520 USB Drive Replacement: 4 단계, 이미지 1/2 Lenovo ThinkPad Edge E520 USB Drive Replacement: 4 단계, 이미지 2/2
    • Slide the switch towards the unlocked lock icon.

    • While holding it in the unlocked position, slide the battery towards the hinge.

    • Fully separate the battery pack from the back of the laptop.

  5. Lenovo ThinkPad Edge E520 USB Drive Replacement, Keyboard: 5 단계, 이미지 1/1
    • Remove the battery from the back of the device

    • Unscrew the two 3.175 mm diameter and 6.35 mm length screws with keyboard symbols pointing at them using a Phillips head screwdriver.

  6. Lenovo ThinkPad Edge E520 USB Drive Replacement: 6 단계, 이미지 1/3 Lenovo ThinkPad Edge E520 USB Drive Replacement: 6 단계, 이미지 2/3 Lenovo ThinkPad Edge E520 USB Drive Replacement: 6 단계, 이미지 3/3
    • Turn the laptop back over so that the keyboard is facing you.

    • Use your hands to separate the keyboard from the laptop

  7. Lenovo ThinkPad Edge E520 USB Drive Replacement, Front Compartment Case: 7 단계, 이미지 1/1
    • Remove all remaining screws on the back of the device.

    • Screw length 6.35 mm, head 3.175 mm Screws behind battery length 3.175 mm, head 3.175 mm

  8. Lenovo ThinkPad Edge E520 USB Drive Replacement: 8 단계, 이미지 1/3 Lenovo ThinkPad Edge E520 USB Drive Replacement: 8 단계, 이미지 2/3 Lenovo ThinkPad Edge E520 USB Drive Replacement: 8 단계, 이미지 3/3
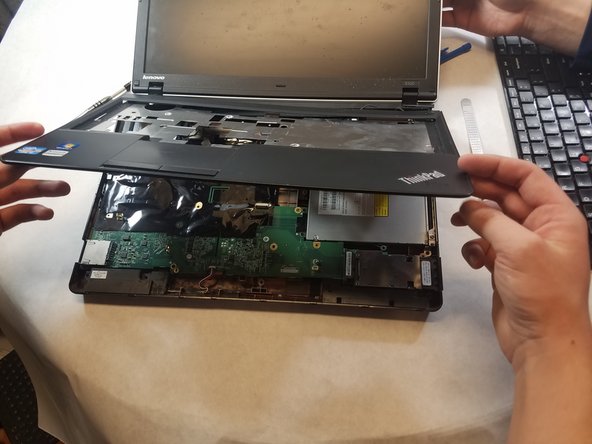
    • Flip device back over and open the screen.

    • Insert the prying tool on one edge of the case and follow along all four edges until the case frees up.

    • Remove the case.

  9. Lenovo ThinkPad Edge E520 USB Drive Replacement, USB Drive: 9 단계, 이미지 1/1
    • There is a silver rectangle next to the CD drive.

    • Remove the black tray from the silver rectangular box.

  10. Lenovo ThinkPad Edge E520 USB Drive Replacement: 10 단계, 이미지 1/1
    • There are two screws that are 1/8 inch under the square cutouts in the silver rectangular box.

    • Unscrew the two screws with a Phillips head screwdriver.

  11. Lenovo ThinkPad Edge E520 USB Drive Replacement: 11 단계, 이미지 1/1
    • Lift the silver rectangular box up and slide outwards to remove USB Drive.

결론

To reassemble your device, follow these instructions in reverse order.

Holly Dunham

회원 가입일: 03/01/18

420 평판

안내서 3개 작성하였습니다

UMass Dartmouth, Team S1-G2, Simcock Spring 2018 UMass Dartmouth, Team S1-G2, Simcock Spring 2018 회원

UMASSD-SIMCOCK-S18S1G2

4 회원들

안내서 12개 작성하였습니다

댓글 0개

댓글 쓰기

조회 통계:

24 시간 전: 1

7일 전: 2

30일 전: 3

전체 시간: 424