소개
This guide will cover how to remove and replace the battery in the Lenovo ThinkPad X1 Carbon 6th Gen. This may be necessary if your battery is faulty, or simply just old. Laptop batteries will lose some of their capacity as they are used, and the typical battery only lasts a few years. If you are having trouble with your computer, and believe that the battery is at fault, consult our troubleshooting page before attempting to replace the battery. Keep in mind that a faulty power adapter may be causing the issues. Before beginning, be sure to power off your laptop and disconnect it from any power source. Use caution when handling the battery and dispose of it properly.
필요한 것
-
-
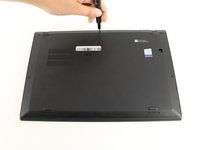
Use a Phillips #0 screwdriver to unscrew the five screws that secure the back cover to the laptop.
-
-
-
-
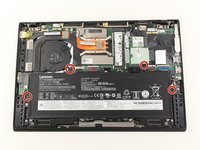
Use the Phillips #0 screwdriver to remove the four 5 mm screws that secure the battery to the laptop frame.
-


To reassemble your device, follow these instructions in reverse order.
To reassemble your device, follow these instructions in reverse order.
다른 23명이 해당 안내서를 완성하였습니다.

팀

Cal Poly, Team S19-G4, White Winter 2020 Cal Poly, Team S19-G4, White Winter 2020 회원
CPSU-WHITE-W20S19G4
3 회원들
안내서 23개를 작성함
댓글 9개
Does it require to switch off battery in BIOS first?
My work wanted to e-waste my 3 year-old ThinkPad. Bought the replacement battery here, followed the instructions—it works fine now. Thanks a lot.
danke )) ))
Great guide, and what an easy laptop to work on!!!
Step 4 is wrong.
You cannot pull the battery out on bottom edge because of the grey plastic arresting aids which you can see in the picture of step 3.
You first have to slide the battery as far as possible to the bottom edge into these grey parts so that the plug connection on top gets lose slightly and then carefully pull it out on side of the mainboard connector.
Also you do not need that Jimmy in step 2. After removing the screws just pull and lift the base cover with your fingers from the area where the hinges are located and then it easily slips out at the front.