주요 콘텐츠로 건너뛰기

Lenovo ThinkPad X1 Carbon 6th Gen Keyboard Replacement

필요한 것

  1. Lenovo ThinkPad X1 Carbon 6th Gen Keyboard Replacement, Back Cover: 1 단계, 이미지 1/2 Lenovo ThinkPad X1 Carbon 6th Gen Keyboard Replacement, Back Cover: 1 단계, 이미지 2/2
    • Use a Phillips #0 screwdriver to unscrew the five screws that secure the back cover to the laptop.

    • The screws do not completely come off from the back cover. Loosen until the screws are completely loose.

  2. Lenovo ThinkPad X1 Carbon 6th Gen Keyboard Replacement: 2 단계, 이미지 1/2 Lenovo ThinkPad X1 Carbon 6th Gen Keyboard Replacement: 2 단계, 이미지 2/2
    • Use a Jimmy to lift the cover directly up off of the locating pins.

    • Though a metal opening tool is shown in the image, we recommend using plastic opening tools to minimize any cosmetic damage.

    • Remove the back cover.

    • If you encounter resistance when lifting the cover, revisit the screws to see if any of them are still threaded on to the device.

  3. Lenovo ThinkPad X1 Carbon 6th Gen Keyboard Replacement, Battery: 3 단계, 이미지 1/2 Lenovo ThinkPad X1 Carbon 6th Gen Keyboard Replacement, Battery: 3 단계, 이미지 2/2
    • Use the Phillips #0 screwdriver to remove the four 5 mm screws that secure the battery to the laptop frame.

  4. Lenovo ThinkPad X1 Carbon 6th Gen Keyboard Replacement: 4 단계, 이미지 1/1
    • Take out the battery by lifting it from the bottom edge of the laptop, and then pulling away from the motherboard.

  5. Lenovo ThinkPad X1 Carbon 6th Gen Keyboard Replacement, SSD: 5 단계, 이미지 1/2 Lenovo ThinkPad X1 Carbon 6th Gen Keyboard Replacement, SSD: 5 단계, 이미지 2/2
    • Use a Phillips #0 screwdriver to remove the single screw that secures the SSD to the motherboard.

  6. Lenovo ThinkPad X1 Carbon 6th Gen Keyboard Replacement: 6 단계, 이미지 1/1
    • Carefully remove the SSD by lifting it and pulling it out of the pins towards the battery of the laptop.

  7. Lenovo ThinkPad X1 Carbon 6th Gen Keyboard Replacement: 7 단계, 이미지 1/2 Lenovo ThinkPad X1 Carbon 6th Gen Keyboard Replacement: 7 단계, 이미지 2/2
    • Carefully peel the thermal pad off of the back of the SSD.

    • If the thermal pad is in good shape, you can reuse it by applying it to the replacement SSD.

  8. Lenovo ThinkPad X1 Carbon 6th Gen Keyboard Replacement, Fan: 8 단계, 이미지 1/2 Lenovo ThinkPad X1 Carbon 6th Gen Keyboard Replacement, Fan: 8 단계, 이미지 2/2
    • Use a Phillips #0 screwdriver to loosen the four screws that secure the fan to the motherboard.

    • The screws do not completely come off from the fan mount. Loosen until the screws are completely loose.

  9. Lenovo ThinkPad X1 Carbon 6th Gen Keyboard Replacement: 9 단계, 이미지 1/2 Lenovo ThinkPad X1 Carbon 6th Gen Keyboard Replacement: 9 단계, 이미지 2/2
    • Use nylon tipped tweezers, or your fingers, to gently pull the fan's power cable towards the SSD, disconnecting it from the pins.

    • Be sure to pull on all of the cables at the same time.

  10. Lenovo ThinkPad X1 Carbon 6th Gen Keyboard Replacement: 10 단계, 이미지 1/2 Lenovo ThinkPad X1 Carbon 6th Gen Keyboard Replacement: 10 단계, 이미지 2/2
    • Use a plastic opening pick to lift the fan mount.

    • Use your fingers to gently pull the fan diagonally away from where it is connected.

  11. Lenovo ThinkPad X1 Carbon 6th Gen Keyboard Replacement: 11 단계, 이미지 1/1
    • Turn the fan over to expose the interior.

    • If necessary, clean out the fan or wipe away and replace the thermal paste.

  12. Lenovo ThinkPad X1 Carbon 6th Gen Keyboard Replacement, Motherboard: 12 단계, 이미지 1/3 Lenovo ThinkPad X1 Carbon 6th Gen Keyboard Replacement, Motherboard: 12 단계, 이미지 2/3 Lenovo ThinkPad X1 Carbon 6th Gen Keyboard Replacement, Motherboard: 12 단계, 이미지 3/3
    • Remove each of the 7 main ribbon cables that connect the motherboard to the rest of the laptop.

    • Detach the last ribbon cable in the same way as before.

    • These connectors and cables and are all very fragile. Handle with care.

    • For the red and orange cables, use a spudger to lift the black plastic bar.

    • The bar should be lifted to the point where it can move easily.

  13. Lenovo ThinkPad X1 Carbon 6th Gen Keyboard Replacement: 13 단계, 이미지 1/2 Lenovo ThinkPad X1 Carbon 6th Gen Keyboard Replacement: 13 단계, 이미지 2/2
    • Place a spudger under the cables to disconnect them from the WAN card.

    • Tweezers or a hook may also be used for this step.

  14. Lenovo ThinkPad X1 Carbon 6th Gen Keyboard Replacement: 14 단계, 이미지 1/2 Lenovo ThinkPad X1 Carbon 6th Gen Keyboard Replacement: 14 단계, 이미지 2/2
    • Use a Phillips #00 screwdriver to remove the two 3mm screws that secure the IO bracket.

  15. Lenovo ThinkPad X1 Carbon 6th Gen Keyboard Replacement: 15 단계, 이미지 1/2 Lenovo ThinkPad X1 Carbon 6th Gen Keyboard Replacement: 15 단계, 이미지 2/2
    • The antenna brackets act as a securing mount for the motherboard to the device.

    • Remove the two 3mm antenna bracket screws using a Phillips #00 screwdriver.

  16. Lenovo ThinkPad X1 Carbon 6th Gen Keyboard Replacement: 16 단계, 이미지 1/1
    • Lift from the location of the screw towards you. Then pull towards the screw side to remove the bracket.

  17. Lenovo ThinkPad X1 Carbon 6th Gen Keyboard Replacement: 17 단계, 이미지 1/1
    • Lift the white and black wires from their press on connections. Make sure to grab the connector head, not the wire itself

  18. Lenovo ThinkPad X1 Carbon 6th Gen Keyboard Replacement: 18 단계, 이미지 1/1
    • The housing for the SD card slot is directly attached to the device.

    • Remove and unscrew the two 5mm screws with a Phillips #0 screwdriver.

  19. Lenovo ThinkPad X1 Carbon 6th Gen Keyboard Replacement: 19 단계, 이미지 1/2 Lenovo ThinkPad X1 Carbon 6th Gen Keyboard Replacement: 19 단계, 이미지 2/2
    • Using an iFixit SIM card screw head tip, apply pressure to the hole to disconnect the SD card slot from the device.

  20. Lenovo ThinkPad X1 Carbon 6th Gen Keyboard Replacement: 20 단계, 이미지 1/1
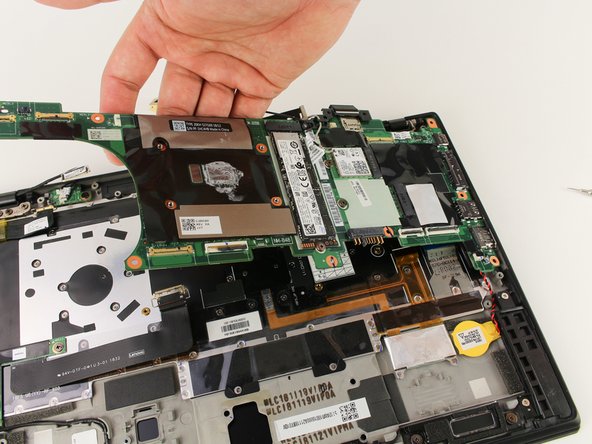
    • Use a Phillips #00 screwdriver to remove each of the four remaining 3mm screws securing the motherboard to the device.

  21. Lenovo ThinkPad X1 Carbon 6th Gen Keyboard Replacement: 21 단계, 이미지 1/2 Lenovo ThinkPad X1 Carbon 6th Gen Keyboard Replacement: 21 단계, 이미지 2/2
    • Lift from the top of the motherboard towards you.

    • Pull away from the IO port side to remove the motherboard.

  22. Lenovo ThinkPad X1 Carbon 6th Gen Keyboard Replacement, Daughterboard [AUX]: 22 단계, 이미지 1/1
    • Carefully remove cord from daughterboard.

  23. Lenovo ThinkPad X1 Carbon 6th Gen Keyboard Replacement: 23 단계, 이미지 1/1
    • Use a PH0 screwdriver to remove the three 2mm screws holding the daughterboard in place.

  24. Lenovo ThinkPad X1 Carbon 6th Gen Keyboard Replacement, Keyboard: 24 단계, 이미지 1/1
    • Remove daughterboard (Explained in another guide).

    • Use a PH0 screwdriver to remove the two 2mm screws holding the USB port in place.

  25. Lenovo ThinkPad X1 Carbon 6th Gen Keyboard Replacement: 25 단계, 이미지 1/1
    • Remove the tape covering screws holding the keyboard in place.

  26. Lenovo ThinkPad X1 Carbon 6th Gen Keyboard Replacement: 26 단계, 이미지 1/1
    • Be careful not to lose any of the screws.

    • Remove the seventy-two 0.5mm screws holding keyboard in place.

  27. Lenovo ThinkPad X1 Carbon 6th Gen Keyboard Replacement: 27 단계, 이미지 1/1
    • This will break the adhesive, this is necessary.

    • Carefully push the keyboard from the front, starting at the edge (Left edge is depicted).

결론

To reassemble your device, follow these instructions in reverse order.

다른 3명이 해당 안내서를 완성하였습니다.

Sutthikiat Sungkeetanon

회원 가입일: 10/03/22

238 평판

안내서 2개 작성하였습니다

댓글 한 개

Thanks for posting that. What a project!

Thomas Duncan - 답글

댓글 쓰기

조회 통계:

24 시간 전: 7

7일 전: 53

30일 전: 196

전체 시간: 4,185