주요 콘텐츠로 건너뛰기

Lenovo ThinkPad X1 Carbon 7th Gen Daughterboard Replacement

필요한 것

  1. Lenovo ThinkPad X1 Carbon 7th Gen Daughterboard Replacement, Back cover removal: 1 단계, 이미지 1/2 Lenovo ThinkPad X1 Carbon 7th Gen Daughterboard Replacement, Back cover removal: 1 단계, 이미지 2/2
    • Use a Phillips #1 screwdriver to loosen the five captive screws securing the back cover.

  2. Lenovo ThinkPad X1 Carbon 7th Gen Daughterboard Replacement, Insert an opening pick: 2 단계, 이미지 1/3 Lenovo ThinkPad X1 Carbon 7th Gen Daughterboard Replacement, Insert an opening pick: 2 단계, 이미지 2/3 Lenovo ThinkPad X1 Carbon 7th Gen Daughterboard Replacement, Insert an opening pick: 2 단계, 이미지 3/3
    • Insert an opening pick at a 45˚ angle between the back cover and frame near the rear middle screw.

    • Pry up on the pick to release the clips securing the back cover to the frame.

    • You will hear several clicks while prying up.

  3. Lenovo ThinkPad X1 Carbon 7th Gen Daughterboard Replacement, Remove the back cover: 3 단계, 이미지 1/3 Lenovo ThinkPad X1 Carbon 7th Gen Daughterboard Replacement, Remove the back cover: 3 단계, 이미지 2/3 Lenovo ThinkPad X1 Carbon 7th Gen Daughterboard Replacement, Remove the back cover: 3 단계, 이미지 3/3
    • Lift the back cover up and remove it from the chassis.

    • You will hear several clicks while lifting up.

    • During reassembly, this is a good point to power on your laptop and test all functions before sealing it up. Be sure to power your laptop back down before you continue working.

  4. Lenovo ThinkPad X1 Carbon 7th Gen Daughterboard Replacement, Unfasten the battery: 4 단계, 이미지 1/2 Lenovo ThinkPad X1 Carbon 7th Gen Daughterboard Replacement, Unfasten the battery: 4 단계, 이미지 2/2
    • Use a Phillips #0 screwdriver to remove the six 4.9 mm-long screws securing the battery.

  5. Lenovo ThinkPad X1 Carbon 7th Gen Daughterboard Replacement, Remove the battery: 5 단계, 이미지 1/3 Lenovo ThinkPad X1 Carbon 7th Gen Daughterboard Replacement, Remove the battery: 5 단계, 이미지 2/3 Lenovo ThinkPad X1 Carbon 7th Gen Daughterboard Replacement, Remove the battery: 5 단계, 이미지 3/3
    • Lift the battery straight out of its recess and remove it.

  6. Lenovo ThinkPad X1 Carbon 7th Gen Daughterboard Replacement, Daughterboard: 6 단계, 이미지 1/2 Lenovo ThinkPad X1 Carbon 7th Gen Daughterboard Replacement, Daughterboard: 6 단계, 이미지 2/2
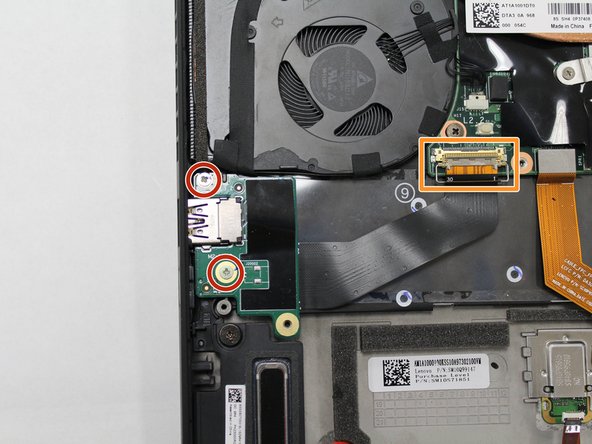
    • Remove the two 1.3 mm screws with a Phillips #0 screwdriver.

    • Disconnect the interconnect cable from the motherboard by flipping up the locking lever and pulling out the ribbon cable.

  7. Lenovo ThinkPad X1 Carbon 7th Gen Daughterboard Replacement: 7 단계, 이미지 1/1
    • Lift the right side of the daughterboard up, then slide the daughterboard to the right to remove it from the computer.

결론

To reassemble your device, follow these instructions in reverse order.

댓글 0개

댓글 쓰기

조회 통계:

24 시간 전: 2

7일 전: 11

30일 전: 74

전체 시간: 1,985