주요 콘텐츠로 건너뛰기

Lenovo ThinkPad X1 Extreme Docking Station Replacement

필요한 것

  1. Lenovo ThinkPad X1 Extreme Docking Station Replacement, Back Cover: 1 단계, 이미지 3개 중 1개 Lenovo ThinkPad X1 Extreme Docking Station Replacement, Back Cover: 1 단계, 이미지 3개 중 2개 Lenovo ThinkPad X1 Extreme Docking Station Replacement, Back Cover: 1 단계, 이미지 3개 중 3개
    • Power off and unplug your device before you begin.

    • Orient the laptop so that it is bottom up, and the trackpad is closest to you.

    • Unscrew the seven captive screws with a Phillips #00 screwdriver.

    • These screws will loosen, but stay attached to the cover. Do not attempt to completely remove them.

    • Slide a blue opening pick in the gap between the bottom panel and chassis, and pry off the one clip on each side.

    • Remove the back cover from the device.

  2. Lenovo ThinkPad X1 Extreme Docking Station Replacement, Speakers: 2 단계, 이미지 1개 중 1개
    • Use a Phillips #00 head screwdriver to remove the four 4 mm screws above the battery.

  3. Lenovo ThinkPad X1 Extreme Docking Station Replacement: 3 단계, 이미지 1개 중 1개
    • Lift the speaker modules on either side of the battery out of its pegs, and unwind the cable from the front of the battery.

    • Set the speaker modules out of the way.

  4. Lenovo ThinkPad X1 Extreme Docking Station Replacement, Battery: 4 단계, 이미지 3개 중 1개 Lenovo ThinkPad X1 Extreme Docking Station Replacement, Battery: 4 단계, 이미지 3개 중 2개 Lenovo ThinkPad X1 Extreme Docking Station Replacement, Battery: 4 단계, 이미지 3개 중 3개
    이 단계에 사용된 도구:
    Tweezers
    $4.99
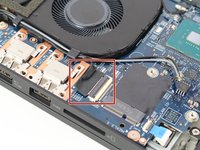
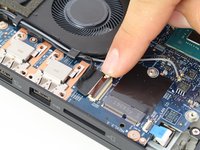
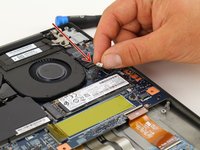
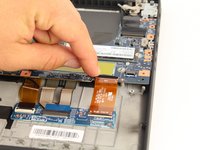
    • Use tweezers to peel the plastic cover off the connector.

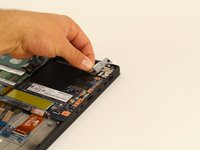
    • Use a spudger or your fingernail to pry up the battery straight up from the motherboard.

  5. Lenovo ThinkPad X1 Extreme Docking Station Replacement: 5 단계, 이미지 1개 중 1개
    • Lift the battery out of the frame and remove it from the device.

  6. Lenovo ThinkPad X1 Extreme Docking Station Replacement, Fan: 6 단계, 이미지 3개 중 1개 Lenovo ThinkPad X1 Extreme Docking Station Replacement, Fan: 6 단계, 이미지 3개 중 2개 Lenovo ThinkPad X1 Extreme Docking Station Replacement, Fan: 6 단계, 이미지 3개 중 3개
    이 단계에 사용된 도구:
    Phillips #00 Screwdriver
    $5.49
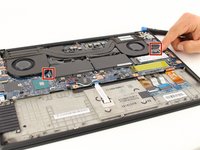
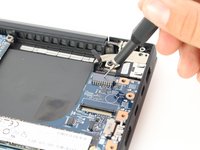
    • Unscrew the 3mm screw holding down the wireless adapter using a Phillips #00 screwdriver.

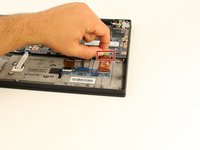
    • Slide the adapter out of its connector.

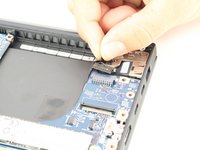
    • Detach the black and gray cables and separate them from the frame of the fan by gently pulling upwards.

  7. Lenovo ThinkPad X1 Extreme Docking Station Replacement: 7 단계, 이미지 2개 중 1개 Lenovo ThinkPad X1 Extreme Docking Station Replacement: 7 단계, 이미지 2개 중 2개
    • Unlatch and remove the cable connecting to the frame of the fan by flipping the thin black tab up.

    • Separate the cable from the frame of the fan.

  8. Lenovo ThinkPad X1 Extreme Docking Station Replacement: 8 단계, 이미지 2개 중 1개 Lenovo ThinkPad X1 Extreme Docking Station Replacement: 8 단계, 이미지 2개 중 2개
    • Loosen the five screws connecting the fan to the motherboard using a Philips #00 head screwdriver.

    • These screws will not come out and will stay connected to the fan.

  9. Lenovo ThinkPad X1 Extreme Docking Station Replacement: 9 단계, 이미지 3개 중 1개 Lenovo ThinkPad X1 Extreme Docking Station Replacement: 9 단계, 이미지 3개 중 2개 Lenovo ThinkPad X1 Extreme Docking Station Replacement: 9 단계, 이미지 3개 중 3개
    • Gently disconnect the two cables located on right and left side of the fan.

    • To identify these, they are labeled "FANR1" and FANL2" on the motherboard.

    • Lift the fan up and out and remove it from the device.

  10. Lenovo ThinkPad X1 Extreme Docking Station Replacement, Motherboard: 10 단계, 이미지 3개 중 1개 Lenovo ThinkPad X1 Extreme Docking Station Replacement, Motherboard: 10 단계, 이미지 3개 중 2개 Lenovo ThinkPad X1 Extreme Docking Station Replacement, Motherboard: 10 단계, 이미지 3개 중 3개
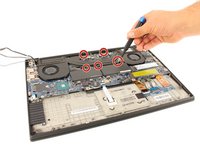
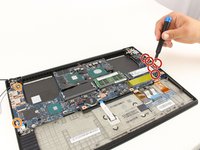
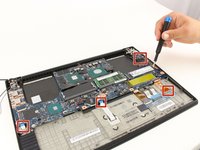
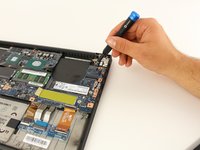
    • Use a Phillips #00 screwdriver to remove the five 4 mm screws below the charging port.

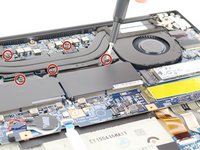
    • Use a Phillips #00 screwdriver to remove the two 3 mm screws.

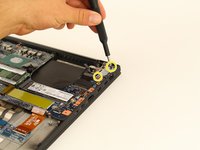
    • Use a Phillips #00 screwdriver to remove the two 5 mm screws securing a silver plate on the charging port, in the top-right.

    • Remove the silver plate on top of the charging port.

  11. Lenovo ThinkPad X1 Extreme Docking Station Replacement: 11 단계, 이미지 3개 중 1개 Lenovo ThinkPad X1 Extreme Docking Station Replacement: 11 단계, 이미지 3개 중 2개 Lenovo ThinkPad X1 Extreme Docking Station Replacement: 11 단계, 이미지 3개 중 3개
    • Disconnect all the ribbon wires from the motherboard.

    • All ribbon wires can be disconnected by flipping up the thin black tab at their connection points, and pulling the ribbon out.

  12. Lenovo ThinkPad X1 Extreme Docking Station Replacement: 12 단계, 이미지 3개 중 1개 Lenovo ThinkPad X1 Extreme Docking Station Replacement: 12 단계, 이미지 3개 중 2개 Lenovo ThinkPad X1 Extreme Docking Station Replacement: 12 단계, 이미지 3개 중 3개
    • Disconnect the black attachment at the top right corner of the motherboard.

    • Insert the SIM eject bit into the small hole on the top and apply a small amount of pressure to release the clip.

    • While maintaining pressure, gently pull on the wire that is connected to it to remove it.

  13. Lenovo ThinkPad X1 Extreme Docking Station Replacement: 13 단계, 이미지 1개 중 1개
    • Gently lift the motherboard out of the computer.

  14. Lenovo ThinkPad X1 Extreme Docking Station Replacement, Docking Station: 14 단계, 이미지 1개 중 1개
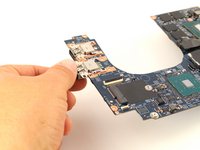
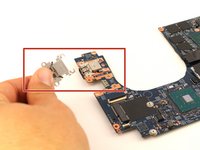
    • Once you have the motherboard removed, you now have access to the docking stations.

  15. Lenovo ThinkPad X1 Extreme Docking Station Replacement: 15 단계, 이미지 2개 중 1개 Lenovo ThinkPad X1 Extreme Docking Station Replacement: 15 단계, 이미지 2개 중 2개
    • Gently push the docking station towards the center of the motherboard, lift up to release a lock, then pull it out to remove it from the device.

결론

To reassemble your device, follow these instructions in reverse order.

작성자

3다른 기여자 명과 함께

Beckham Richmond

회원 가입일: 02/10/20

503 평판

안내서 3개를 작성함

Cal Poly, Team S7-G3, Regan Winter 2020 Cal Poly, Team S7-G3, Regan Winter 2020 회원

CPSU-REGAN-W20S7G3

4 회원들

안내서 8개를 작성함

0가이드 댓글

댓글 쓰기

조회 통계:

지난 24시간: 0

지난 7일: 2

지난 30일: 14

전체 시간: 1,090