주요 콘텐츠로 건너뛰기

Lenovo ThinkPad Yoga 11e Gen 6 Motherboard Replacement

필요한 것

  1. Lenovo ThinkPad Yoga 11e Gen 6 Motherboard Replacement, Battery: 1 단계, 이미지 1개 중 1개
    • Wearing the anti-static wrist strap will prevent a static shock from damaging the components in the laptop.

    • Disconnect the laptop from power and make sure it is completely powered off.

    • Turn the laptop facing down.

    • Loosen the eight captive screws using a JIS #0 screwdriver.

    • The screws are attached to the panel and cannot be removed.

    • Use a spudger to release the tabs securing the back case and carefully remove the panel.

  2. Lenovo ThinkPad Yoga 11e Gen 6 Motherboard Replacement: 2 단계, 이미지 2개 중 1개 Lenovo ThinkPad Yoga 11e Gen 6 Motherboard Replacement: 2 단계, 이미지 2개 중 2개
    • Remove the three 4.5 mm screws from the battery using a JIS #0 screwdriver.

    • Lift the battery, then use your fingernail to slide the connector out of its socket.

    • Remove the battery.

  3. Lenovo ThinkPad Yoga 11e Gen 6 Motherboard Replacement, Wi-Fi Board: 3 단계, 이미지 2개 중 1개 Lenovo ThinkPad Yoga 11e Gen 6 Motherboard Replacement, Wi-Fi Board: 3 단계, 이미지 2개 중 2개
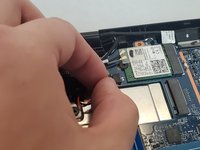
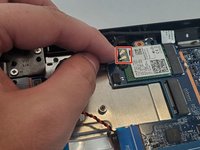
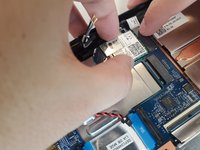
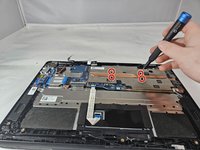
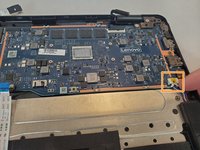
    • Push on alternating sides of the JST connector and pull straight away from the socket to disconnect the CMOS battery.

  4. Lenovo ThinkPad Yoga 11e Gen 6 Motherboard Replacement: 4 단계, 이미지 3개 중 1개 Lenovo ThinkPad Yoga 11e Gen 6 Motherboard Replacement: 4 단계, 이미지 3개 중 2개 Lenovo ThinkPad Yoga 11e Gen 6 Motherboard Replacement: 4 단계, 이미지 3개 중 3개
    • Lift the two wires and plastic piece away from the Wi-Fi board.

    • Remove the single 3 mm screw holding the Wi-Fi board in place using a Phillips #0 screwdriver.

    • Hold the sides of the Wi-Fi board and slide it out of the socket.

  5. Lenovo ThinkPad Yoga 11e Gen 6 Motherboard Replacement, Motherboard: 5 단계, 이미지 3개 중 1개 Lenovo ThinkPad Yoga 11e Gen 6 Motherboard Replacement, Motherboard: 5 단계, 이미지 3개 중 2개 Lenovo ThinkPad Yoga 11e Gen 6 Motherboard Replacement, Motherboard: 5 단계, 이미지 3개 중 3개
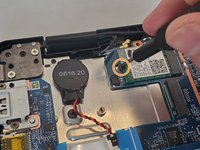
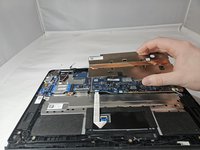
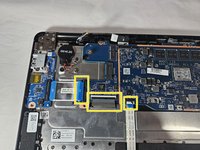
    • Loosen the four captive screws from the metal panel with a copper strip on it using a Phillips #0 screwdriver.

    • Carefully lift the metal panel. The screws are attached to the panel and will not come out.

  6. Lenovo ThinkPad Yoga 11e Gen 6 Motherboard Replacement: 6 단계, 이미지 3개 중 1개 Lenovo ThinkPad Yoga 11e Gen 6 Motherboard Replacement: 6 단계, 이미지 3개 중 2개 Lenovo ThinkPad Yoga 11e Gen 6 Motherboard Replacement: 6 단계, 이미지 3개 중 3개
    • Pinch one of the display cable connectors and gently pull it out of its socket. Do the same for the 2nd display cable connector.

    • Pinch the sliding connector and slide it out.

    • Remove the 3 No-Fuss Ribbon Cable Connectors by pulling them out.

  7. Lenovo ThinkPad Yoga 11e Gen 6 Motherboard Replacement: 7 단계, 이미지 1개 중 1개
    • Remove the three 4.5mm screws using a Phillips #0 screwdriver.

  8. Lenovo ThinkPad Yoga 11e Gen 6 Motherboard Replacement: 8 단계, 이미지 1개 중 1개
    • Gently lift and remove the motherboard out from the laptop.

결론

To reassemble your device, follow these instructions in reverse order.

작성자

4다른 기여자 명과 함께

Lex

회원 가입일: 10/02/24

515 평판

안내서 4개를 작성함

0가이드 댓글

댓글 쓰기

조회 통계:

지난 24시간: 2

지난 7일: 11

지난 30일: 44

전체 시간: 514