주요 콘텐츠로 건너뛰기

Lenovo V14-IIL Screen Bezel Replacement

필요한 것

  1. Lenovo V14-IIL Screen Bezel Replacement, Back Panel: 1 단계, 이미지 2개 중 1개 Lenovo V14-IIL Screen Bezel Replacement, Back Panel: 1 단계, 이미지 2개 중 2개
    • Make sure the laptop is powered off and unplug all cables before beginning any repair.

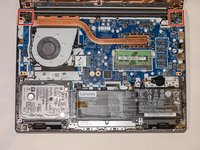
    • Flip your laptop over and place on a flat surface so you can access the screws on the base cover.

    • Remove the six 7 mm screws from the back panel of the laptop using a Phillips #0 screwdriver.

    • Remove the four 4 mm screws from the bottom edge of the laptop using a Phillips #0 screwdriver.

  2. Lenovo V14-IIL Screen Bezel Replacement: 2 단계, 이미지 1개 중 1개
    • Use an iFixit opening tool to pry apart the case by sliding it along each side of the laptop.

    • You may need to move the tool to different locations to fully release the back cover.

  3. Lenovo V14-IIL Screen Bezel Replacement: 3 단계, 이미지 1개 중 1개
    • Lift away the back panel and set it aside.

  4. Lenovo V14-IIL Screen Bezel Replacement, Display Assembly: 4 단계, 이미지 2개 중 1개 Lenovo V14-IIL Screen Bezel Replacement, Display Assembly: 4 단계, 이미지 2개 중 2개
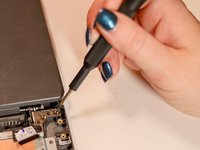
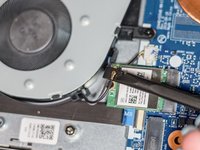
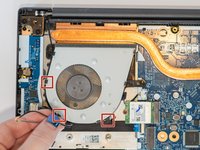
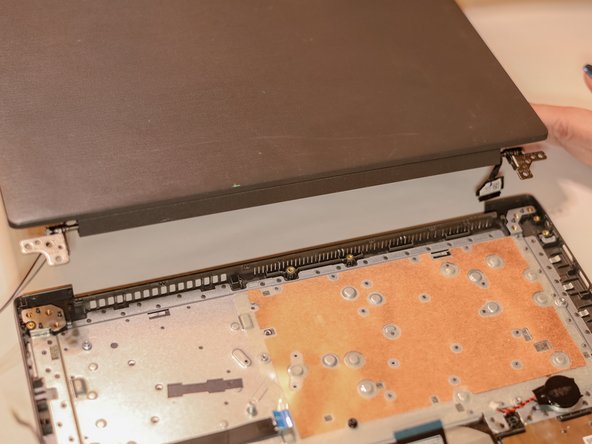
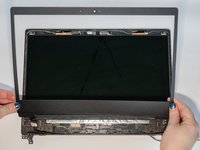
    • Using a Phillips #0 screwdriver, remove the four 5 mm screws from the hinges of the laptop.

  5. Lenovo V14-IIL Screen Bezel Replacement: 5 단계, 이미지 1개 중 1개
    • Lift up the latch and gently pull the display cable free.

  6. Lenovo V14-IIL Screen Bezel Replacement: 6 단계, 이미지 2개 중 1개 Lenovo V14-IIL Screen Bezel Replacement: 6 단계, 이미지 2개 중 2개
    • Using the spudger, disconnect the two wireless LAN cables (black and gray) from the wireless LAN card.

    • Remove the LAN cables from the three brackets on the fan.

  7. Lenovo V14-IIL Screen Bezel Replacement: 7 단계, 이미지 1개 중 1개
    • Ensure that all cables and hinges are detached.

    • Lift the display assembly away from the base.

  8. Lenovo V14-IIL Screen Bezel Replacement, Screen Bezel: 8 단계, 이미지 2개 중 1개 Lenovo V14-IIL Screen Bezel Replacement, Screen Bezel: 8 단계, 이미지 2개 중 2개
    • Slide the cable hinge cover to the right.

    • Pull the part away from the screen.

  9. Lenovo V14-IIL Screen Bezel Replacement: 9 단계, 이미지 2개 중 1개 Lenovo V14-IIL Screen Bezel Replacement: 9 단계, 이미지 2개 중 2개
    • Use the iFixit opening tool to separate the bezel panel.

    • Slide the opening tool all the way around to loosen the bezels on all sides.

    • You may need to use the tool to gently loosen the adhesive tape.

    • Lift away the bezel panel.

결론

To reassemble your device, follow these instructions in reverse order.

작성자

2다른 기여자 명과 함께

Kristen Gismondi

회원 가입일: 11/12/14

92,276 평판

안내서 241개를 작성함

iFixit iFixit 회원

Staff

118 회원들

안내서 19,537개를 작성함

댓글 0개

댓글 쓰기

조회 통계:

지난 24시간: 0

지난 7일: 1

지난 30일: 7

전체 시간: 55