주요 콘텐츠로 건너뛰기

Lenovo Y410P Cooling Fan Replacement

필요한 것

  1. Lenovo Y410P Cooling Fan Replacement, Removal of Bottom Panel: 1 단계, 이미지 1/2 Lenovo Y410P Cooling Fan Replacement, Removal of Bottom Panel: 1 단계, 이미지 2/2
    • Remove eight M2.5 x 8mm Phillips head screws, using a Phillips #0 screwdriver, in the specified locations.

    • Lift the bottom cover off and set it aside.

  2. Lenovo Y410P Cooling Fan Replacement, Removal of Hard Drive: 2 단계, 이미지 1/2 Lenovo Y410P Cooling Fan Replacement, Removal of Hard Drive: 2 단계, 이미지 2/2
    • Remove the two M2.5x4mm screws using a Phillips #0 screwdriver.

    • Slide the hard drive out of the casing.

    • Be careful when handling the hard drive; rough impacts may cause data loss.

  3. Lenovo Y410P Cooling Fan Replacement, Remove Optical Drive: 3 단계, 이미지 1/3 Lenovo Y410P Cooling Fan Replacement, Remove Optical Drive: 3 단계, 이미지 2/3 Lenovo Y410P Cooling Fan Replacement, Remove Optical Drive: 3 단계, 이미지 3/3
    • With the laptop's bottom facing up, pull the optical drive release lever back and pull the optical drive out.

    • Unscrew the three M2x3mm Phillips head screws shown.

    • At the front edge of the laptop, empty the SD card holder by pressing on the card. This will allow for further disassembly in later steps.

  4. Lenovo Y410P Cooling Fan Replacement, Remove Keyboard and Cables: 4 단계, 이미지 1/2 Lenovo Y410P Cooling Fan Replacement, Remove Keyboard and Cables: 4 단계, 이미지 2/2
    • Remove the two M2.5 x 6mm screws using a Phillips #00 screwdriver.

    • Disconnect the two WiFi antenna cables.

    • Disconnect the sound connector.

  5. Lenovo Y410P Cooling Fan Replacement: 5 단계, 이미지 1/1
    • Open the laptop hinge. Tip the laptop onto its side, and use the back end of the screwdriver to push the keyboard out from the optical drive area.

    • Turn the laptop right side up and pry the keyboard up slowly, until it is clear of the case.

    • Be careful of the ribbon cable when removing the keyboard. The ribbon is still attached.

    • Detach the ribbon cables by opening the specified latches.

  6. Lenovo Y410P Cooling Fan Replacement, Removal of Palm Rest: 6 단계, 이미지 1/3 Lenovo Y410P Cooling Fan Replacement, Removal of Palm Rest: 6 단계, 이미지 2/3 Lenovo Y410P Cooling Fan Replacement, Removal of Palm Rest: 6 단계, 이미지 3/3
    • Detach the ribbon cables by opening the specified latches.

    • Turn the laptop upside down and remove the M2.5x8mm screw with Phillips #0 screwdriver.

    • Turn the laptop on its side and pry the bottom from the top.

    • Only partially remove the palm rest; there is still a ribbon cable attached underneath it.

    • Remove the ribbon cable by opening its respective latch.

  7. Lenovo Y410P Cooling Fan Replacement, Removal of Motherboard: 7 단계, 이미지 1/3 Lenovo Y410P Cooling Fan Replacement, Removal of Motherboard: 7 단계, 이미지 2/3 Lenovo Y410P Cooling Fan Replacement, Removal of Motherboard: 7 단계, 이미지 3/3
    • Remove the specified cable on top of the motherboard.

    • Flip the laptop over, and remove the specified cables.

    • Remove the two M2.5x4mm screws with a Phillips #0 screwdriver

    • Remove the motherboard with hands.

  8. Lenovo Y410P Cooling Fan Replacement, Unscrew Heatsink: 8 단계, 이미지 1/2 Lenovo Y410P Cooling Fan Replacement, Unscrew Heatsink: 8 단계, 이미지 2/2
    • Unscrew (adequately loosen) the six heatsink screws in the order written on the heatsink. Use a Phillips #0 screwdriver.

    • These six screws are built into the heatsink and will not detach from it.

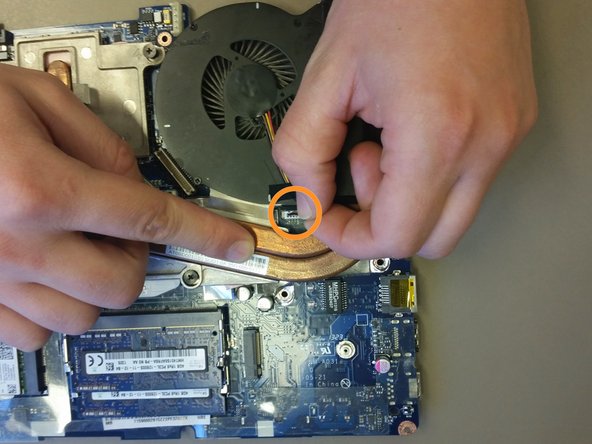
    • Unplug the fan cable from the motherboard.

  9. Lenovo Y410P Cooling Fan Replacement, Remove the Heatsink: 9 단계, 이미지 1/1
    • Gently remove the heatsink with your hand

    • There may be some resistance due to dried up thermal paste, simply pry the heatsink from the board.

  10. Lenovo Y410P Cooling Fan Replacement, Remove Old Thermal Paste: 10 단계, 이미지 1/2 Lenovo Y410P Cooling Fan Replacement, Remove Old Thermal Paste: 10 단계, 이미지 2/2
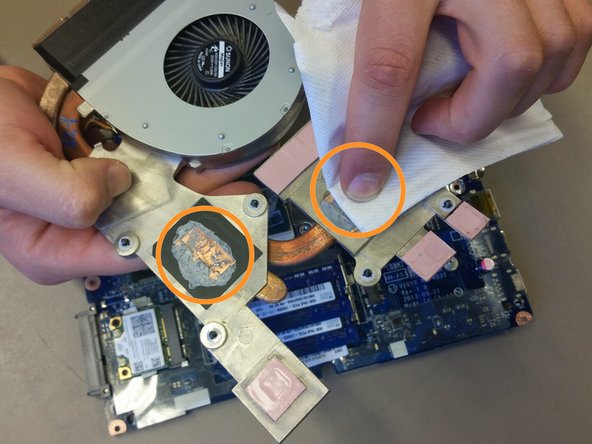
    • Find an anti-microbial wipe and gently wipe the old thermal paste from the CPU and GPU

    • Now wipe the old thermal paste from the underside of the heatsink

    • Be careful not to mess up any of the pink thermal pads, these are important for other chips

  11. Lenovo Y410P Cooling Fan Replacement, Apply New Thermal Paste: 11 단계, 이미지 1/1
    • Apply new thermal paste to the CPU and GPU

    • Only apply a small bead approximately the size of a pea

결론

To reassemble your device, follow these instructions in reverse order.

다른 6명이 해당 안내서를 완성하였습니다.

Eric Chen

회원 가입일: 01/22/15

868 평판

안내서 4개 작성하였습니다

Cal Poly, Team 21-21, Maness Winter 2015 Cal Poly, Team 21-21, Maness Winter 2015 회원

CPSU-MANESS-W15S21G21

4 회원들

안내서 6개 작성하였습니다

댓글 0개

댓글 쓰기

조회 통계:

24 시간 전: 0

7일 전: 0

30일 전: 5

전체 시간: 4,759