주요 콘텐츠로 건너뛰기

Lenovo Yoga 3 11 Screen Replacement

필요한 것

  1. Lenovo Yoga 3 11 Screen Replacement, Screen: 1 단계, 이미지 1/2 Lenovo Yoga 3 11 Screen Replacement, Screen: 1 단계, 이미지 2/2
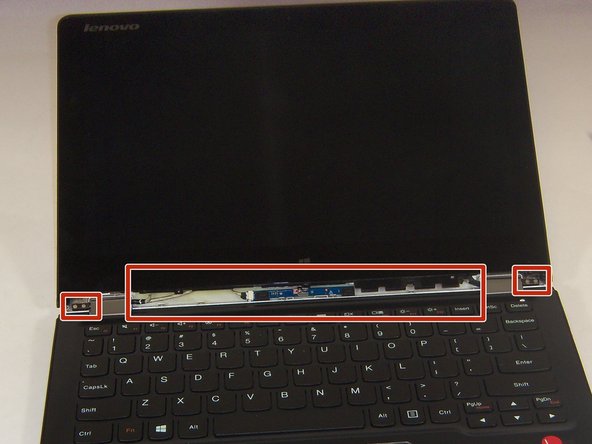
    • Use a plastic opening tool or the pointed end of a spudger to pry up the 2 rubber inserts in the bottom left and right corners of the screen.

  2. Lenovo Yoga 3 11 Screen Replacement: 2 단계, 이미지 1/1
    • Remove the single silver 5 mm screw found beneath each rubber insert.

  3. Lenovo Yoga 3 11 Screen Replacement: 3 단계, 이미지 1/2 Lenovo Yoga 3 11 Screen Replacement: 3 단계, 이미지 2/2
    • Use the plastic opening tool to pry off the three plastic trim pieces.

  4. Lenovo Yoga 3 11 Screen Replacement: 4 단계, 이미지 1/2 Lenovo Yoga 3 11 Screen Replacement: 4 단계, 이미지 2/2
    • Work the plastic opening tool in between bezel and the upper case.

    • Once the plastic opening tool is wedged in between the two, work the plastic opening tool around the perimeter of the screen, separating the bezel from the display.

  5. Lenovo Yoga 3 11 Screen Replacement: 5 단계, 이미지 1/1
    • Use the tweezers to unplug the screen connector in the middle.

  6. Lenovo Yoga 3 11 Screen Replacement: 6 단계, 이미지 1/2 Lenovo Yoga 3 11 Screen Replacement: 6 단계, 이미지 2/2
    • Use the tweezers to pull the tape upwards. The tape will pull the wires up with it, separating the connection.

  7. Lenovo Yoga 3 11 Screen Replacement: 7 단계, 이미지 1/1
    • Use the tweezers to follow the wires and move them out from under the plastic hooks.

  8. Lenovo Yoga 3 11 Screen Replacement: 8 단계, 이미지 1/1
    • Use the tweezers to unplug the connector near the top of the screen.

  9. Lenovo Yoga 3 11 Screen Replacement: 9 단계, 이미지 1/1
    • Use the tweezers to pull the tape upwards in order to free the wires underneath it.

  10. Lenovo Yoga 3 11 Screen Replacement: 10 단계, 이미지 1/1
    • Use the tweezers to pull up the camera by simply pulling upwards on the tape that is over it.

  11. Lenovo Yoga 3 11 Screen Replacement: 11 단계, 이미지 1/1
    • Use the tweezers to follow the wires and to pull them out from under the plastic black hooks. Also pull up any tape that is over the wires.

  12. Lenovo Yoga 3 11 Screen Replacement: 12 단계, 이미지 1/3 Lenovo Yoga 3 11 Screen Replacement: 12 단계, 이미지 2/3 Lenovo Yoga 3 11 Screen Replacement: 12 단계, 이미지 3/3
    • Use the plastic opening tool to work the black component up and out of its original spot, then pull out the following connected wires.

  13. Lenovo Yoga 3 11 Screen Replacement: 13 단계, 이미지 1/1
    • Use the tweezers to unplug the black connection near the hinge of the laptop, taking the yellow tape off with it.

  14. Lenovo Yoga 3 11 Screen Replacement: 14 단계, 이미지 1/1
    • Gently lift and remove the screen for replacing.

결론

To reassemble your device, follow these instructions in reverse order.

다른 한 분이 해당 안내서를 완성하였습니다.

Miles Davis

회원 가입일: 08/27/15

131 평판

안내서 2개 작성하였습니다

USF Tampa, Team 2-3, Blackwell Fall 2015 USF Tampa, Team 2-3, Blackwell Fall 2015 회원

USFT-BLACKWELL-F15S2G3

4 회원들

안내서 11개 작성하였습니다

댓글 0개

댓글 쓰기

조회 통계:

24 시간 전: 1

7일 전: 3

30일 전: 14

전체 시간: 876